Easy to Make Ultralight Shelter
The Stitchback “Half Pyramid Tarp” or HPT is a tarp shelter that has a simple design that is easy to make. It is a good option for those looking to make their first shelter, and is a good way to get some practice working with the ultralight materials and long seams that would be used for making more complex shelters.
The HPT is essentially a flat tarp that has been optimized for pitching in the half pyramid configuration. This design has several features that make it easier to construct than some other types of shelters. First, it’s made from a single width of fabric, which means there is no ridge line or flat felled seams. This also means that no seam sealing is needed. Finally, there is minimal measuring, marking and cutting required. (Those who have experience working with the slippery and large pieces of fabric used for a shelter, know that laying it out for measuring and cutting can be one of the most time consuming parts, especially if you don’t have a large work table.)
Disclaimer: The HPT is a minimalist shelter. It won’t provide the same level of protection from the elements that a more enclosed shelter would. It is recommended to have some knowledge of tarp camping skills when using this shelter.
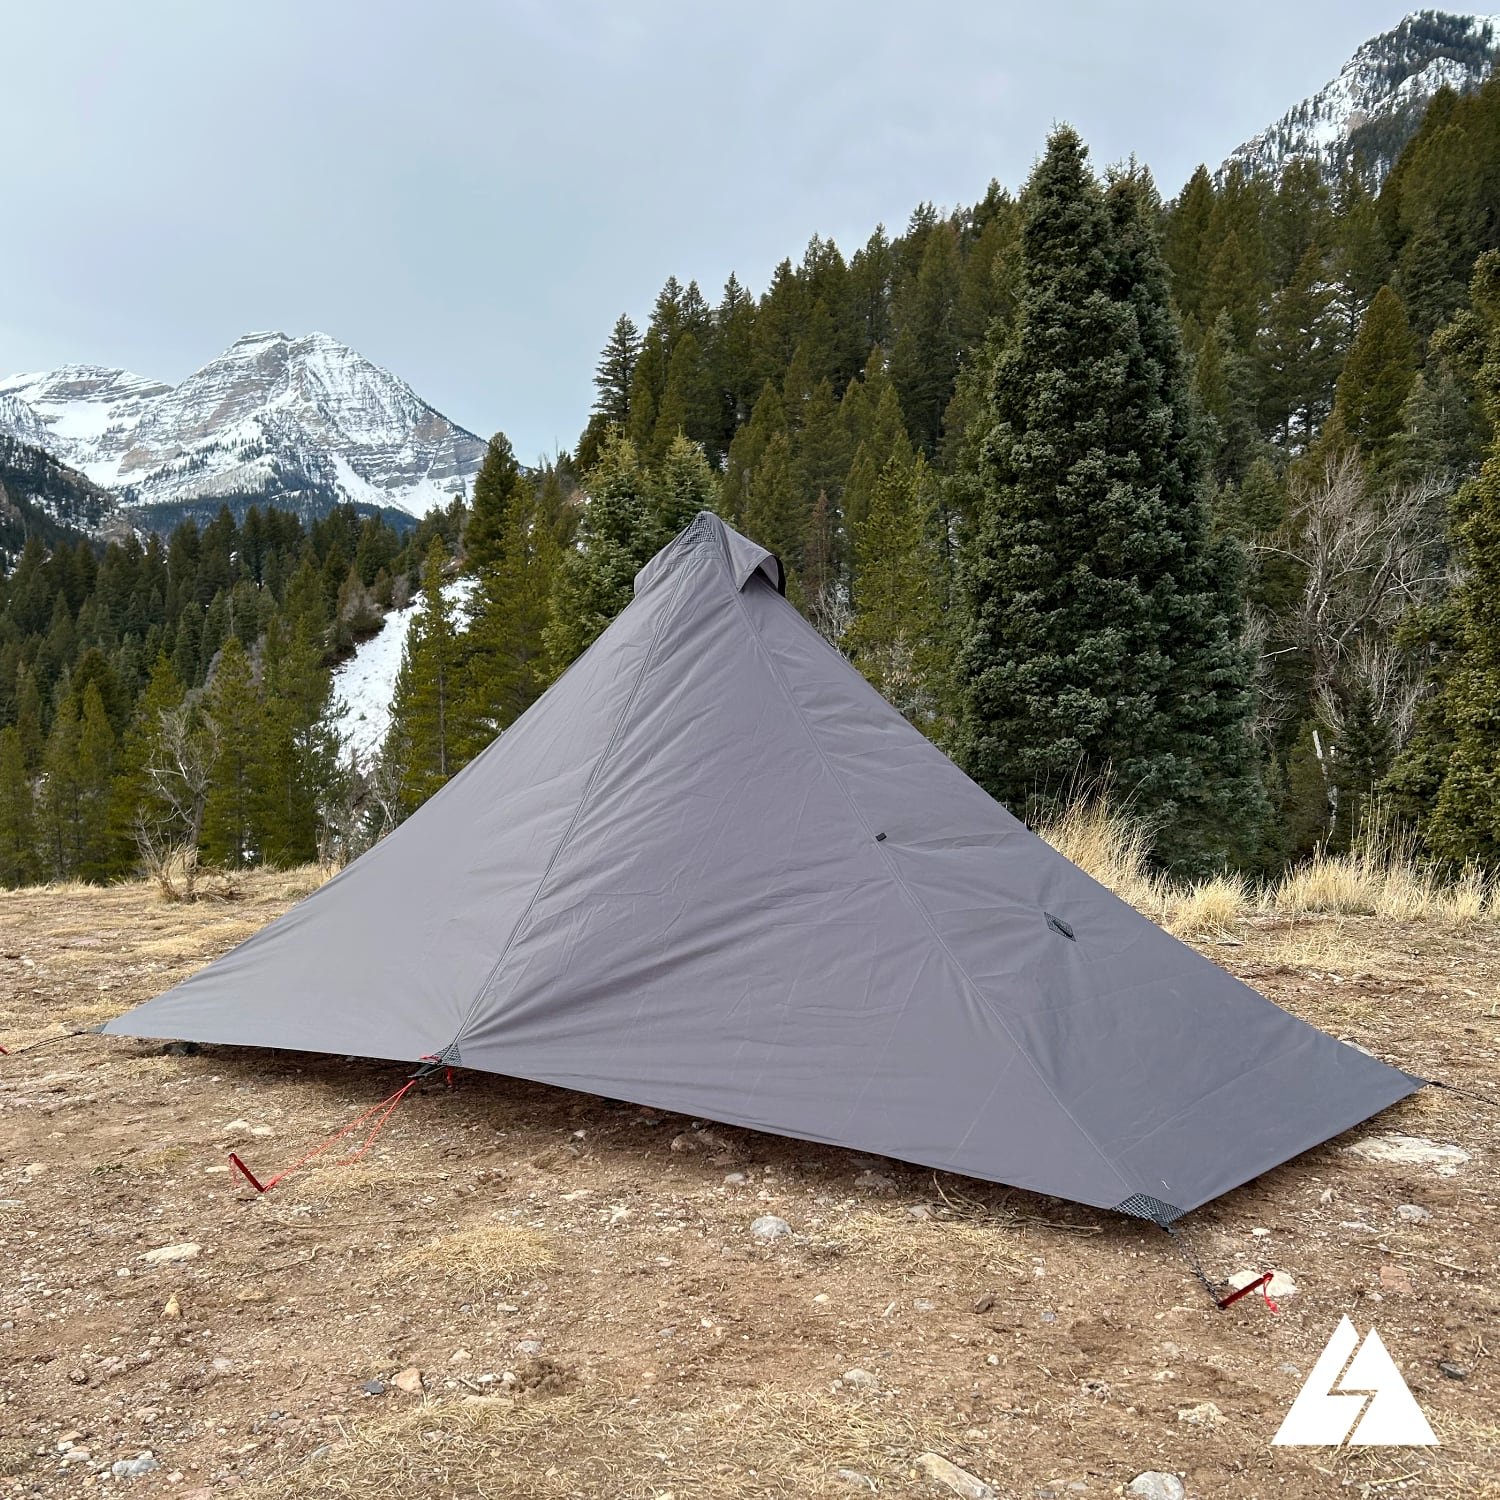
In my own use, I have found it to be a good shelter for when fair weather is expected. I’m a fan of cowboy camping, and the HPT provides a nice middle ground between sleeping in a tent and under the stars. The HPT provides good ventilation and you can still see the sky, plus it provides protection from the wind or unexpected showers. It is a good option for quick overnighters. It is also useful as an emergency shelter, it takes up hardly any space in a daypack, but is there if needed. That being said, if I’m planning a longer trip, or bad weather is in the forecast, I opt for a more enclosed shelter.
Rolled shelter shown with bottle for size comparison.
Materials Needed:
4 - Yards waterproof fabric. 1.6oz coated ripstop recommended. (*see below for notes on fabric type and size.)
16” of ¾” wide grosgrain or thin webbing.
1 - ¾” Beastee D-ring. This type of D-ring has a smaller hole, which works well for holding the tip of a trekking pole.
4 - Yards strong cord. 2.5mm diameter or smaller recommended. (For stake loops and guy line.)
6 - Tent stakes
*Notes on fabric type:
In developing this shelter I built versions in 1.1 oz and 1.6 oz fabrics. I recommend the heavier fabric. (1.6 oz HyperD PU4000 from Ripstop by the Roll, to be exact.) In addition to being more durable, it has less stretch, the shelter pitches tighter, and it is easier to work with. The shelter in 1.6 oz fabric weighs about 12.8 oz.
*Notes on fabric size:
Fabric should be at least 58” wide. 4 yards of fabric make a shelter that is just barely long enough for a 6’ person to lay down without touching the tarp. If you are 6’ tall or taller, consider making the tarp longer. I experimented with shelters up to 10” longer and found that they worked fine, but were slightly more prone to billowing in the wind because of the longer edges.
Instructions:
Fold the fabric in half as shown below.
Measure 13” in from the open ends along the top edge. Draw a line from the 13” mark to the lower corner as shown.
Cut along the line, cutting through both layers of fabric.
With the fabric still folded in half, trim a small bit of the corner on the folded side. (About ¼” tall as shown.) This will mark the center of the tarp.
Sew a ⅜” double folded hem along the short ends of the fabric as shown. Stitch each hem with two rows of stitching as shown in the photo.
Sew a ⅜” double folded hem along the back edge as shown, using two rows of stitching.
Fold a ⅜” double fold hem on the front edge of the tarp, and pin it in place.
Make the pole loop by taking a 6” long piece of ¾” grosgrain and thread it through the Beastee D-ring. Find the center of the front edge of the tarp by using the notch that was previously cut. Slide the grosgrain from the D-ring under the hem. Spread the 2 ends of the grosgrain so that one end is on either side of the center mark as shown.
Stitch the inner edge of the hem in place, stitching across the grosgrain as shown below.
Begin sewing the second row of stitches on the hem. When the grosgrain loop is reached, fold it across the hem and stitch over it as shown. Continue stitching the second row across the rest of the hem.
Reinforce the pole looping by stitching a bar tack across the grosgrain close to the edge of the fabric as shown below.
Form the tie-out loops by taking a 2” piece of grosgrain and folding it in half around the corner of the fabric. Stitch the grosgrain in place using 2 bar tacks as shown. The majority of the stitching should be on the hem where the fabric is triple layer. Repeat this process on all 4 corners.
A tie-out loop is also needed at the center of the back edge as shown below.
Take a 10” piece of cord and thread it through a grosgrain tie-out. Tie the ends of the cord with an overhand knot forming a loop. This loop will be used for staking out the corners. Repeat this process with all of the tie-outs.
Attach the main guy-line by taking a 84” long piece of cord and threading it through the small holes in the beastee d-ring as shown. Tie the cord into a large loop with an overhand knot as shown.

That’s it! the shelter is ready to pitch! Super simple and quick to make.
Notes on upgrading the HPT:
Reinforcement patches can be added at the corners of the tarp and where the trekking pole loop attaches. This would improve the durability of the tarp. It would be best to add these before hemming, so that the edges of the reinforcement patches are folded into the hem.
A removable beak could be added to further enclose the shelter. A rain poncho can be used to form a makeshift beak and provide extra protection in a downpour.
Pitching the HPT:
Pitching the tarp is pretty straightforward, but site selection is important. Look for a spot that is flat and level, as this will aid in achieving a taught pitch.
1. Stake out the back corners pulling the edge tight.
2. Stake out the front corners. Pull the front corners in, so that the sides of the tarp form a 90 degree angle to the back edge of the tarp, as shown below. This will leave the front edge of the tarp loose.

3. Insert the tip of an adjustable trekking pole into the hole on the D ring. Extend the pole to form the peak of the shelter. Stake out the guy line. Use a tensioning knot such as a taut-line to tie the guy line to the stake, so that the tension can be adjusted.
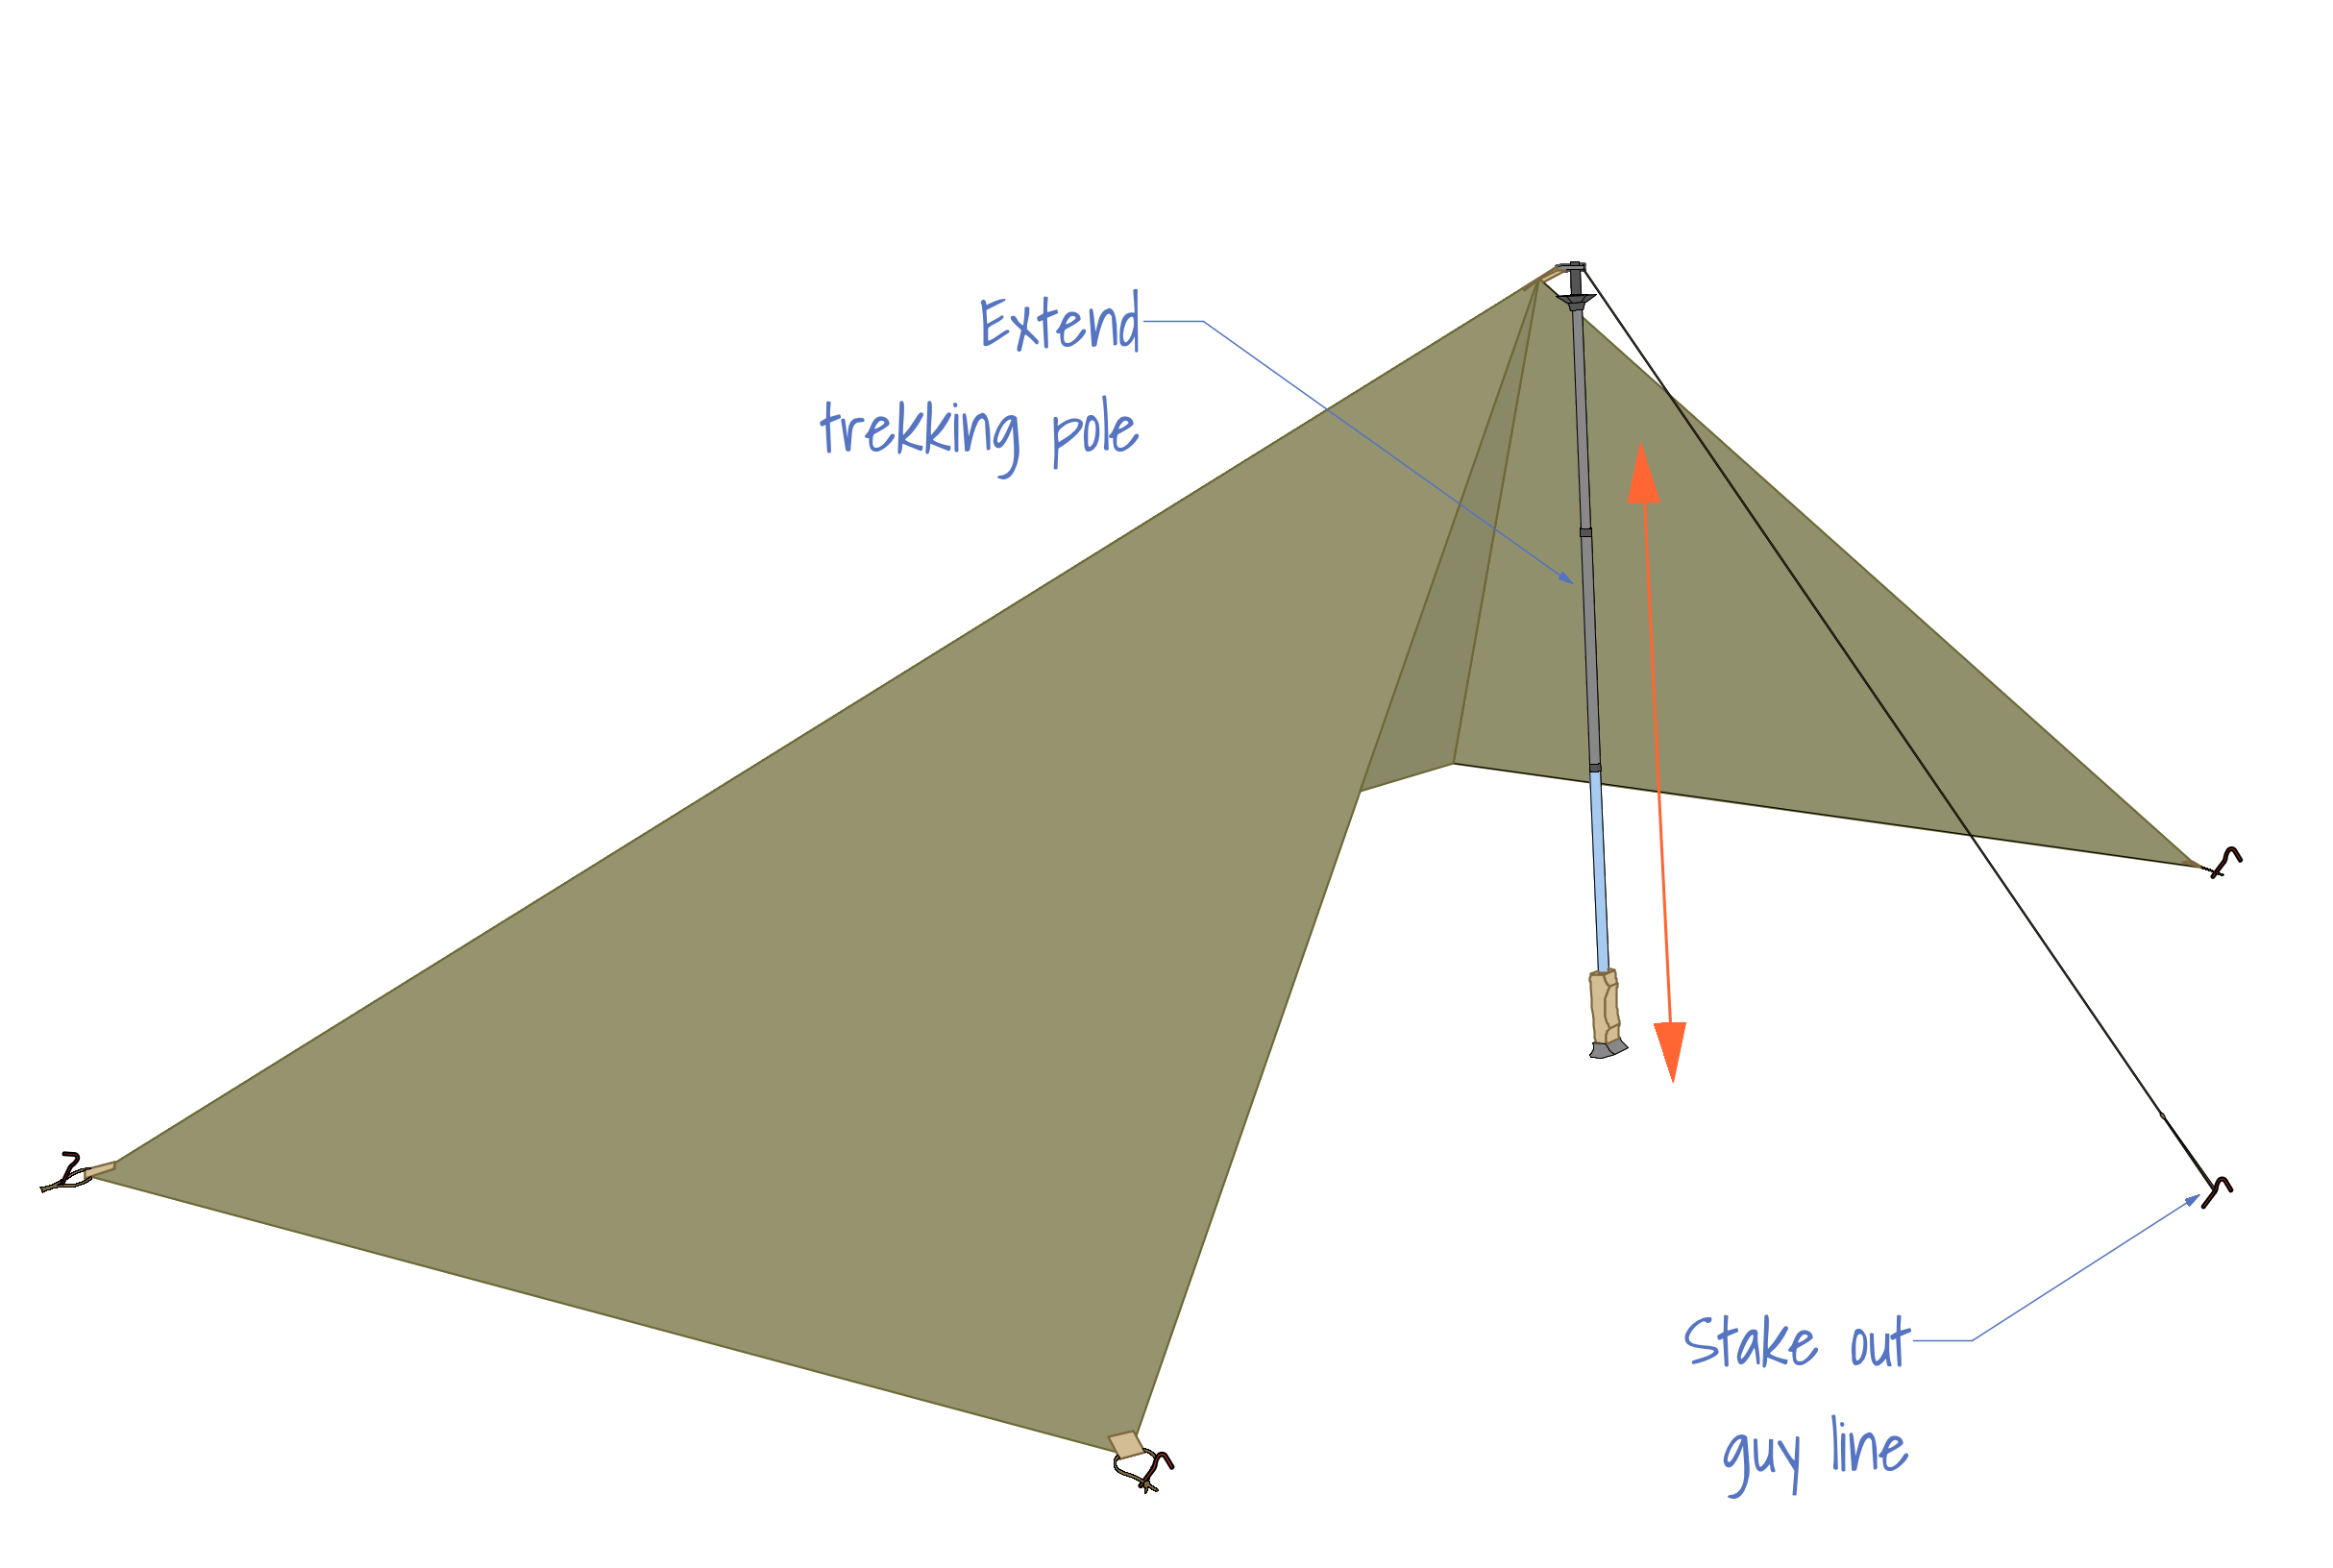

5. Stake out the back loop.


There you go! You’re now ready to spend the night in shelter you made yourself.
One final note. While weathering a relatively intense rainstorm in this shelter, I found that overall it did a good job of keeping me dry, but like many minimalist shelters, some water did splash or blow in. The use of a splash bivy of some kind is a good idea if using this shelter when rain is expected.
Related products that we recommend:
The links above are affiliate links. As an Amazon Associate Stitchback earns from qualifying purchases.