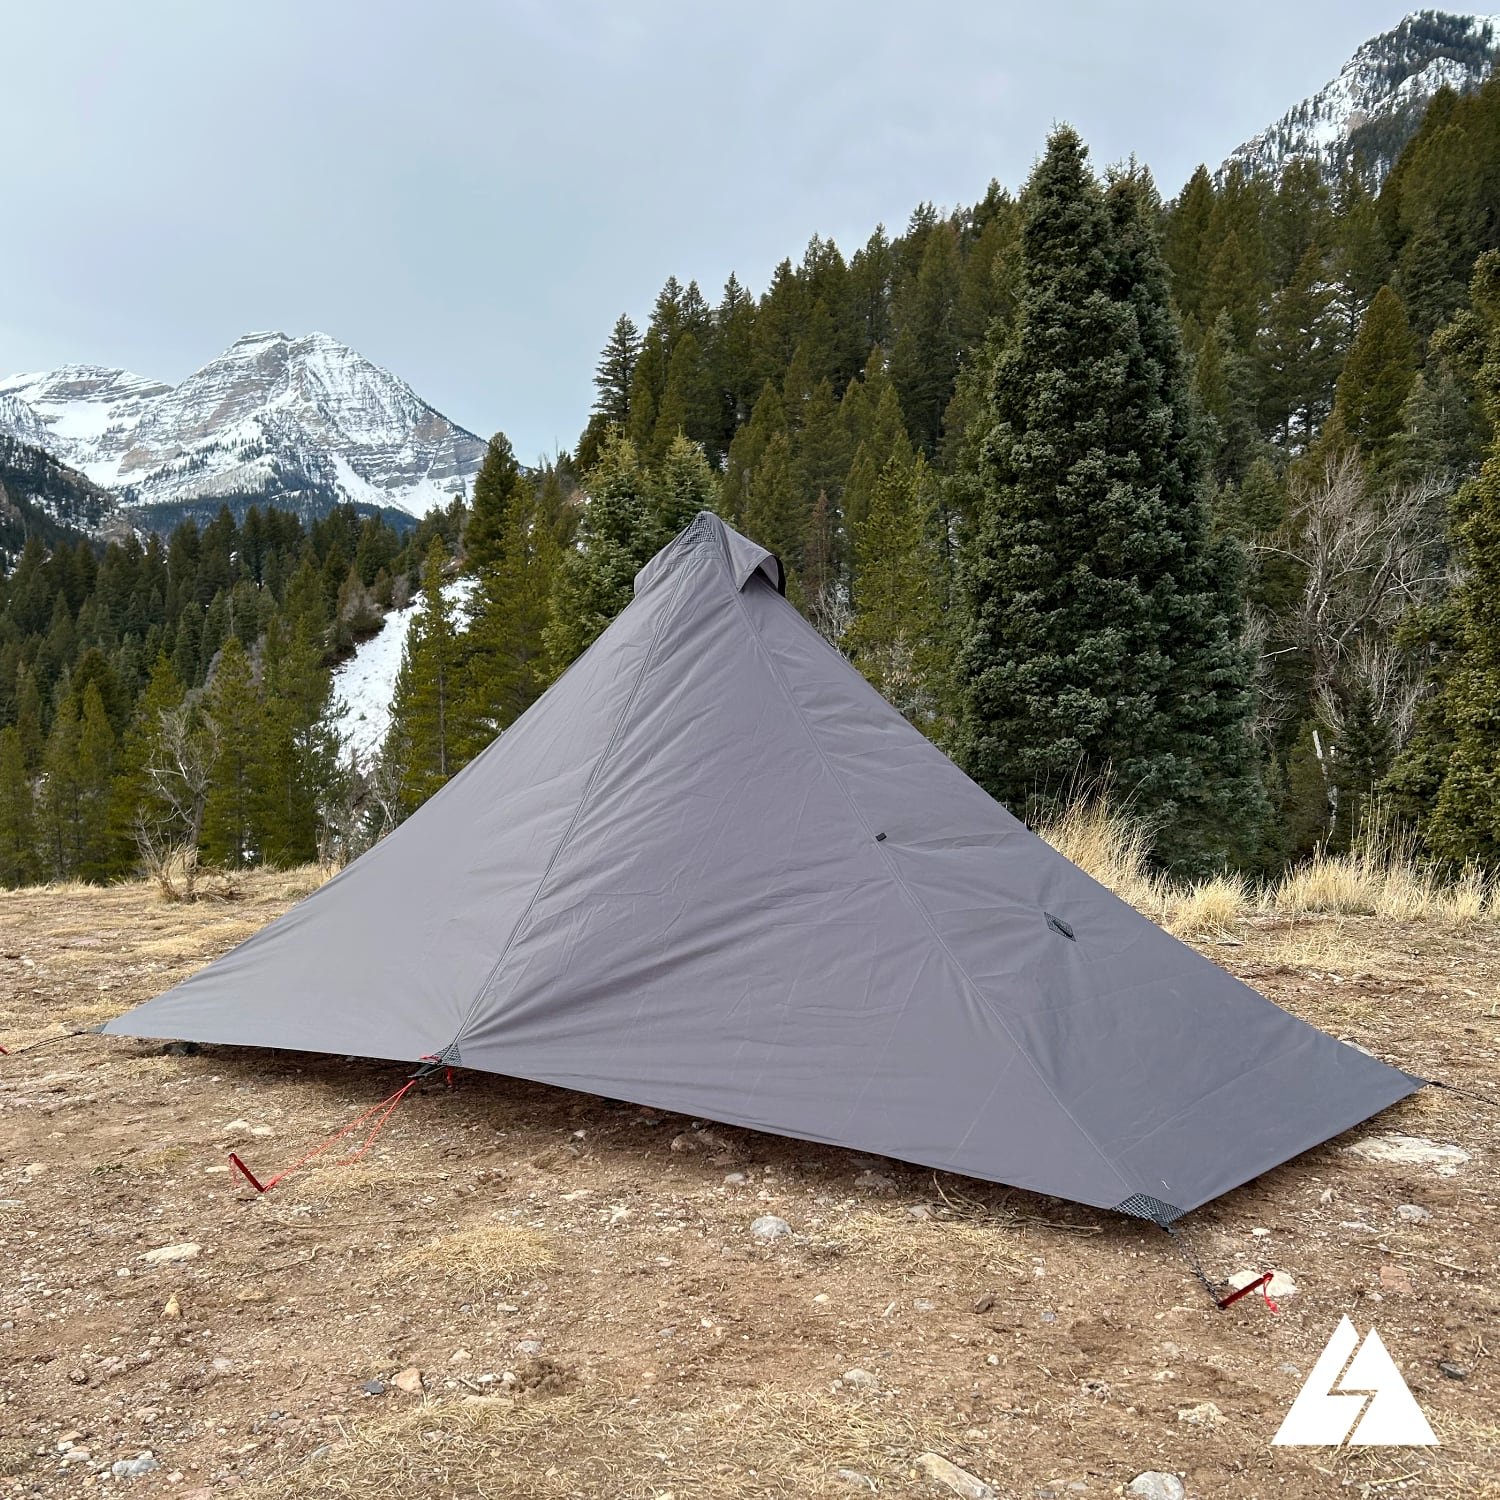
Make a Pyramid Shelter
If you’ve spent any time chasing a lighter pack and simpler gear, you’ve probably come across the pyramid tarp shelter. It’s a classic for a reason: its single-pole design is easy to set up, it uses minimal fabric, and its shape sheds wind and rain incredibly well for its weight. Pyramid tarps are roomy for how little material they use, and versatile enough to handle everything from summer trips to shoulder-season storms. For ultralight backpackers, they hit a sweet spot between protection, simplicity, and weight savings.
In this article, I’ll walk through the process I used to make my own pyramid tarp. I’ll cover the basic design decisions, the materials I chose, and the step-by-step construction process I used. It’s worth saying up front that there is more than one way to build a pyramid shelter, and plenty of opinions about the “right” fabrics, reinforcements, and sewing techniques. This isn’t meant to be the end-all pyramid tarp build guide, but rather a documentation of the methods I used, which I hope will be helpful to those planning their own project.
Design:
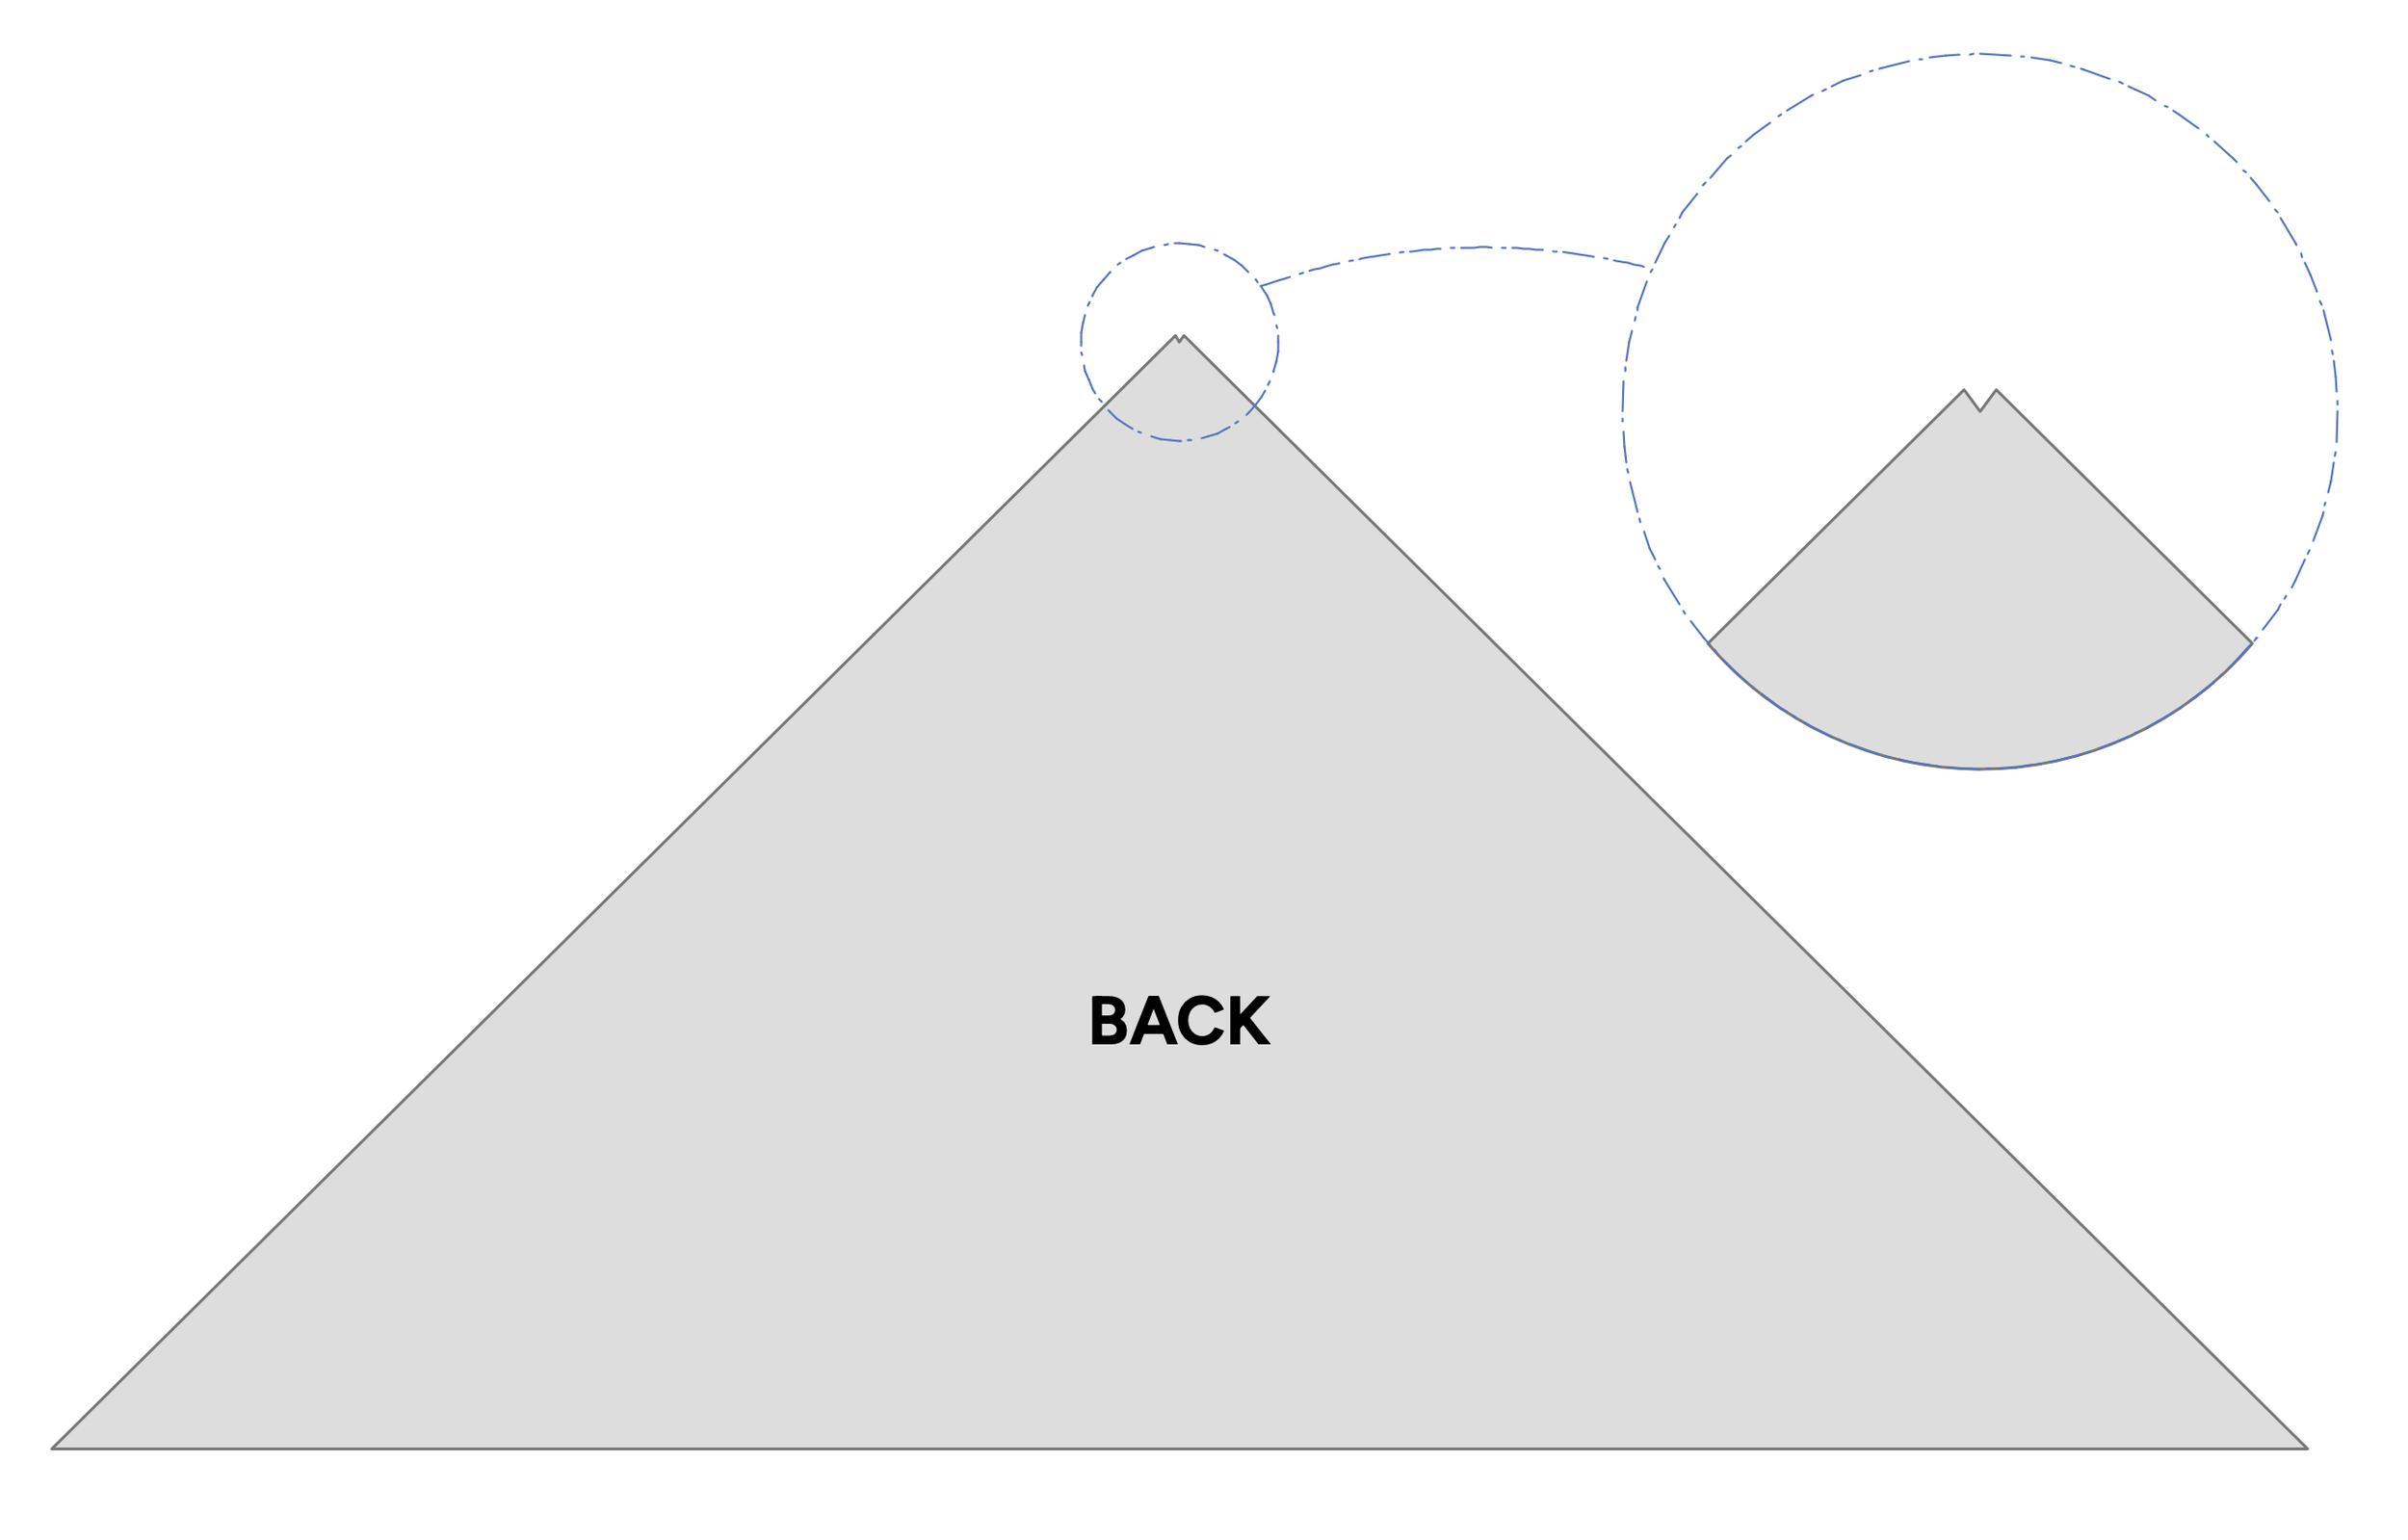
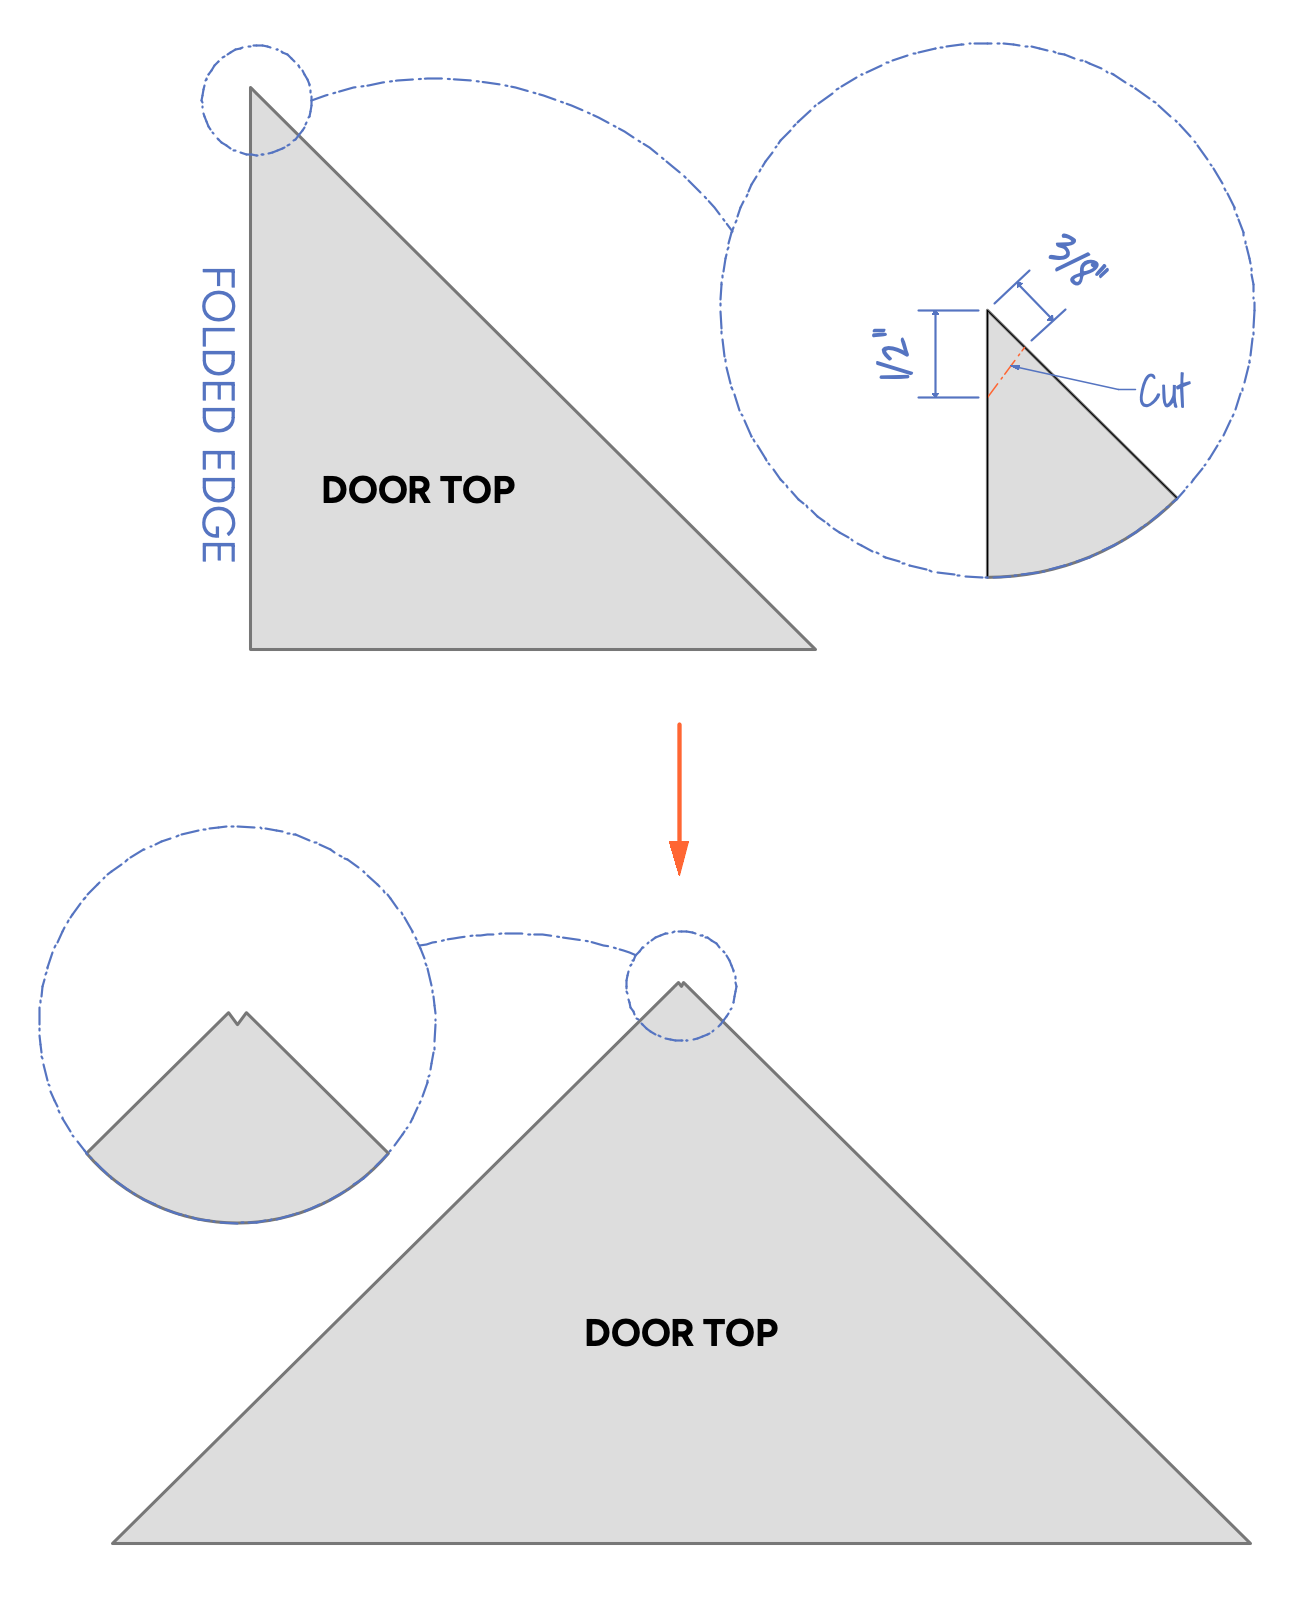
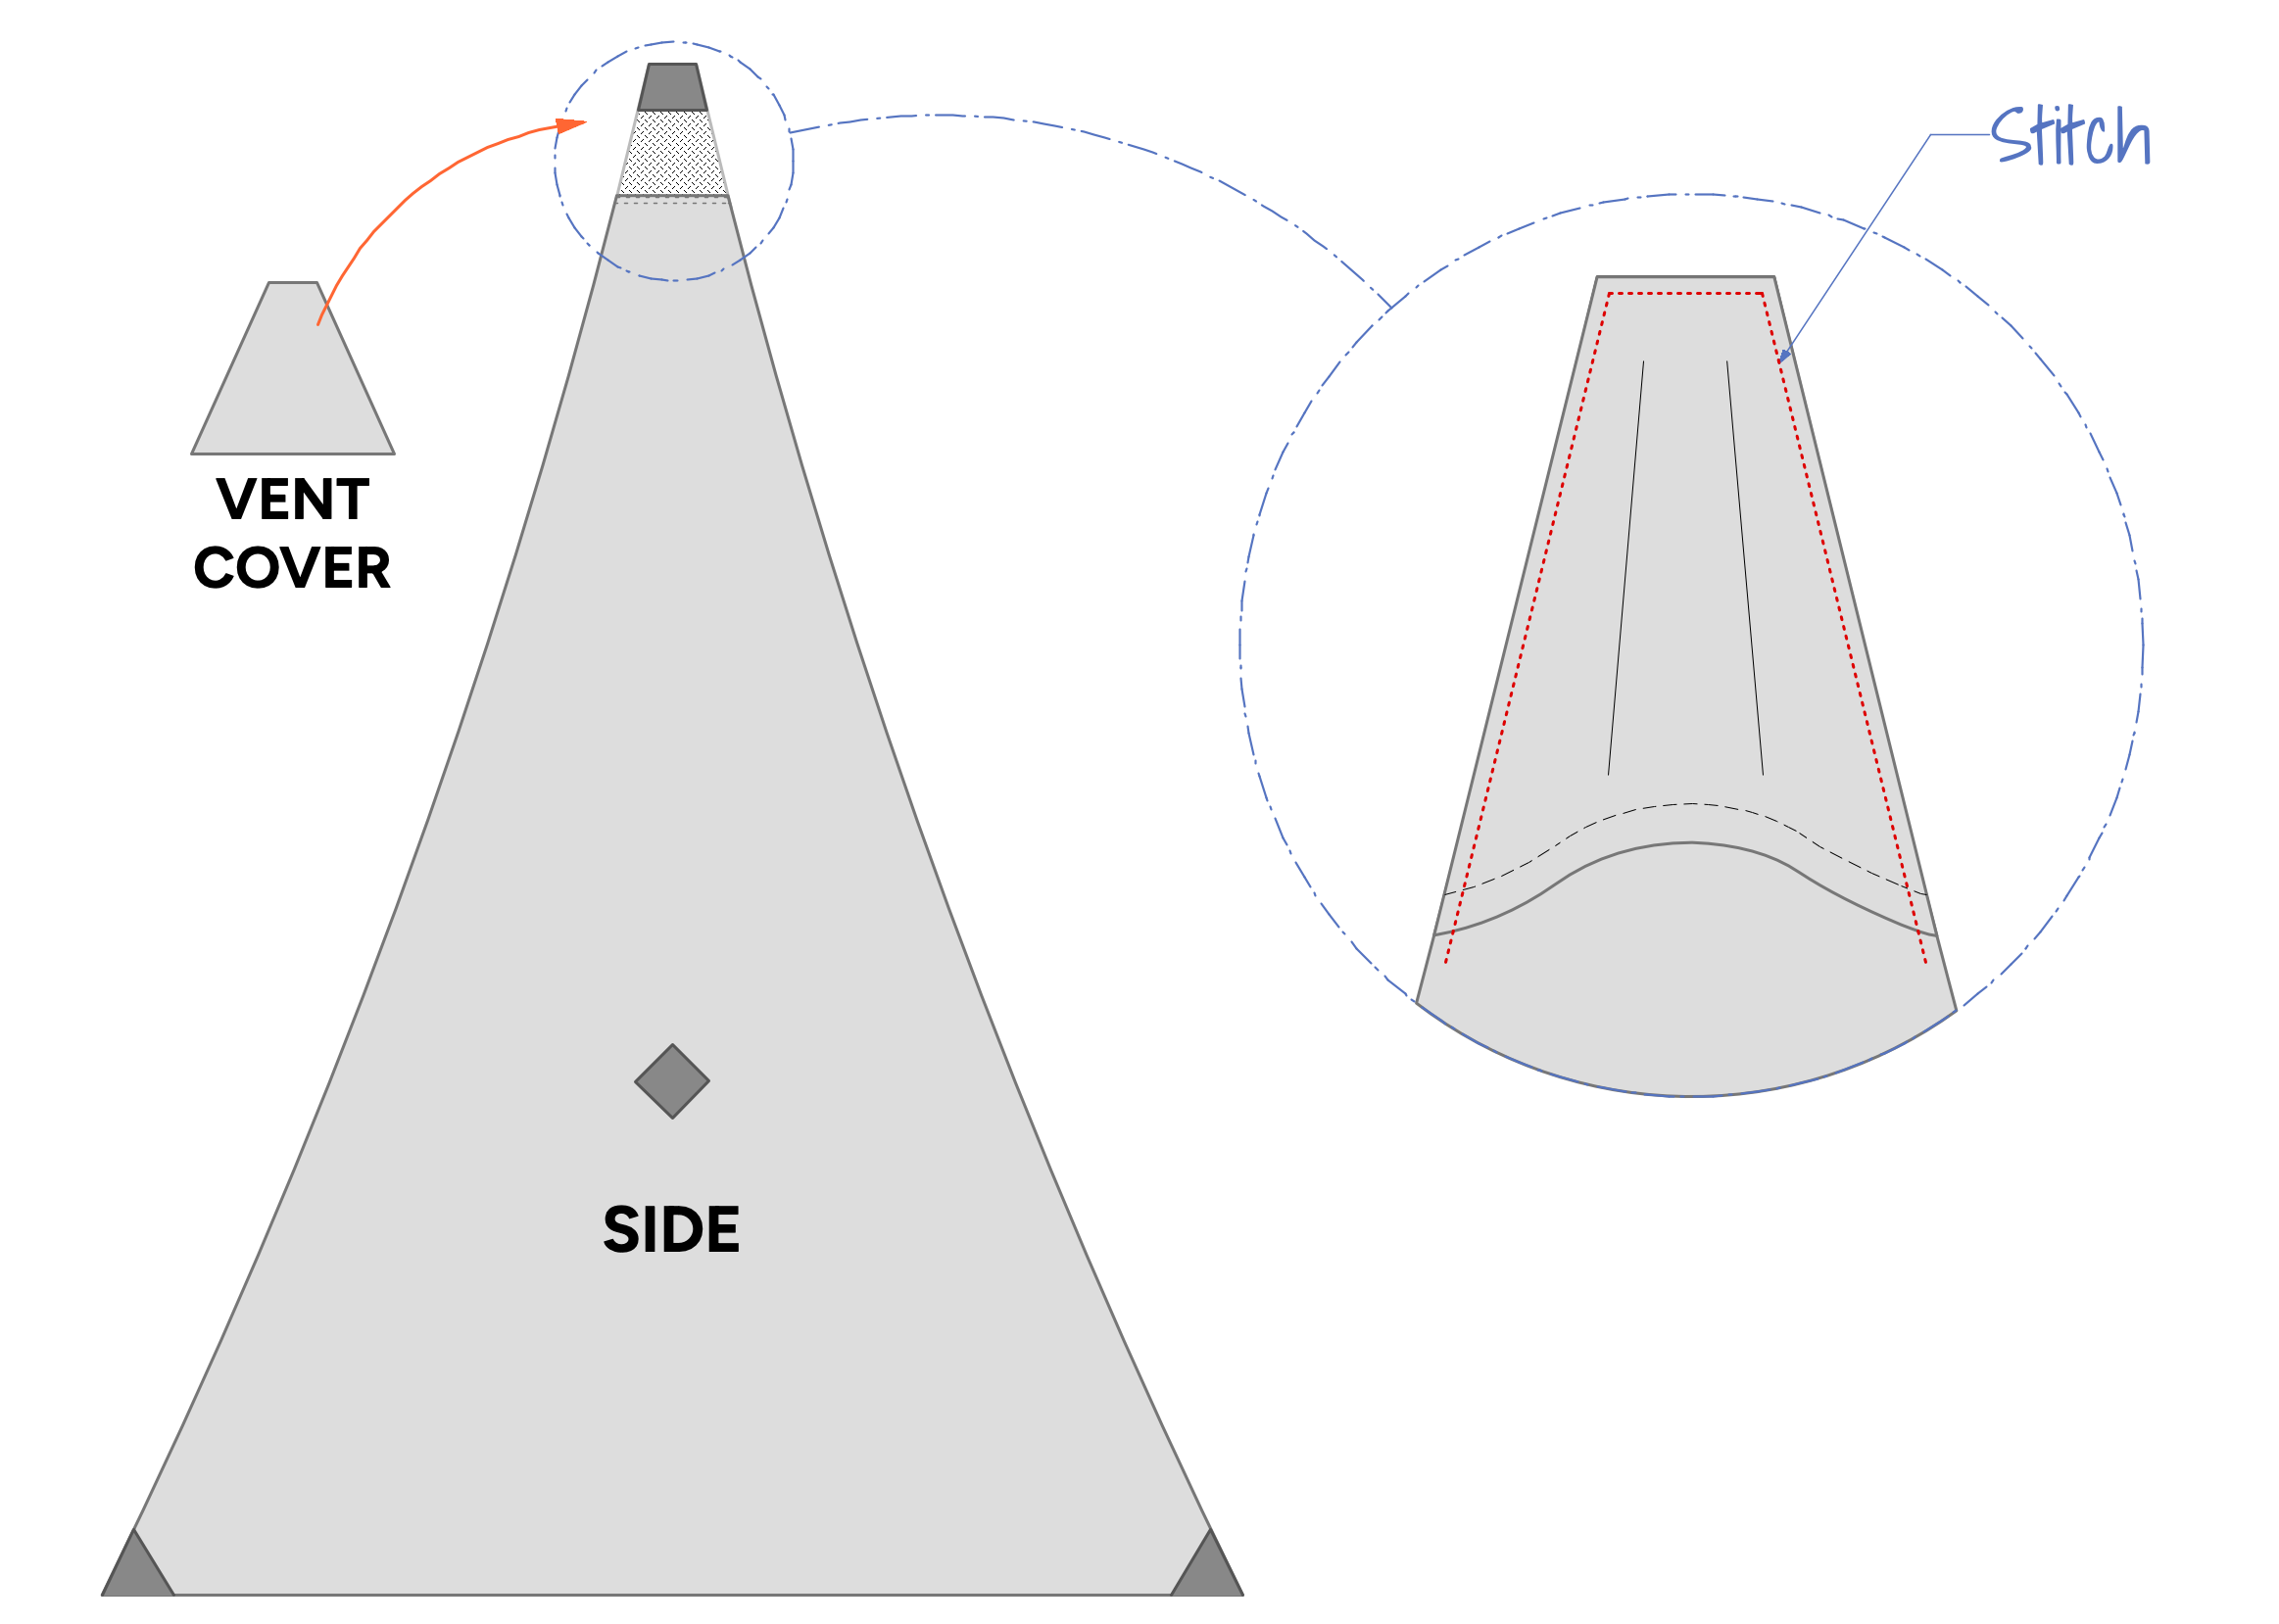
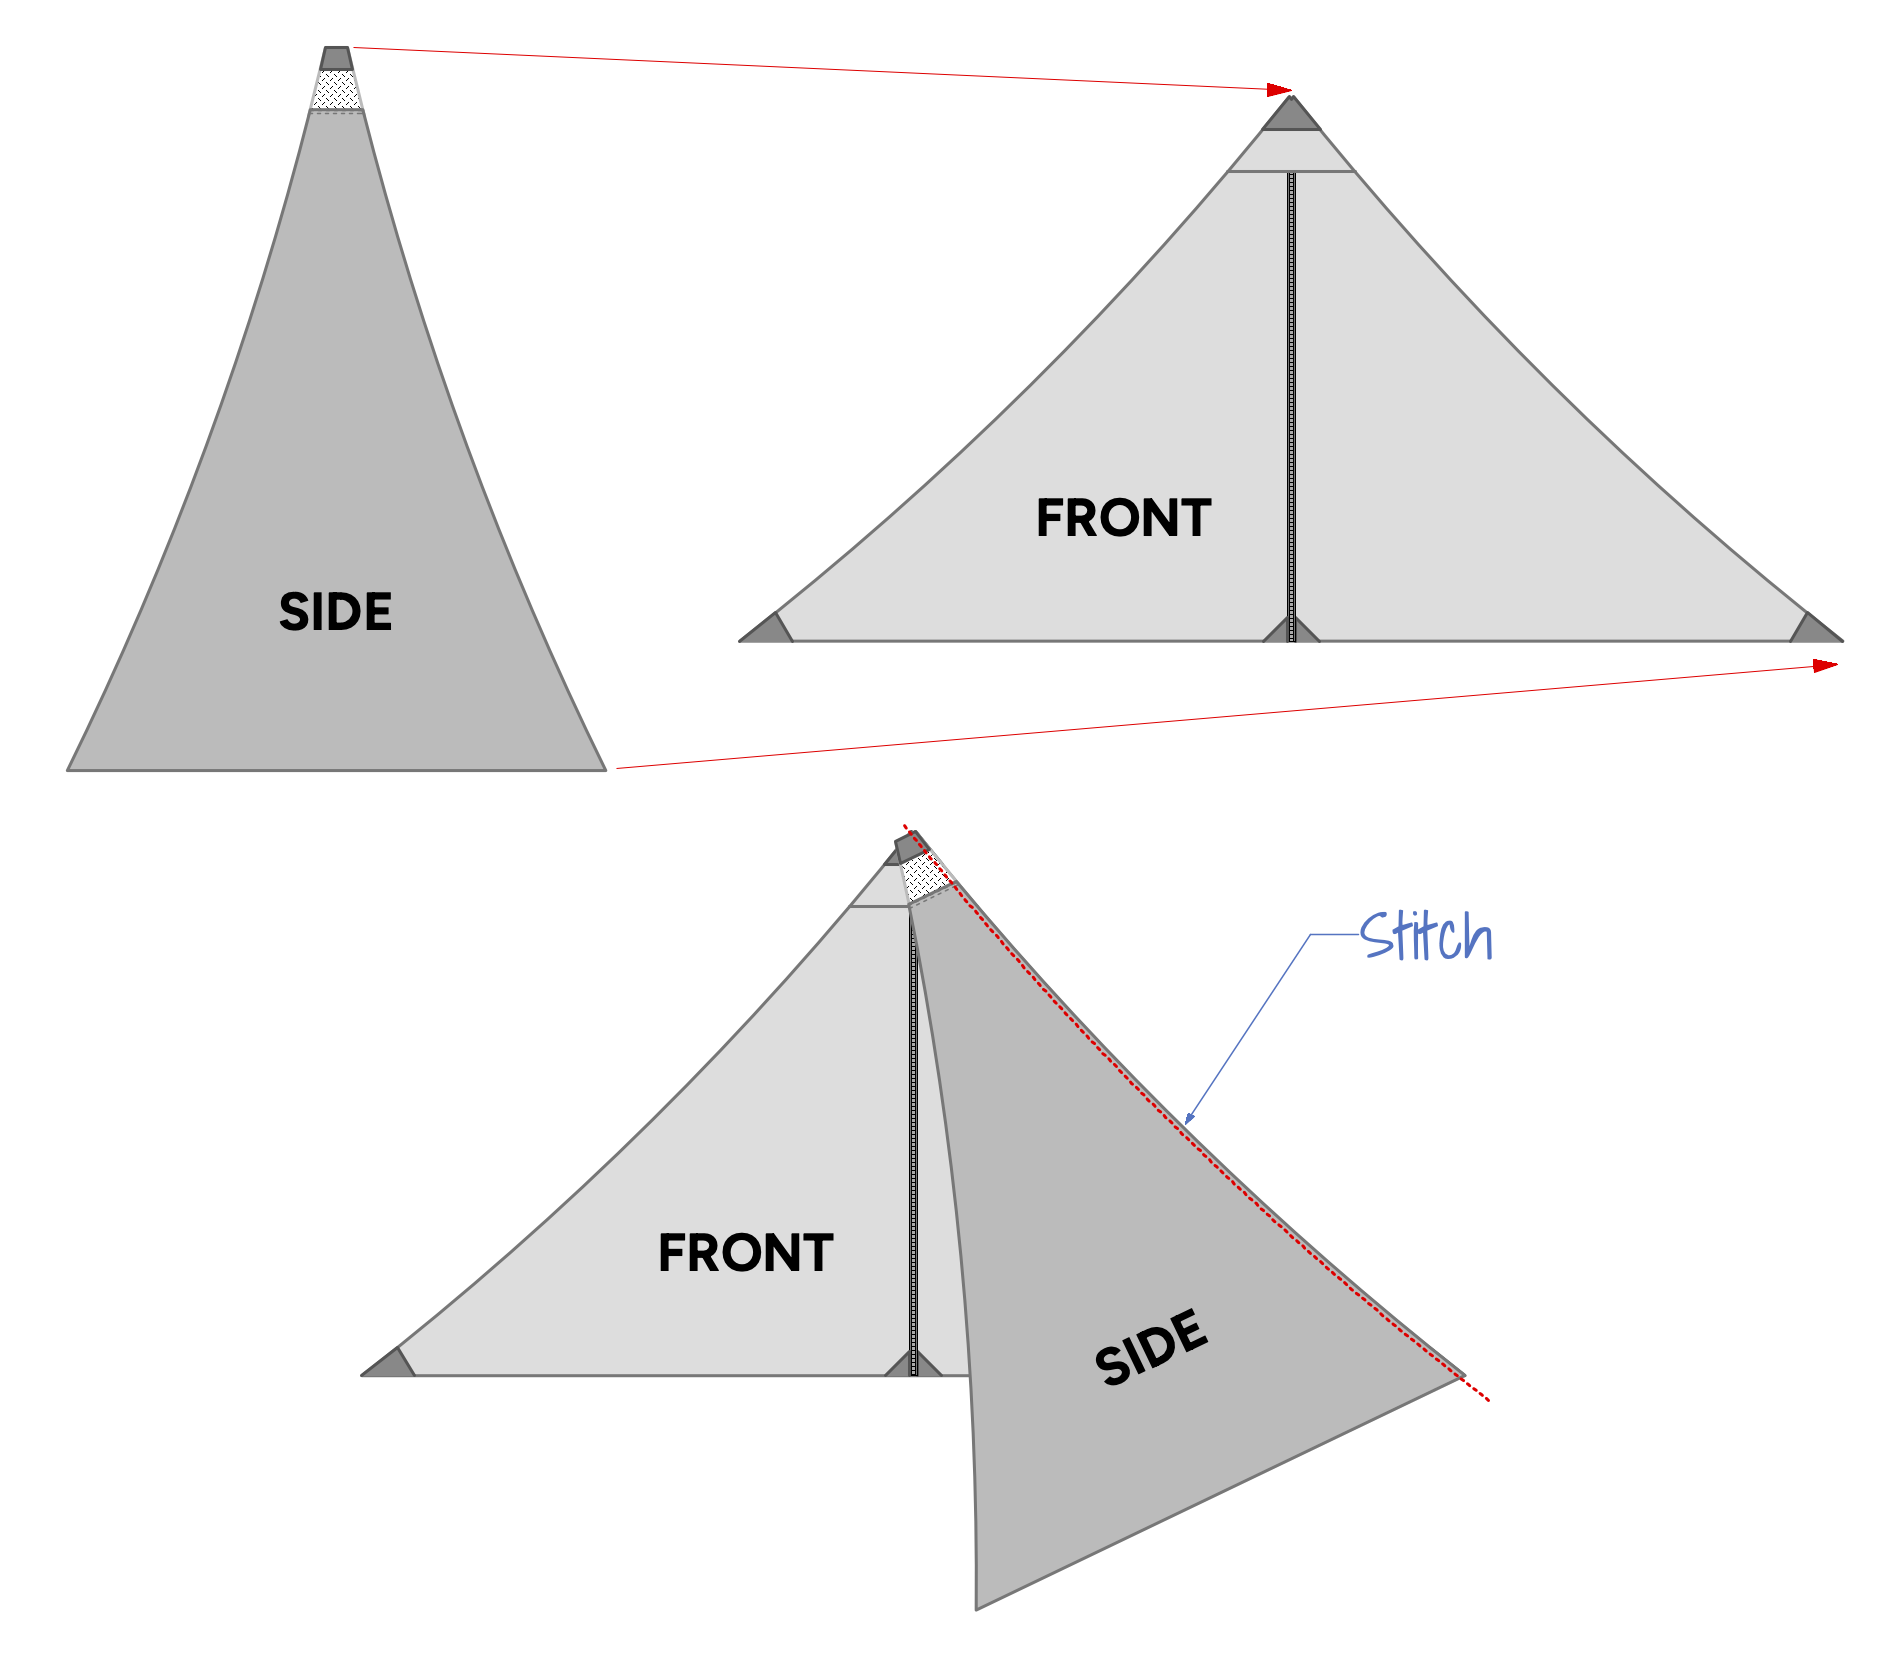
The design is a classic one-man pyramid tent. The floor dimensions are approximately 54” x 112” with a peak height of approximately 49”. On a previous pyramid tarp that I built, I had trouble getting all four panels to meet at a single point at the peak, which resulted in the peak being a bit lopsided. This time around I decided to leave a 2” flat spot at the peak between the front and back panels. I found this much easier to assemble. As an added benefit the flat spot at the top also seems to hold the trekking pole handle more securely.
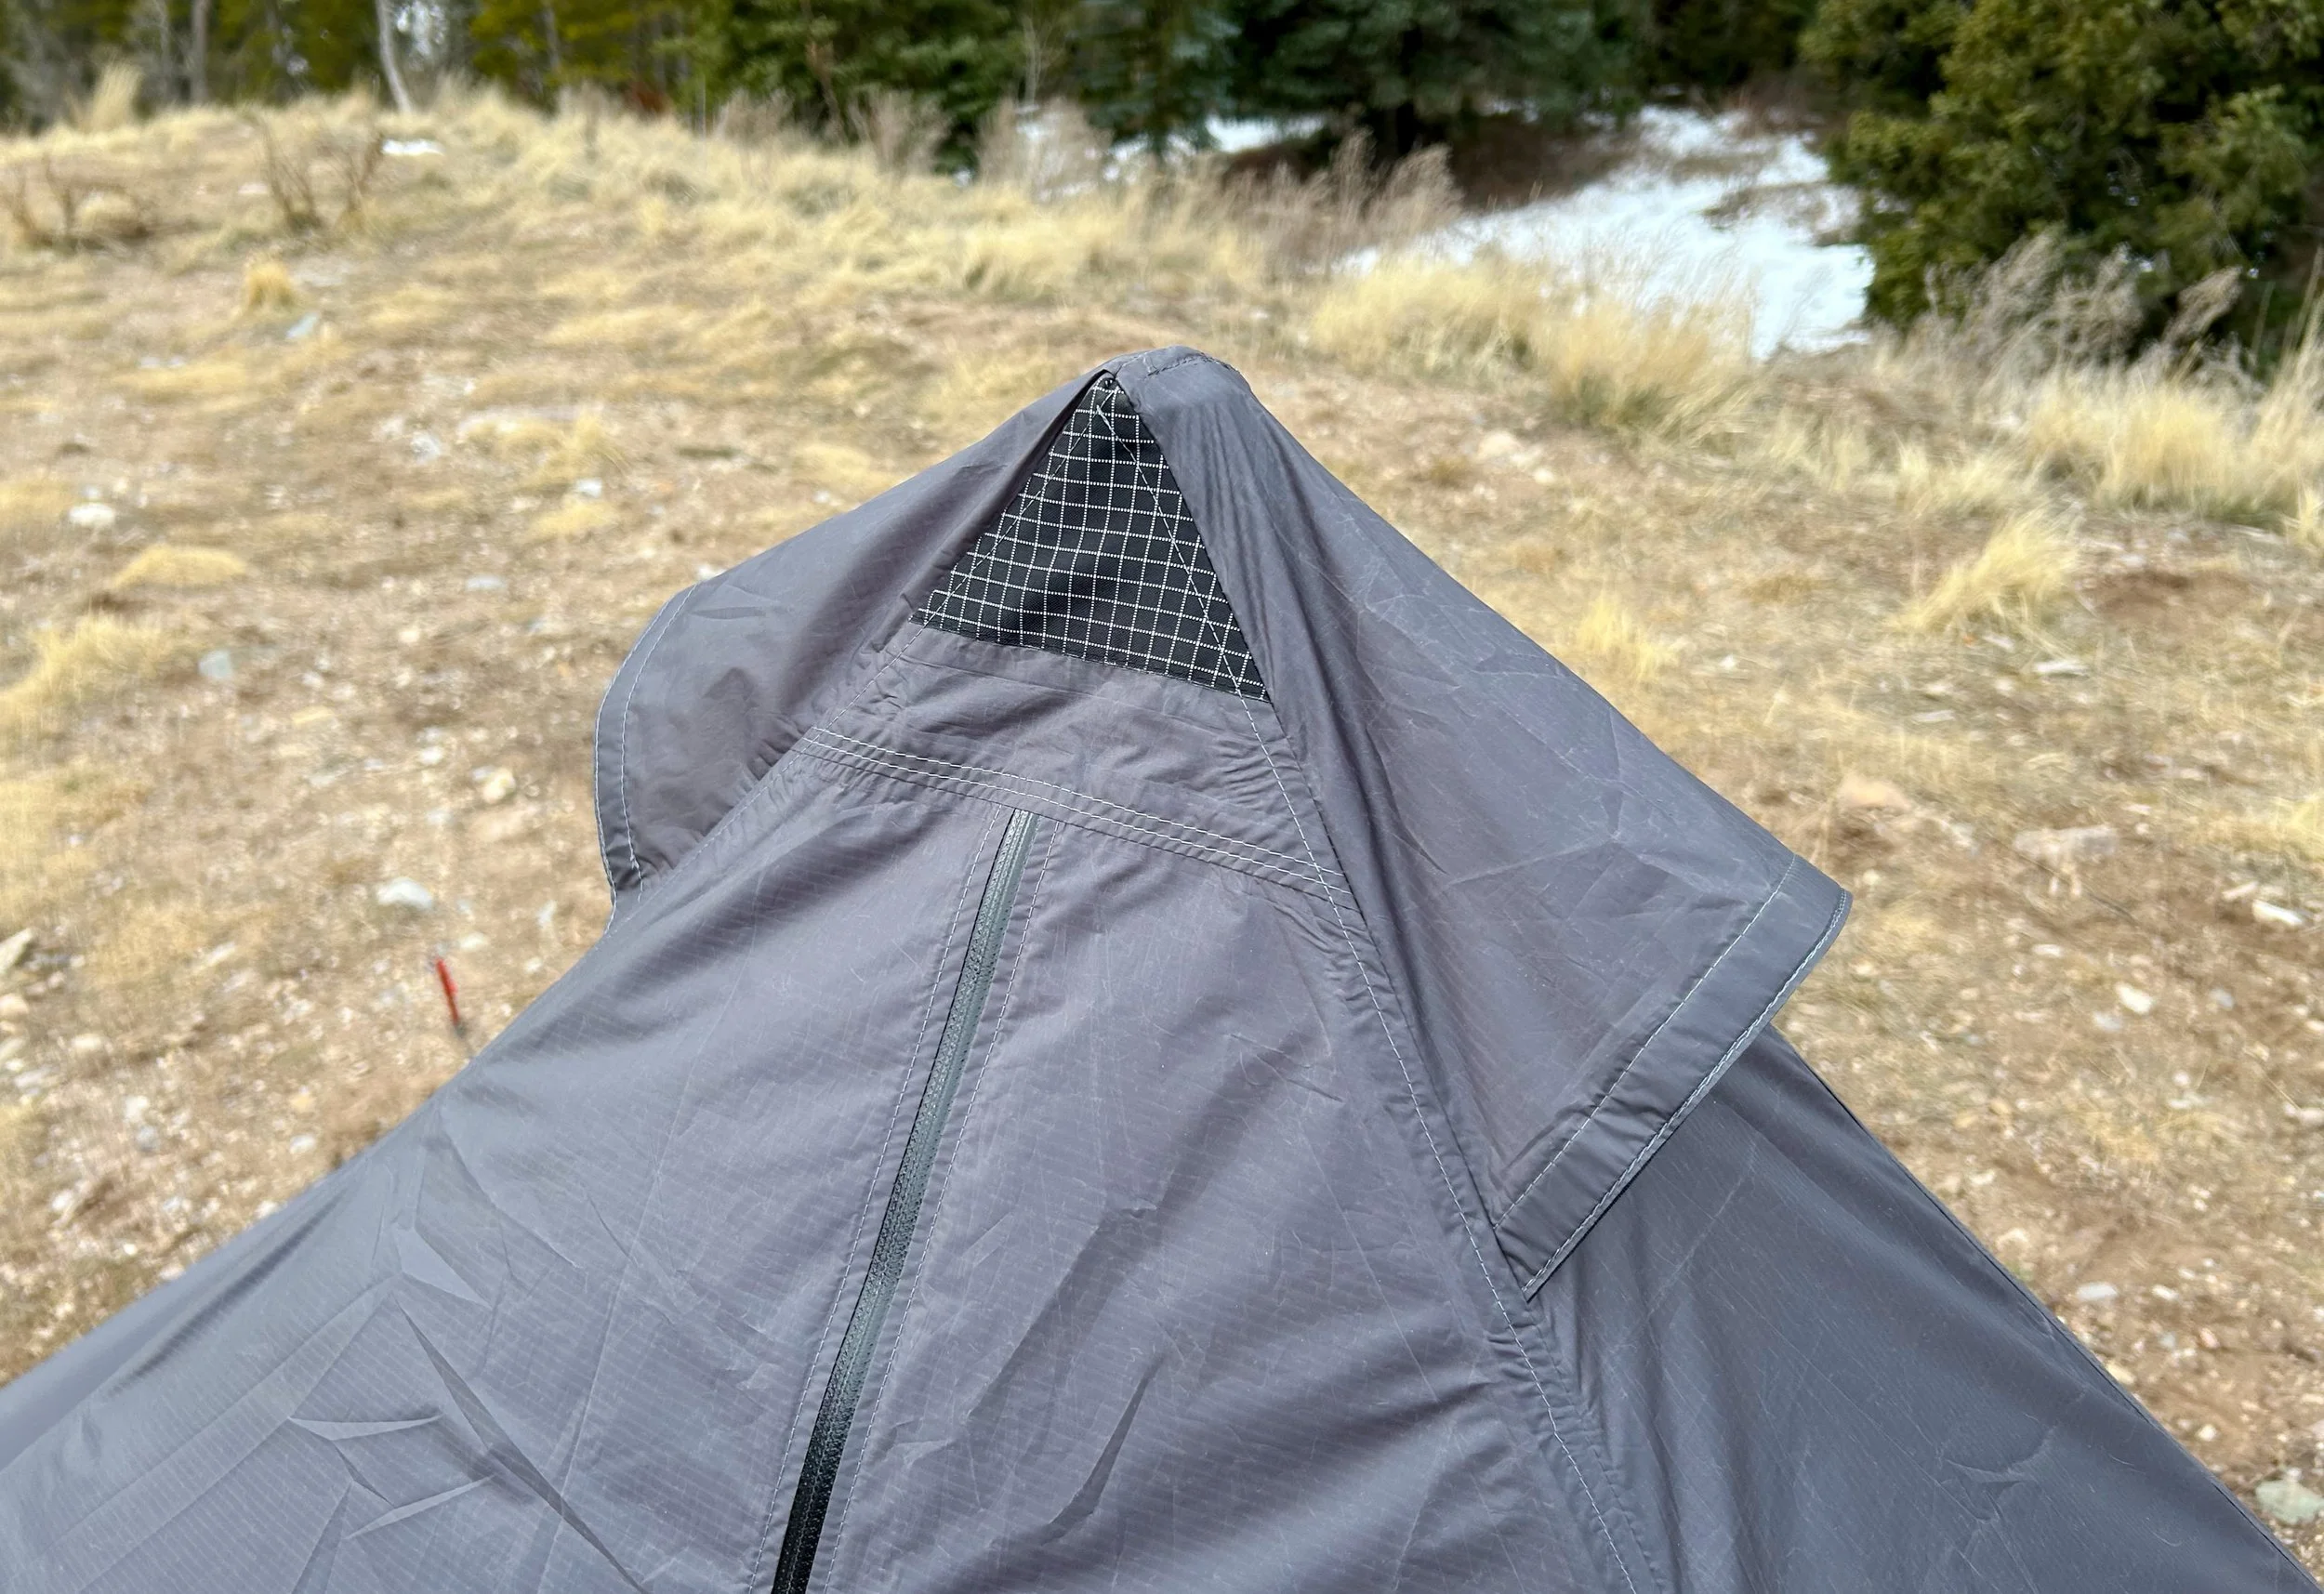
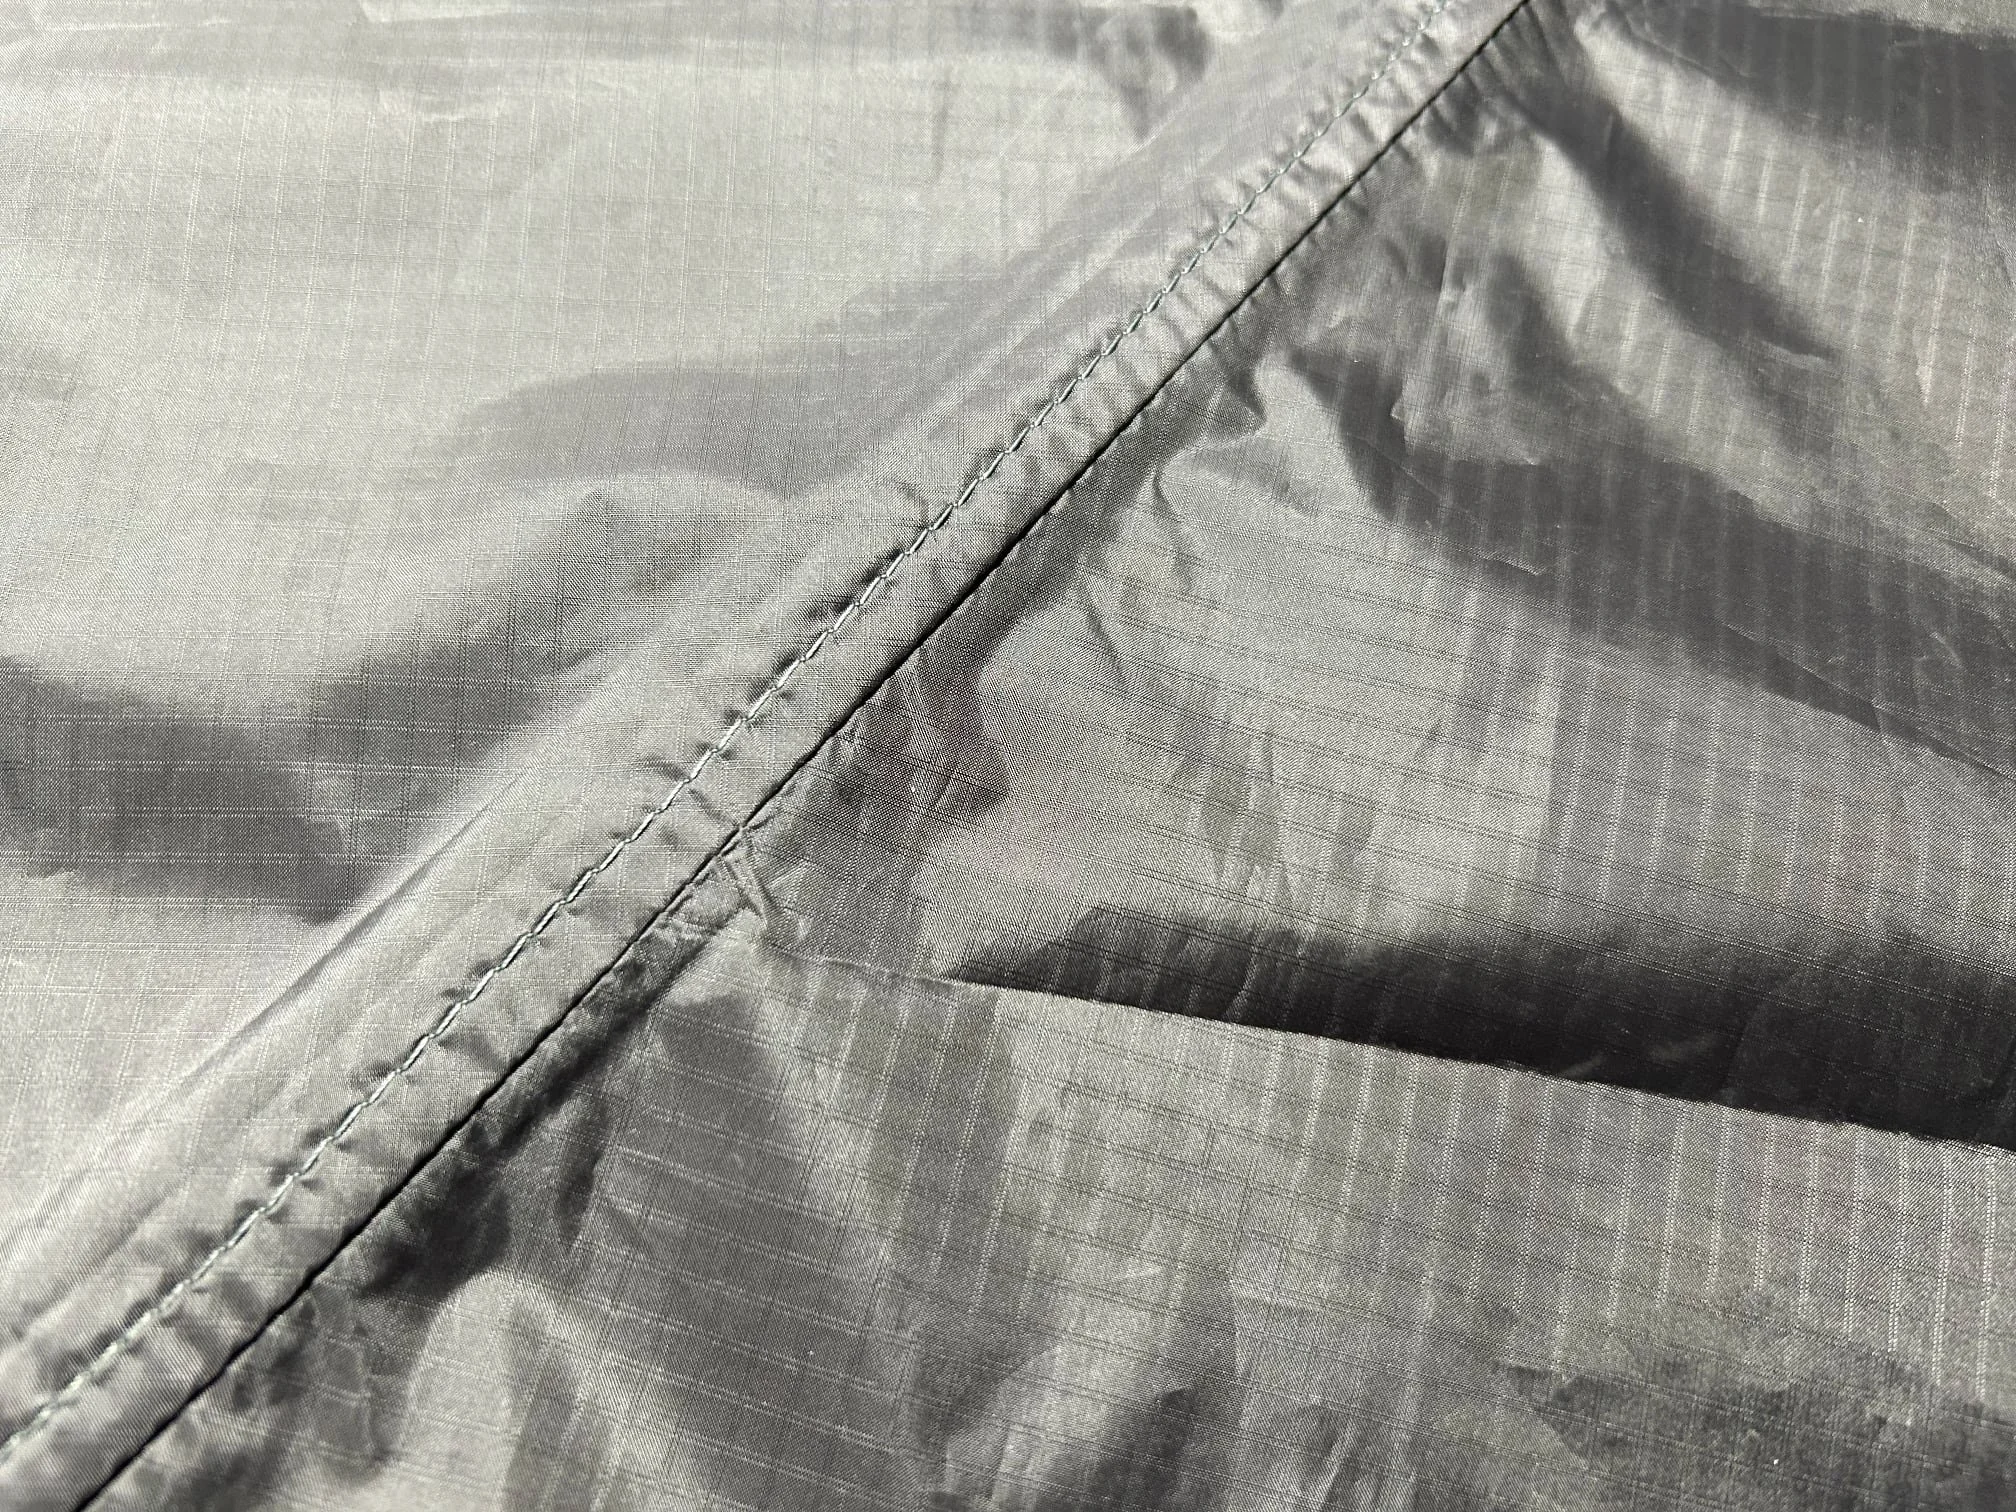
Flat spot at peak of tarp.
The four main seams of the tarp have catenary curves cut in them. A catenary curve is “the curve a flexible chain, or rope assumes under its own weight when suspended from two points”. Cutting a curve into the edge of the panels before assembling them results in a tarp that can be pitched more tautly and flaps less in the wind. It’s an interesting but fairly technical topic that I won’t cover in depth here. There is a lot of information that can be found online about how to calculate the curve, and determine its depth etc. But, I shied away from the math, and more or less guessed that two inches would be a good depth, and I’m happy with how that turned out. You will see the method I used to draw and cut an approximate catenary curve in the build instructions.
Materials:
My choice in materials was based on seam sealing. For this build, I wanted to seal the seams with seam sealing tape. On a previous pyramid tarp I made, I used Seam Grip+Sil on the seams, and was never fully satisfied with how it turned out. I didn’t enjoy the process of applying it, plus the sealer looked a little sloppy, and sand seemed to stick to it. I know there are ways to mitigate these issues, but recently I’ve had good experiences using seam tape on several other projects, so I thought I would try it on this shelter.
With that in mind, my choice of fabrics was limited to those with a PU-coating, as seam tape will not stick to silicone coated fabrics. Sil-coated fabrics do have advantages over PU fabrics, a topic that’s beyond the scope of this article. But for this project PU was required. Luckily there are some great PU coated fabrics available. I ended up choosing “1.1 oz Silpoly PU4000” from Ripstop by the Roll. I found that the seam sealing tape adhered well, and that the fabric was easy to cut and sew.
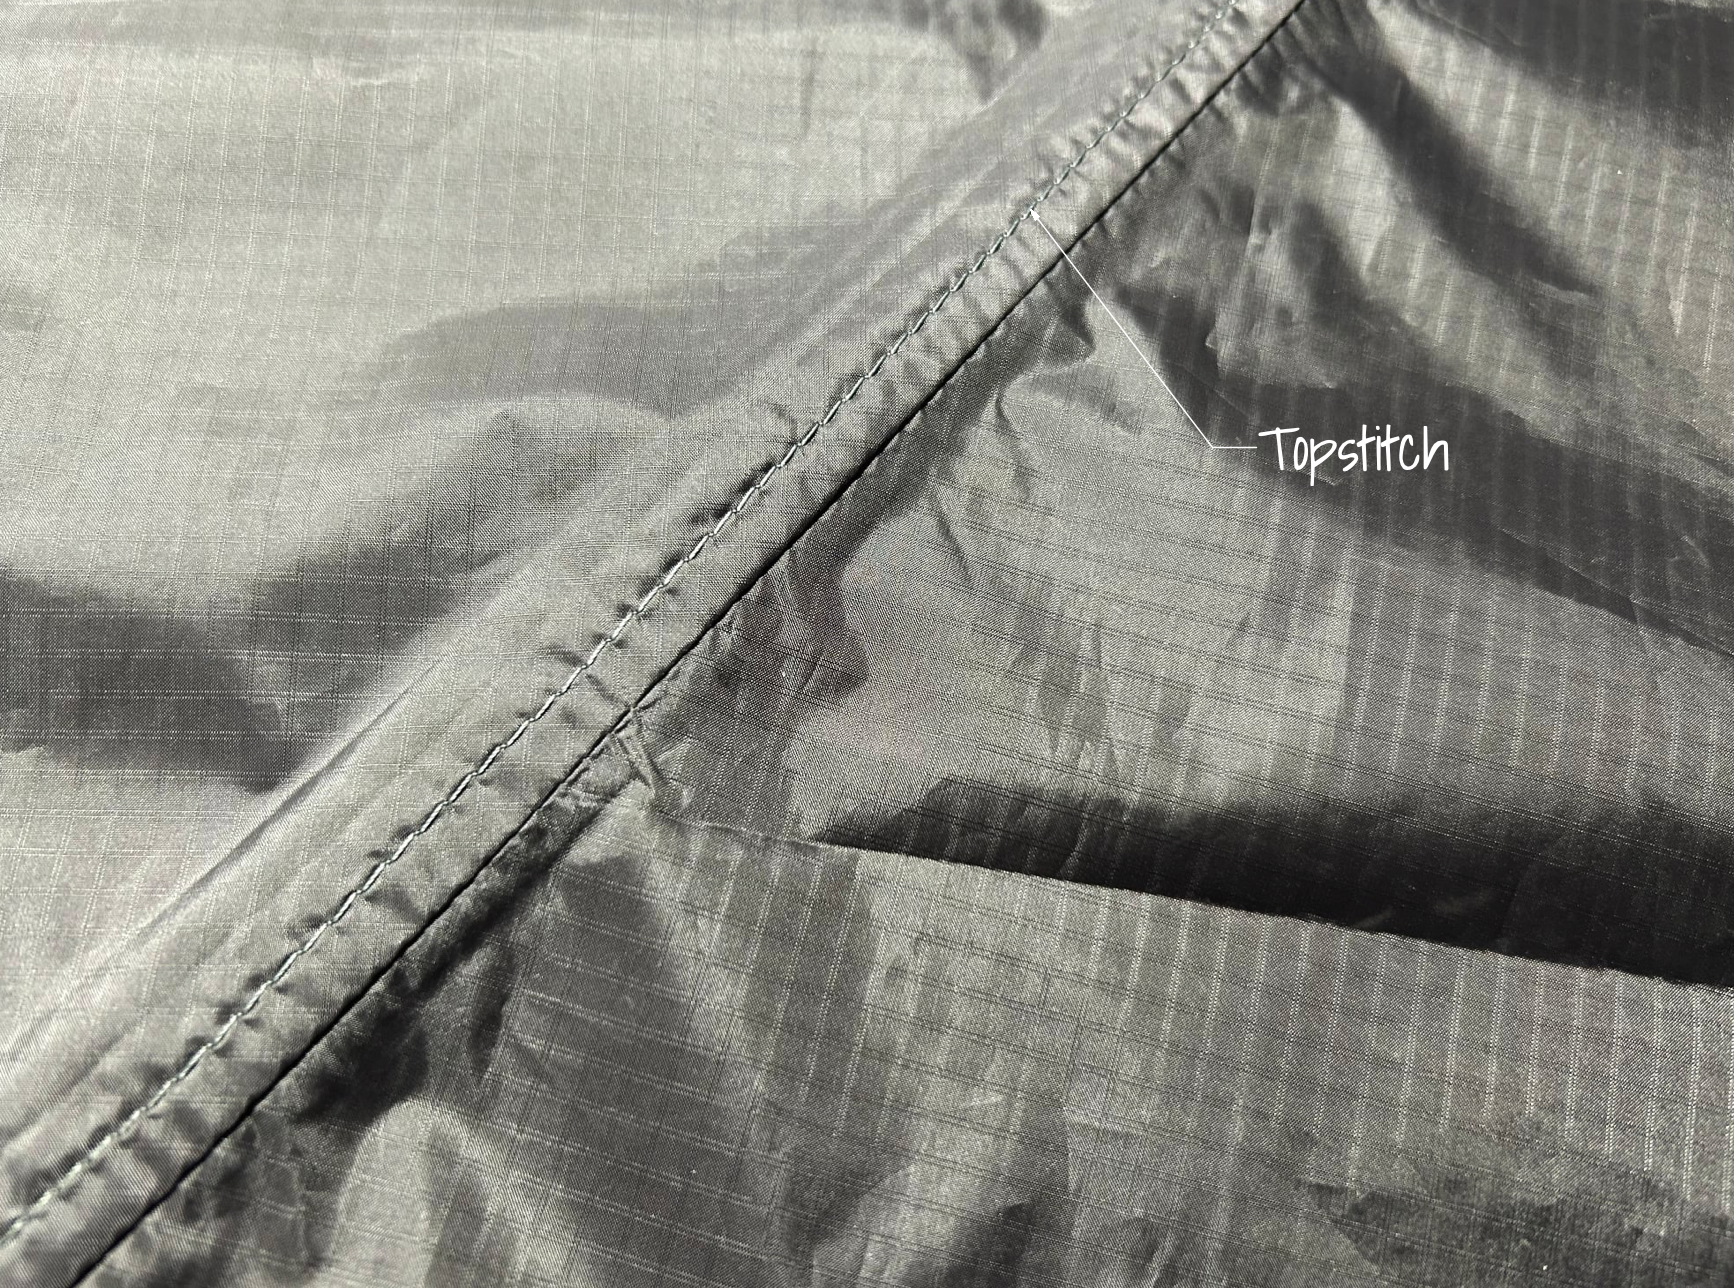
For the main panel construction, I used a simple 3/8" top-stitched seam. This is a straightforward seam that’s easy to sew accurately and, just as importantly, has worked well with seam tape for me in the past. The taped seam lays flat, seals evenly, and hasn’t given me any trouble so far. A top-stitched French seam as shown in this video, would likely be a more durable and traditional choice, especially for long-term use or harsher conditions, but it also adds complexity and bulk. For this project, I opted to keep things simple and stick with what I knew would play nicely with the tape.
That said, time will tell how these seams hold up after extended real-world use. If I start seeing issues like elongating stitches, or failures under tension, I’ll update this article with what I learn and what I’d do differently next time. If you decide to build your own tarp with top-stitched French seams instead, just keep in mind that you’ll need to adjust the seam allowances of the parts shown in the diagrams accordingly.
Materials list:
7-1/2 yards fabric at least 57” wide
1/4 yard no-see-um mesh
(1) 51-1/4” water resistant zipper w/ double sided zipper slider (#3 with 1” wide tape recommended)
Approximately 60” of 1/2” grosgrain or webbing
Approximately 96” cordage
(5) Linelocs
Approximately 24” of 3/4” grosgrain
Approximately 10 yards seam sealing tape
(2) strips of thin plastic 1/2” x 10-1/2” (I used a 2 liter bottle)
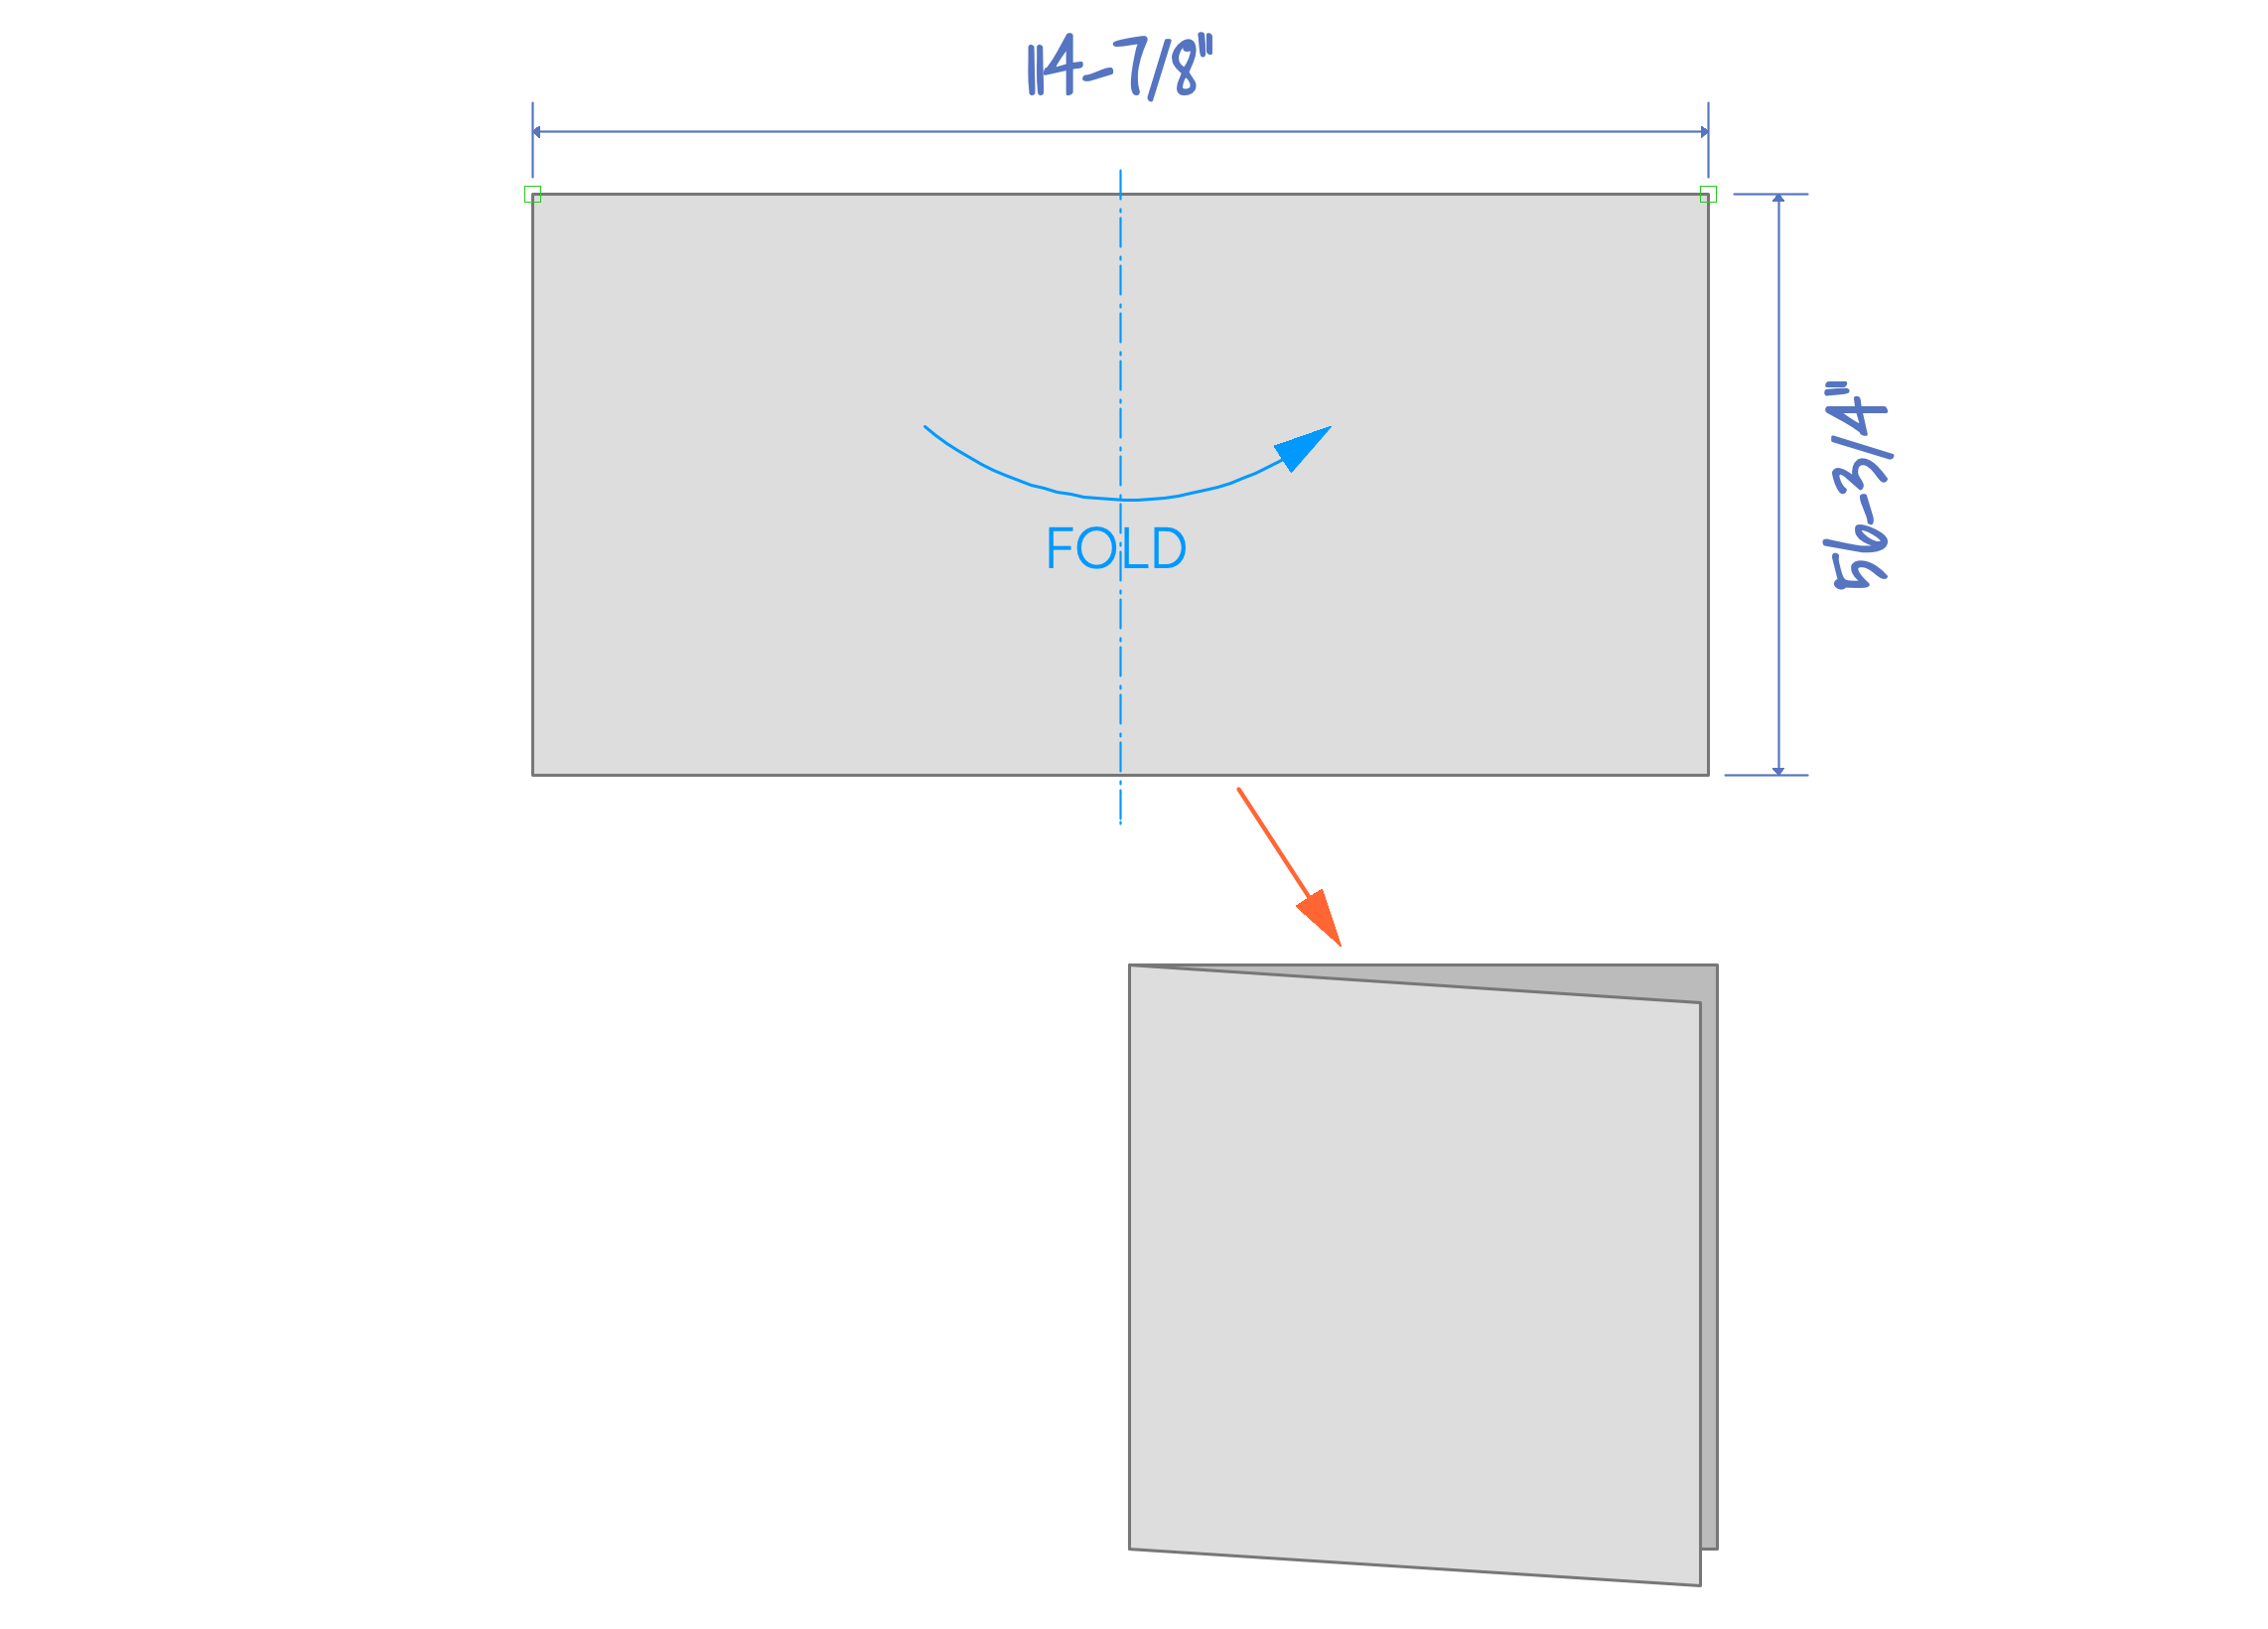
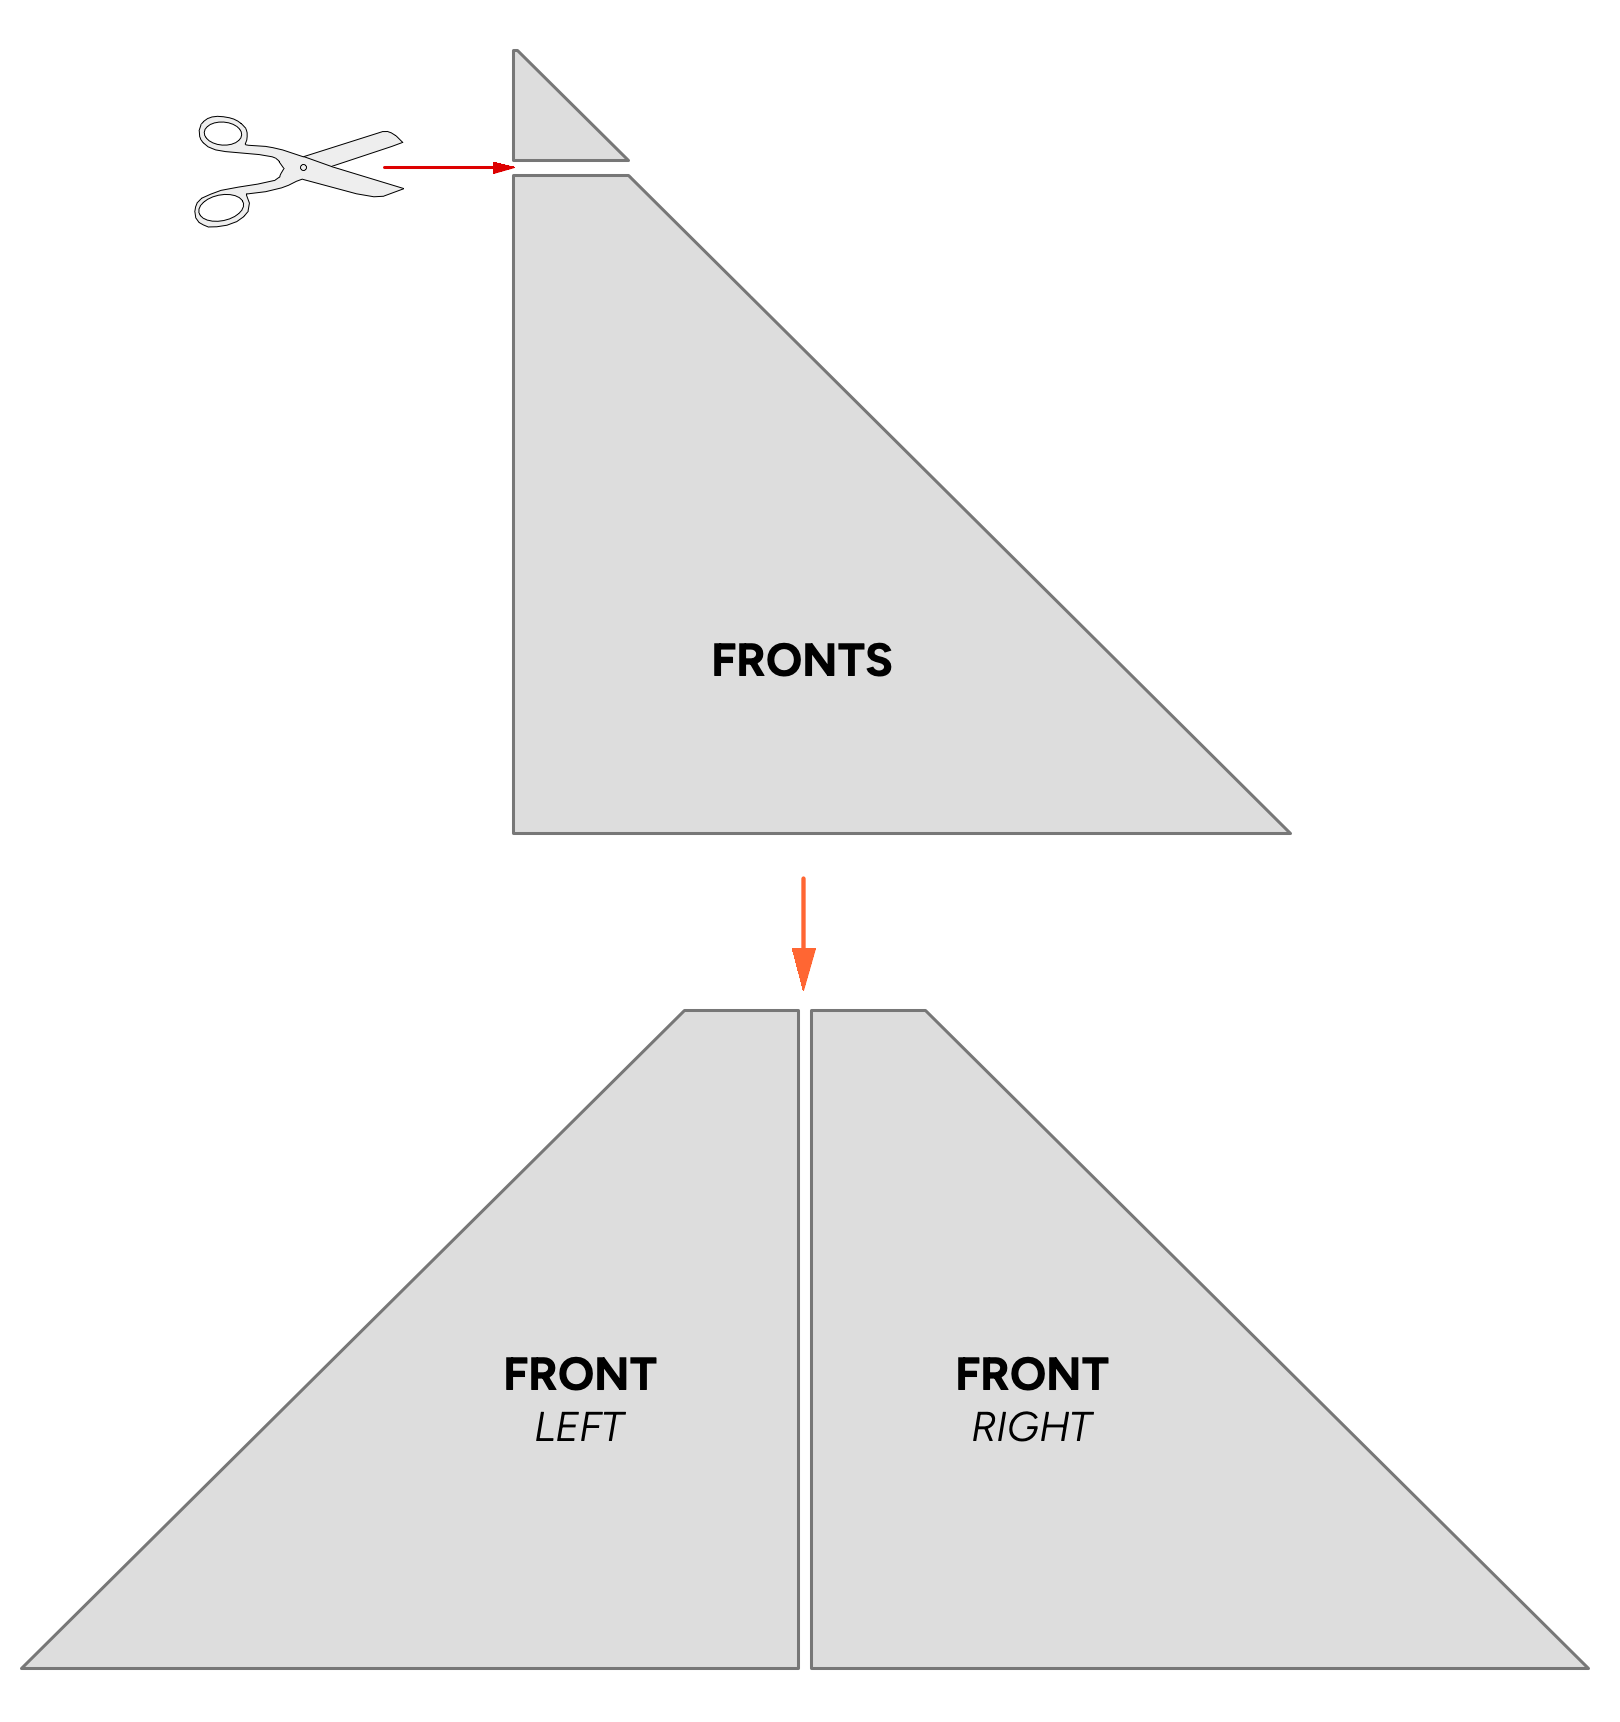
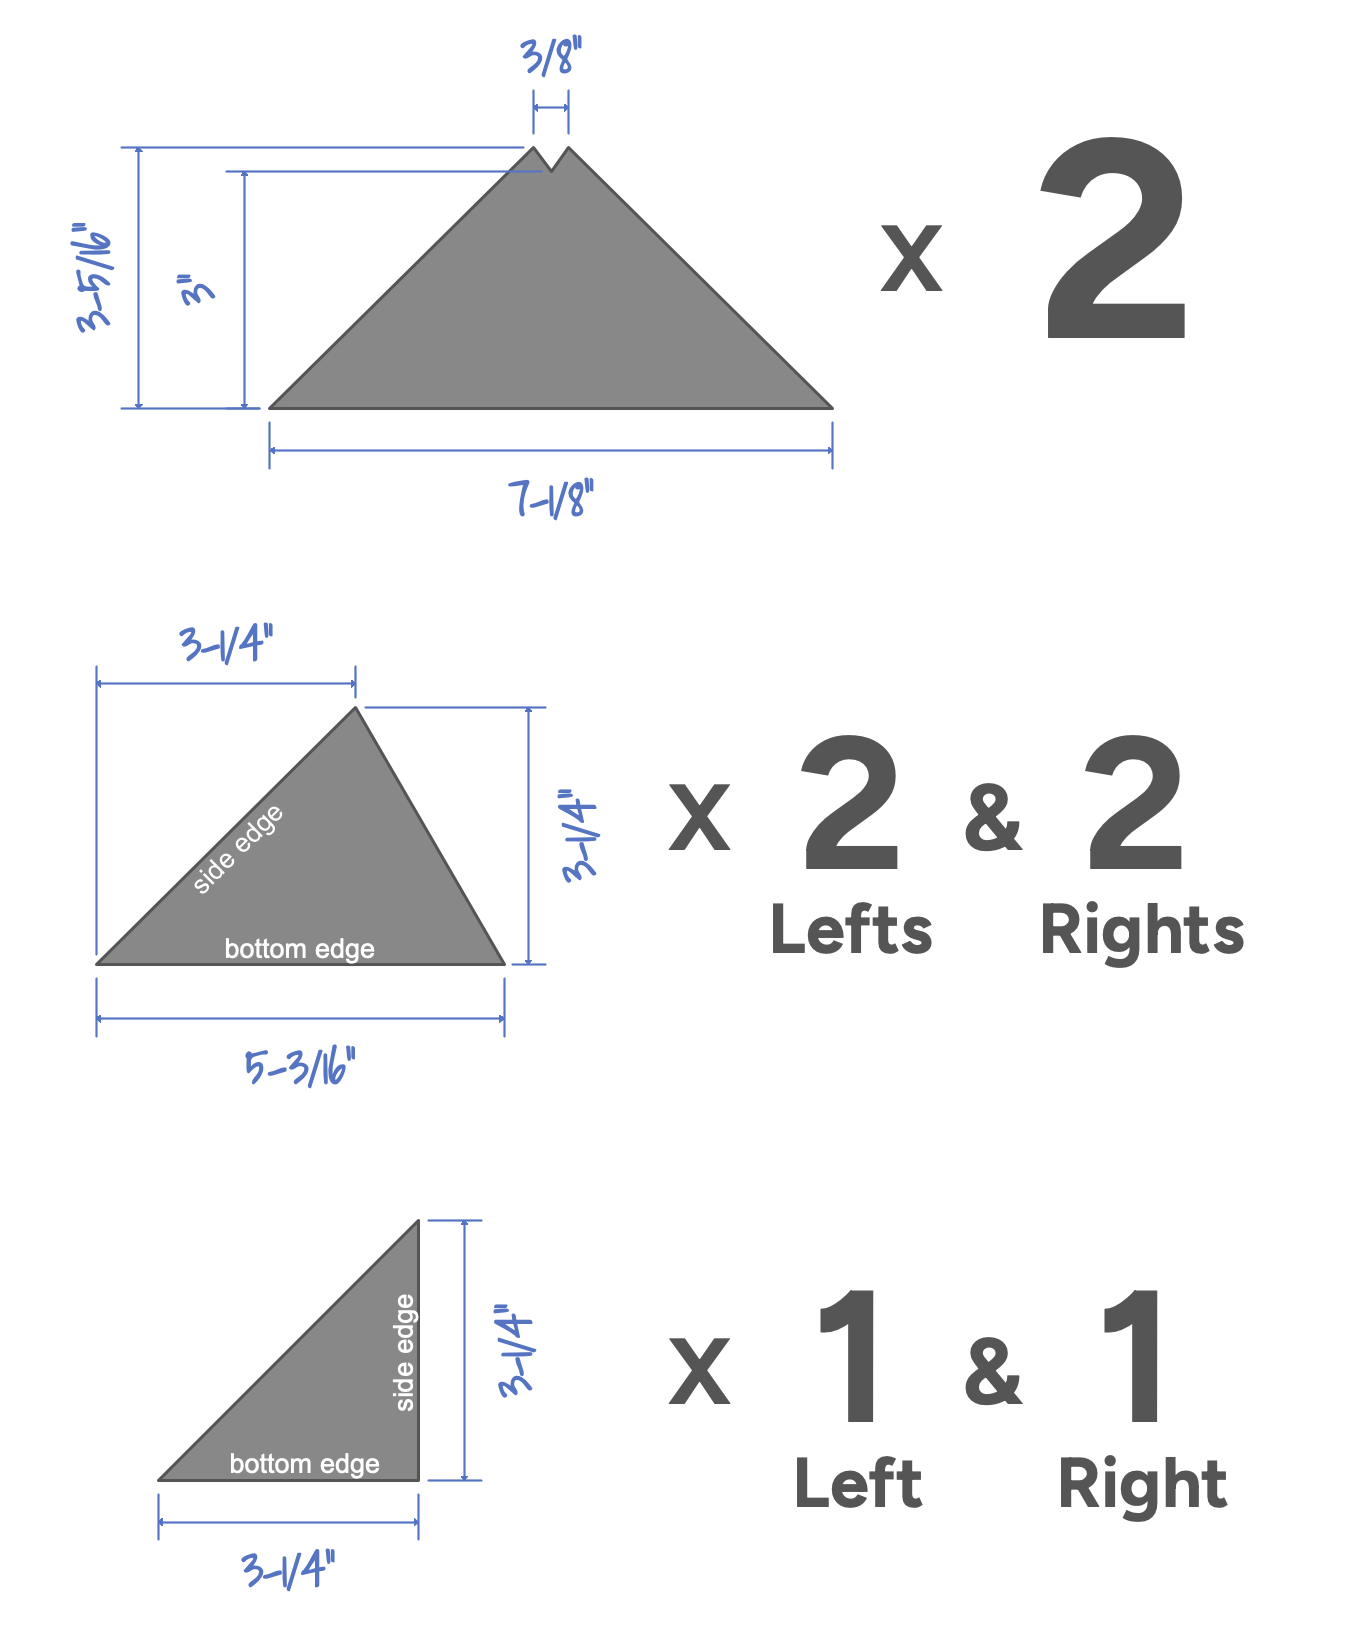
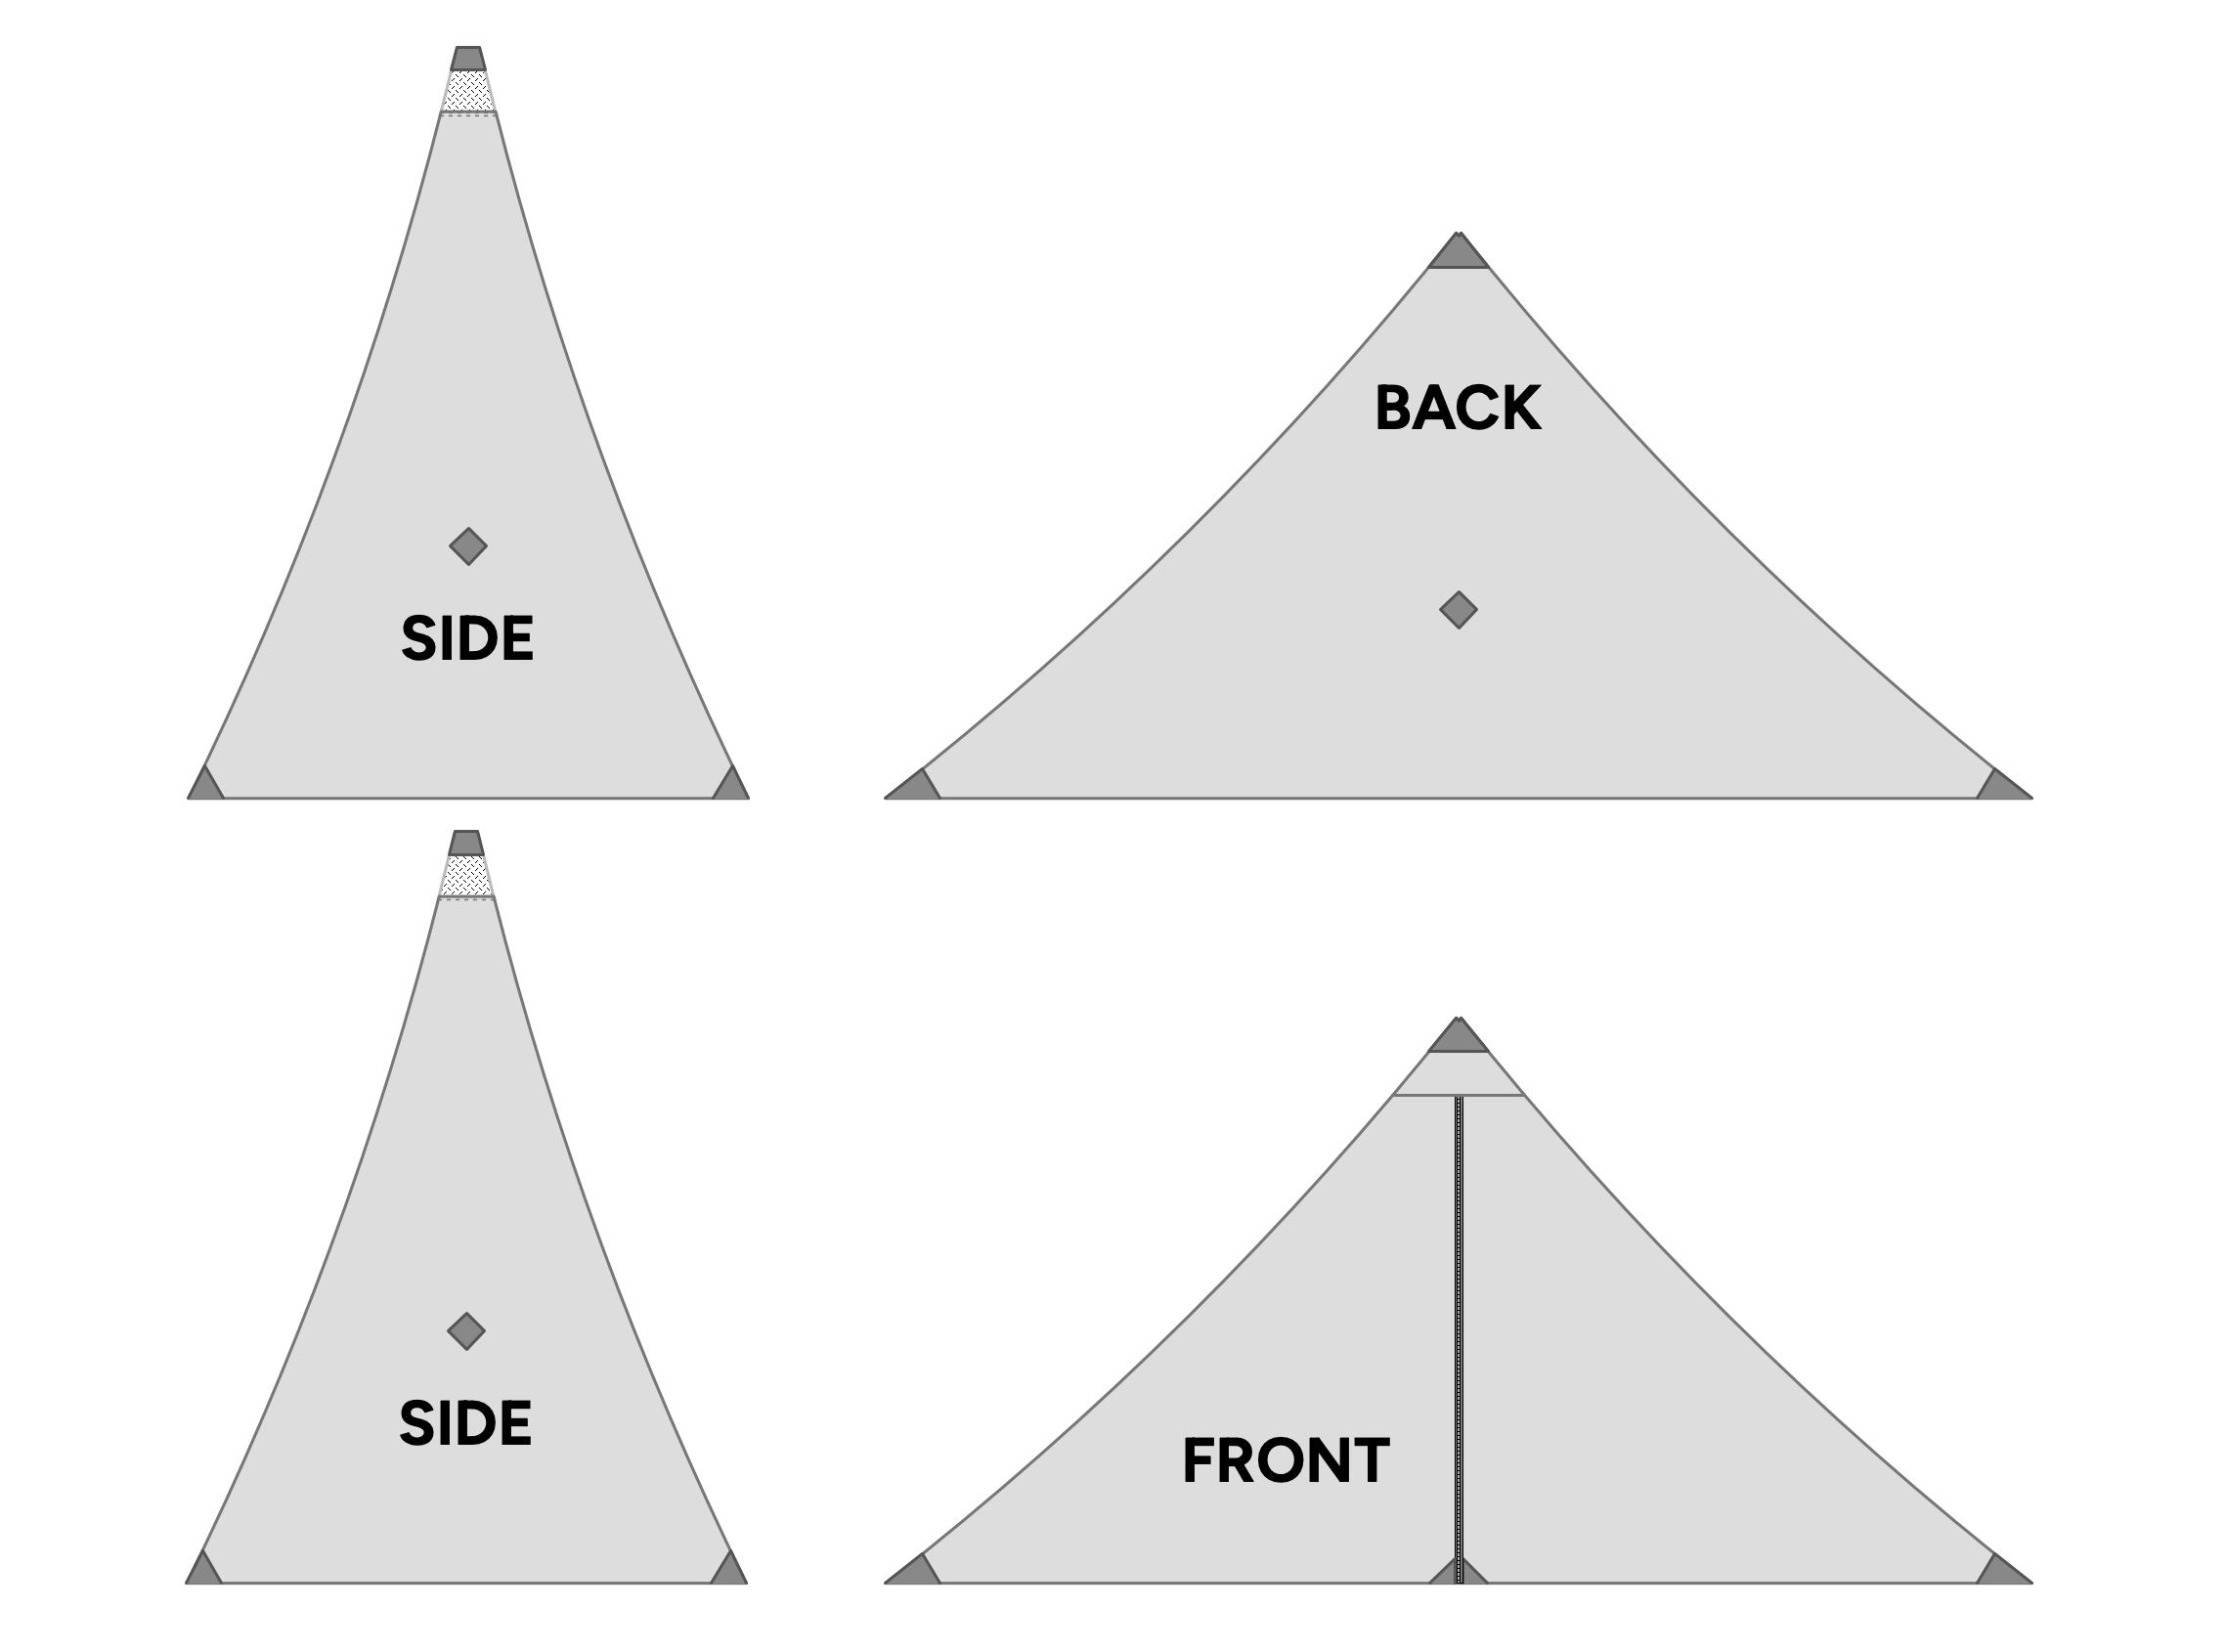
Cutting out the front and back:
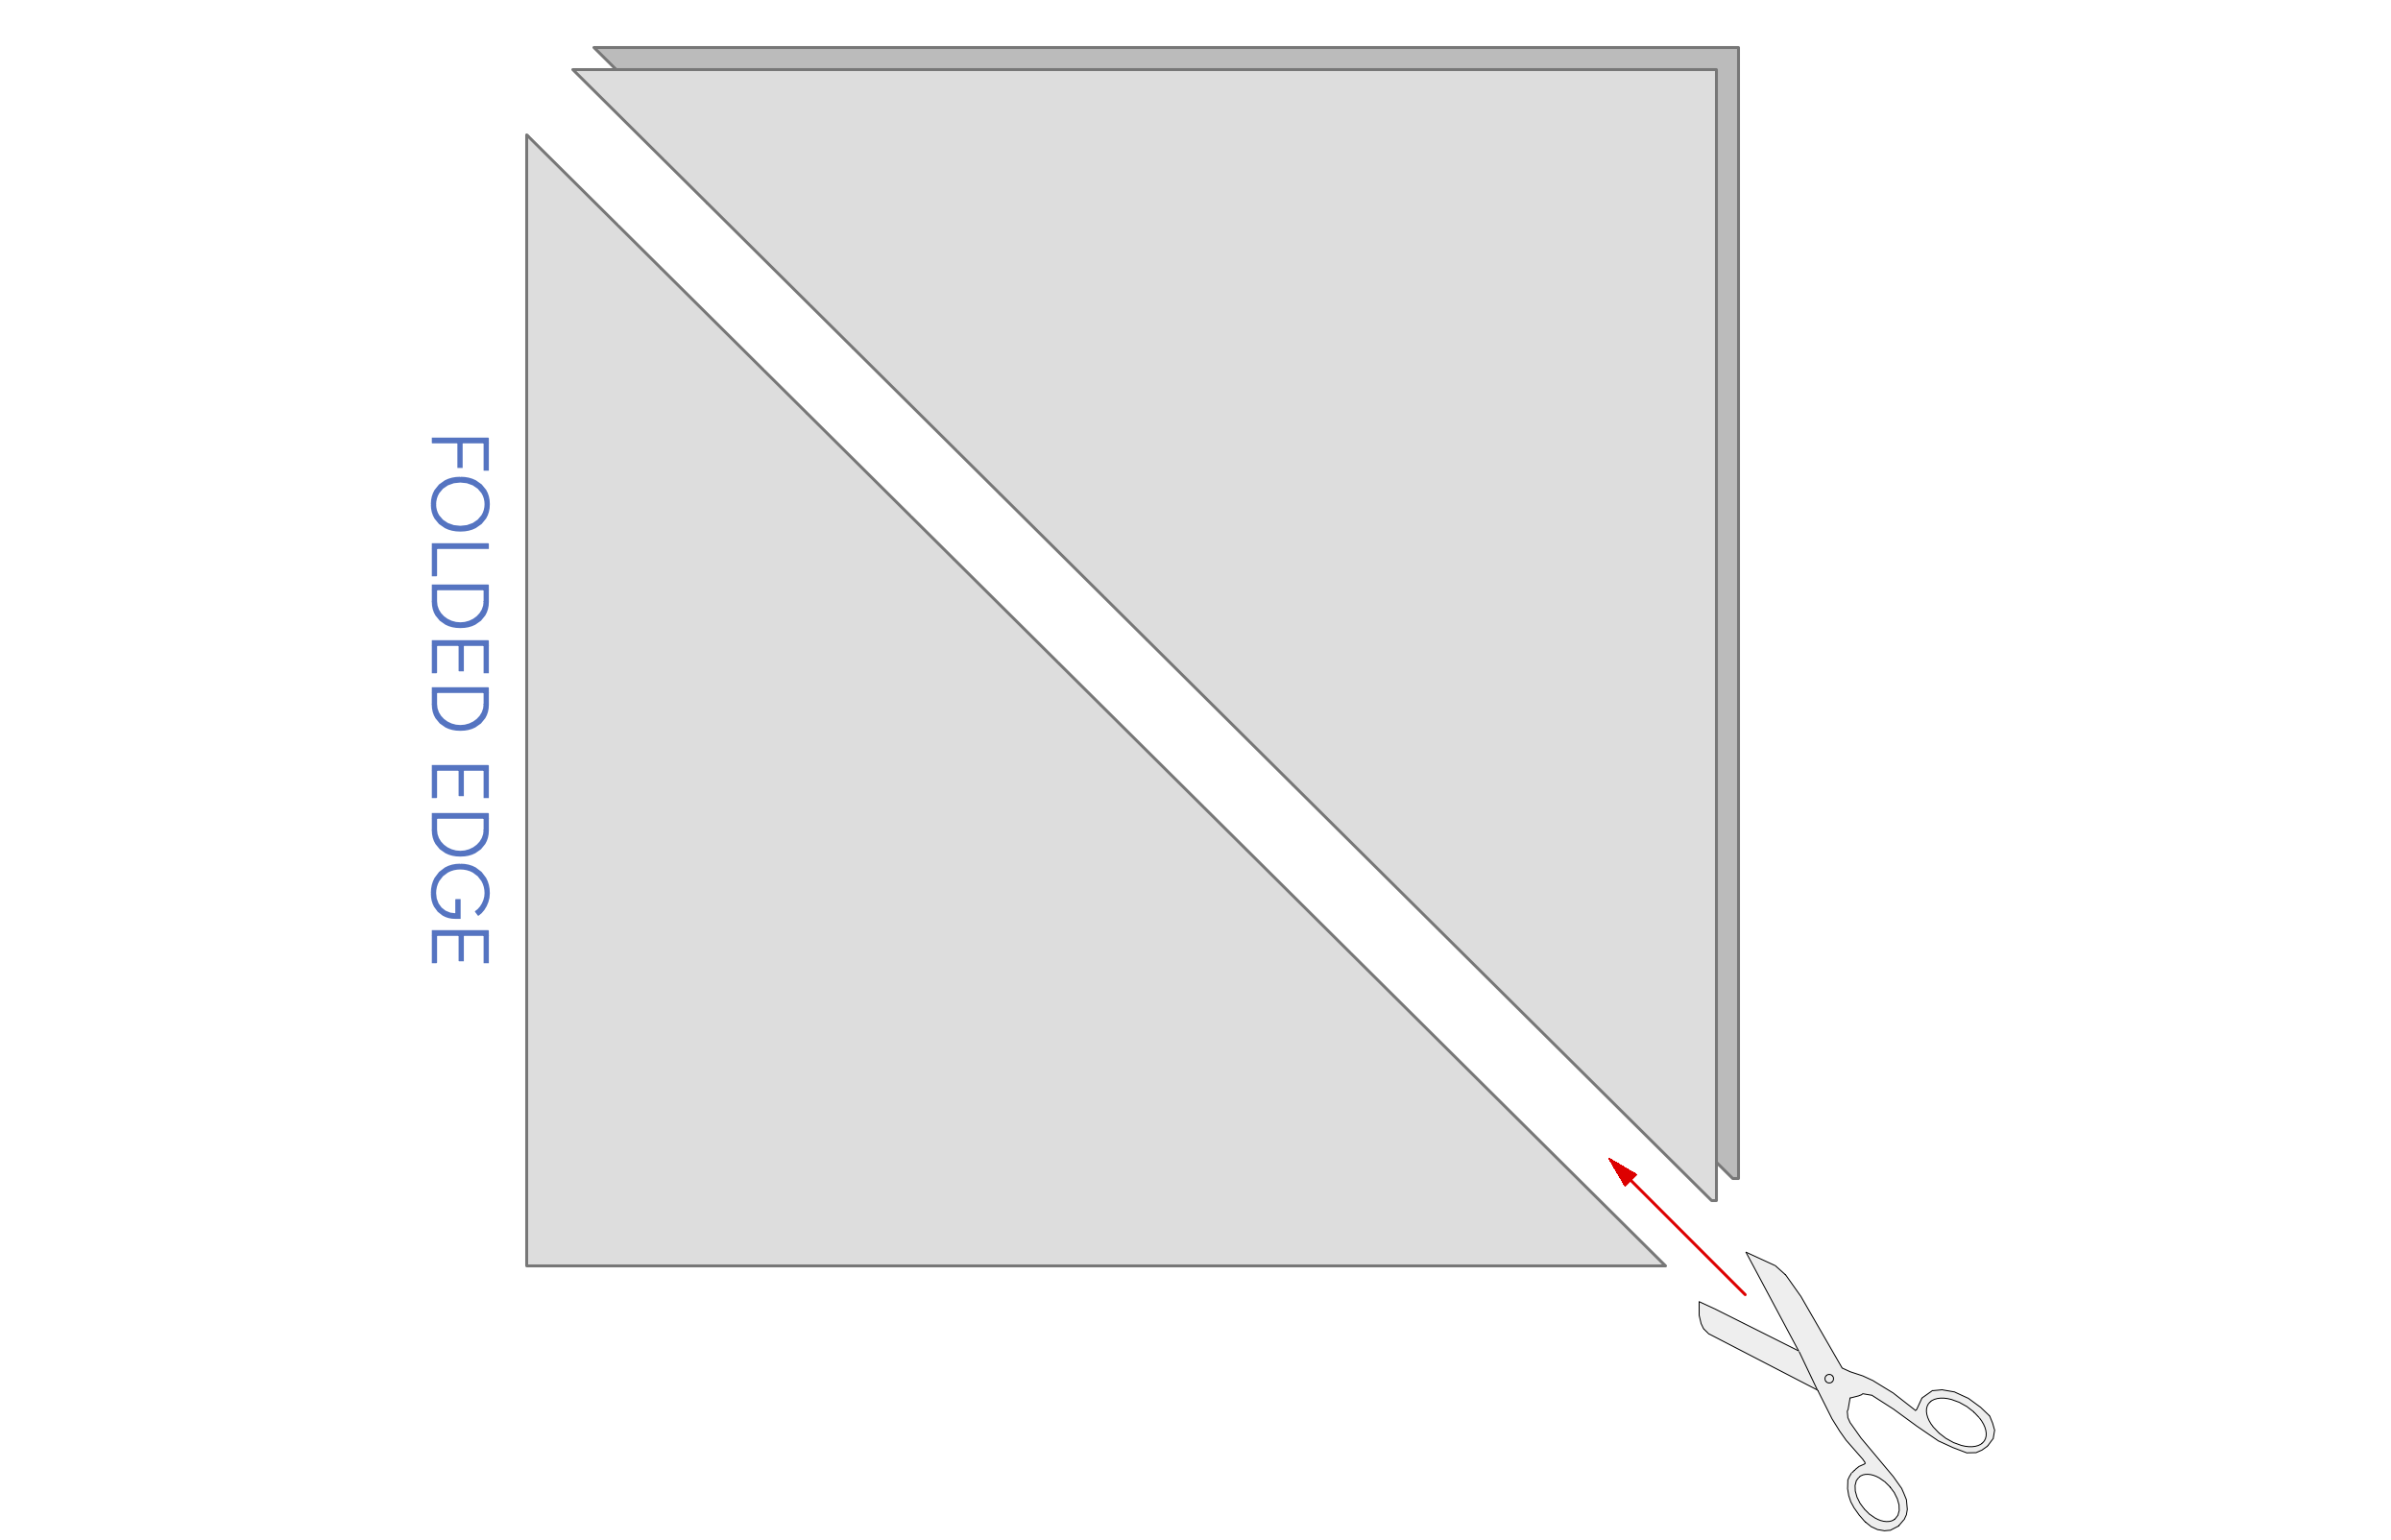
The front and back panels can be cut out at the same time, with careful measuring and cutting. Begin by cutting a rectangle 114-⅞” x 56-¾”. Fold the rectangle in half, so the shorter sides meet, as shown below.
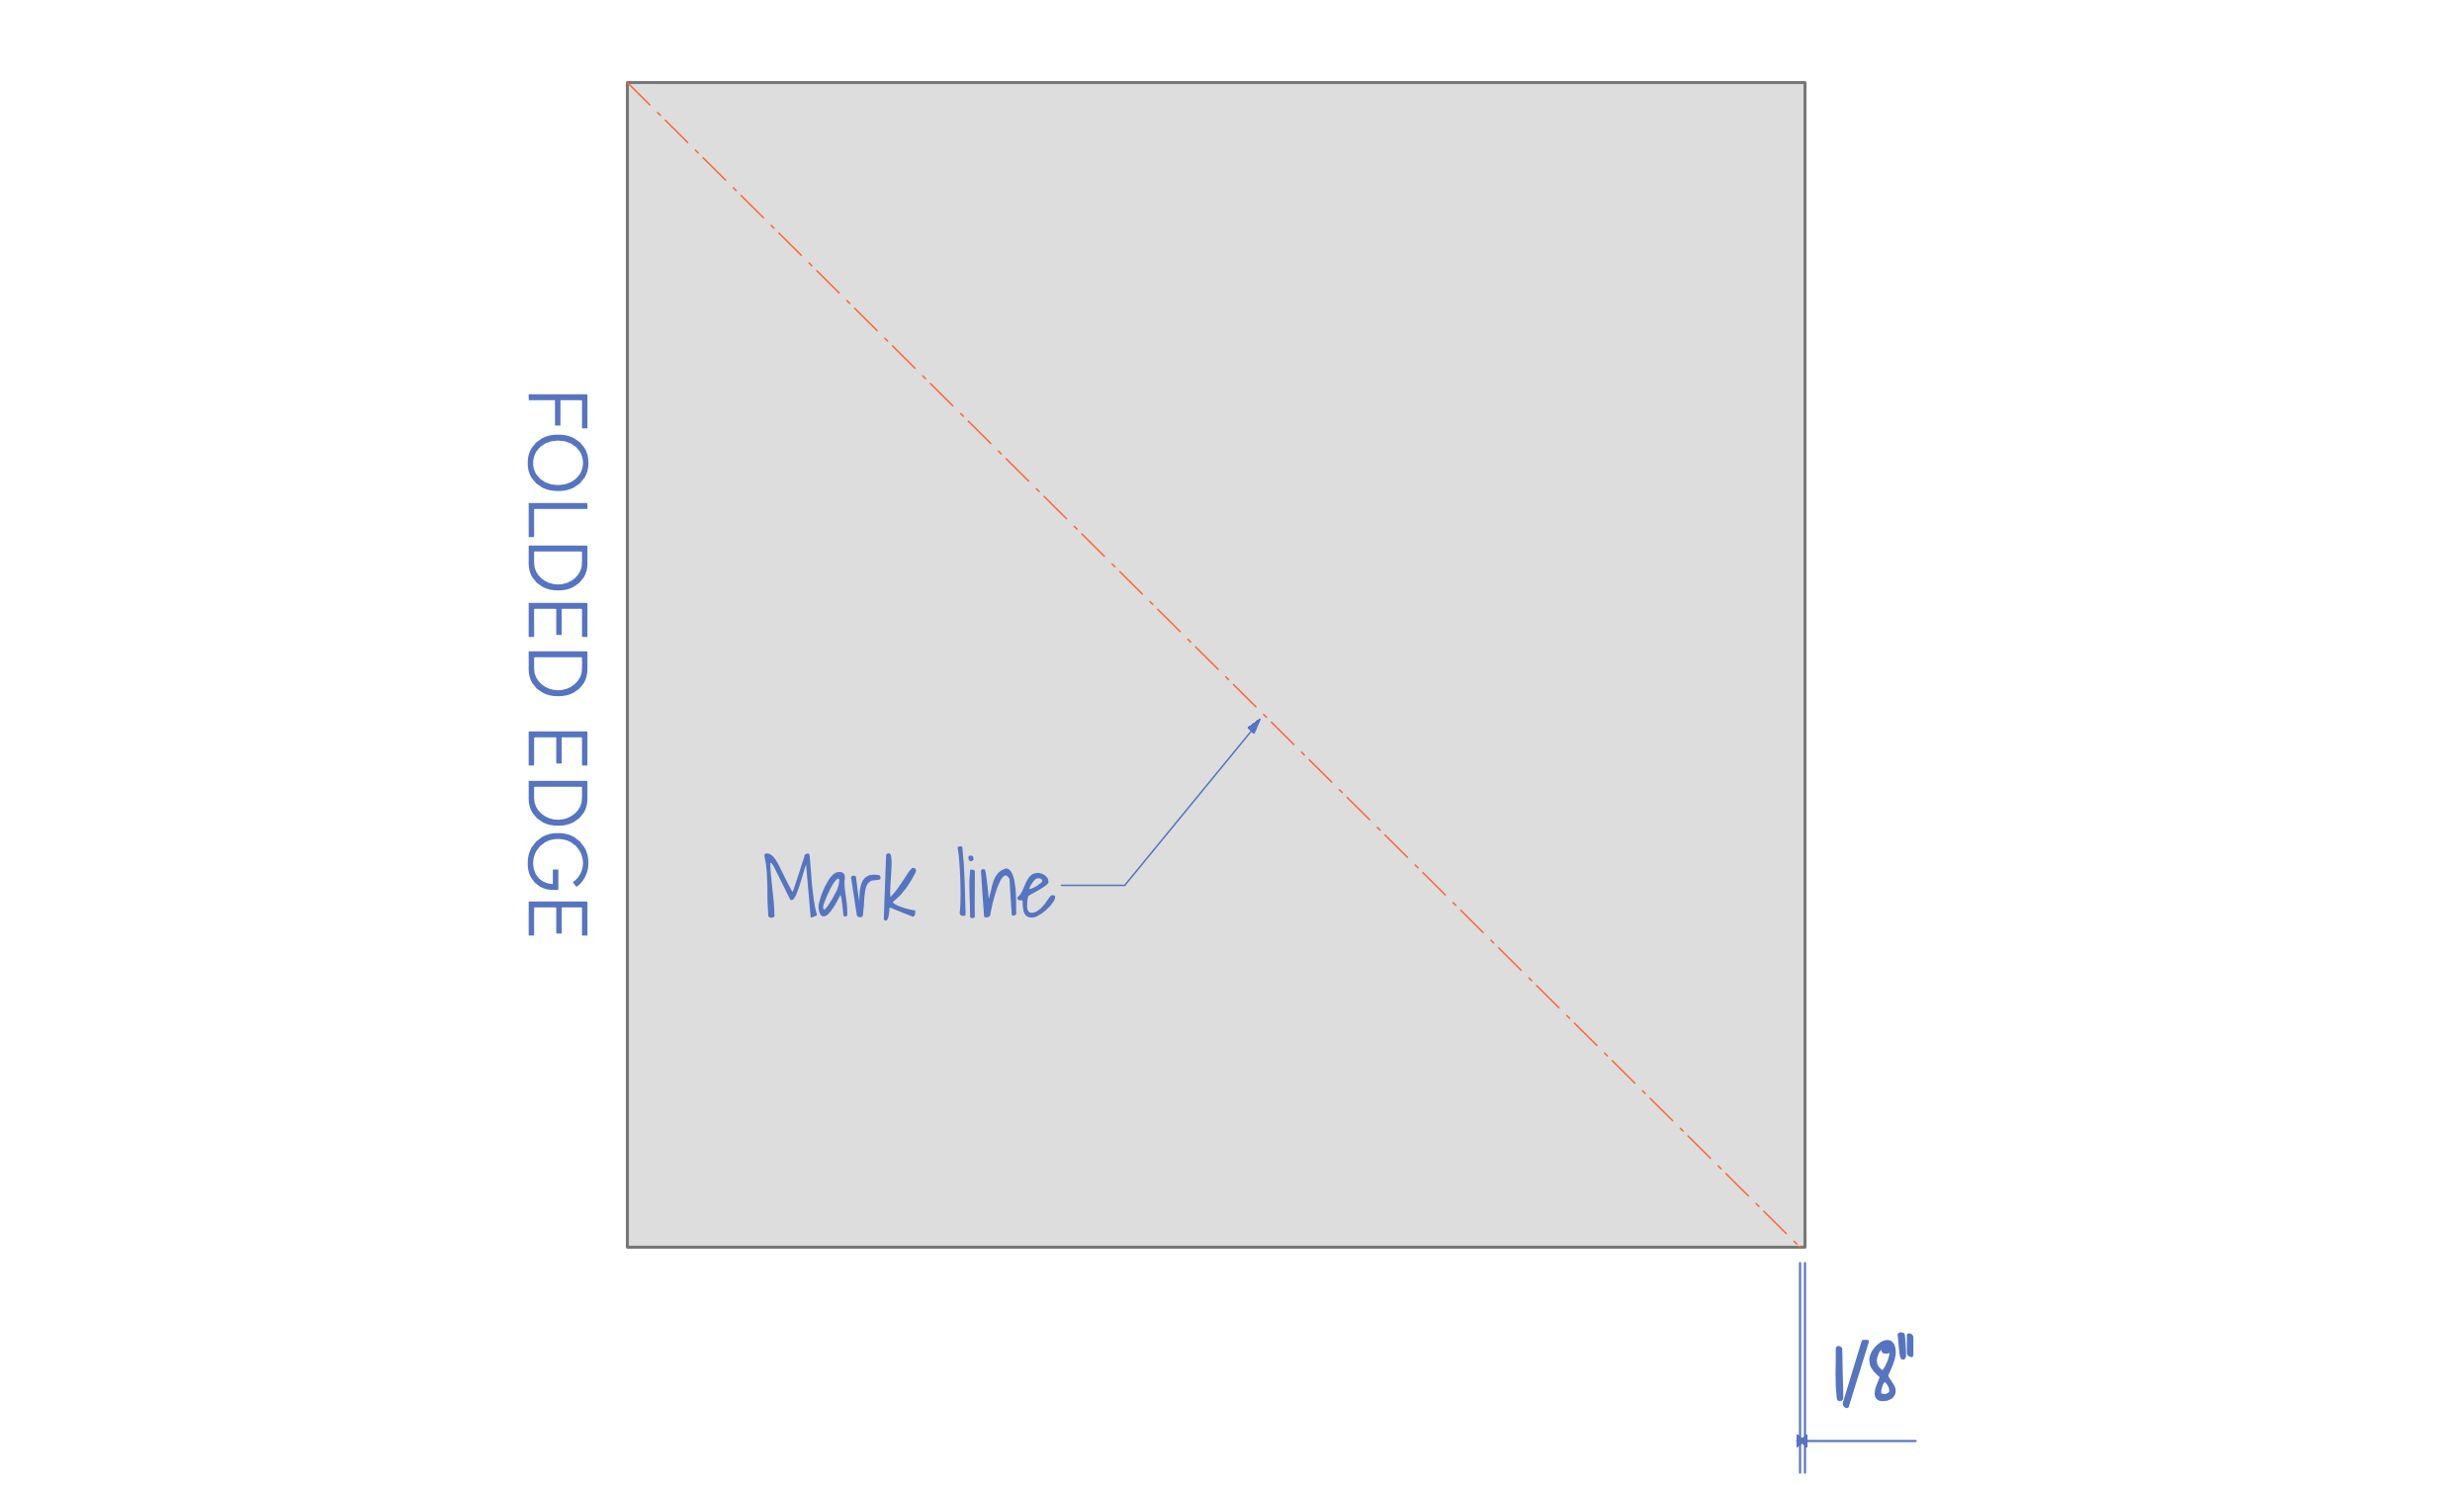
On the bottom edge measure ⅛” from where the corners meet and make a mark as shown. Mark a line from the upper corner to the lower mark, as shown below.
Cut along the line as shown. The folded part is the back, and the two leftover parts are the front.
Take the folded part (back panel) and cut the top corner off using the dimensions as shown below.
When unfolded the back panel should look as shown.
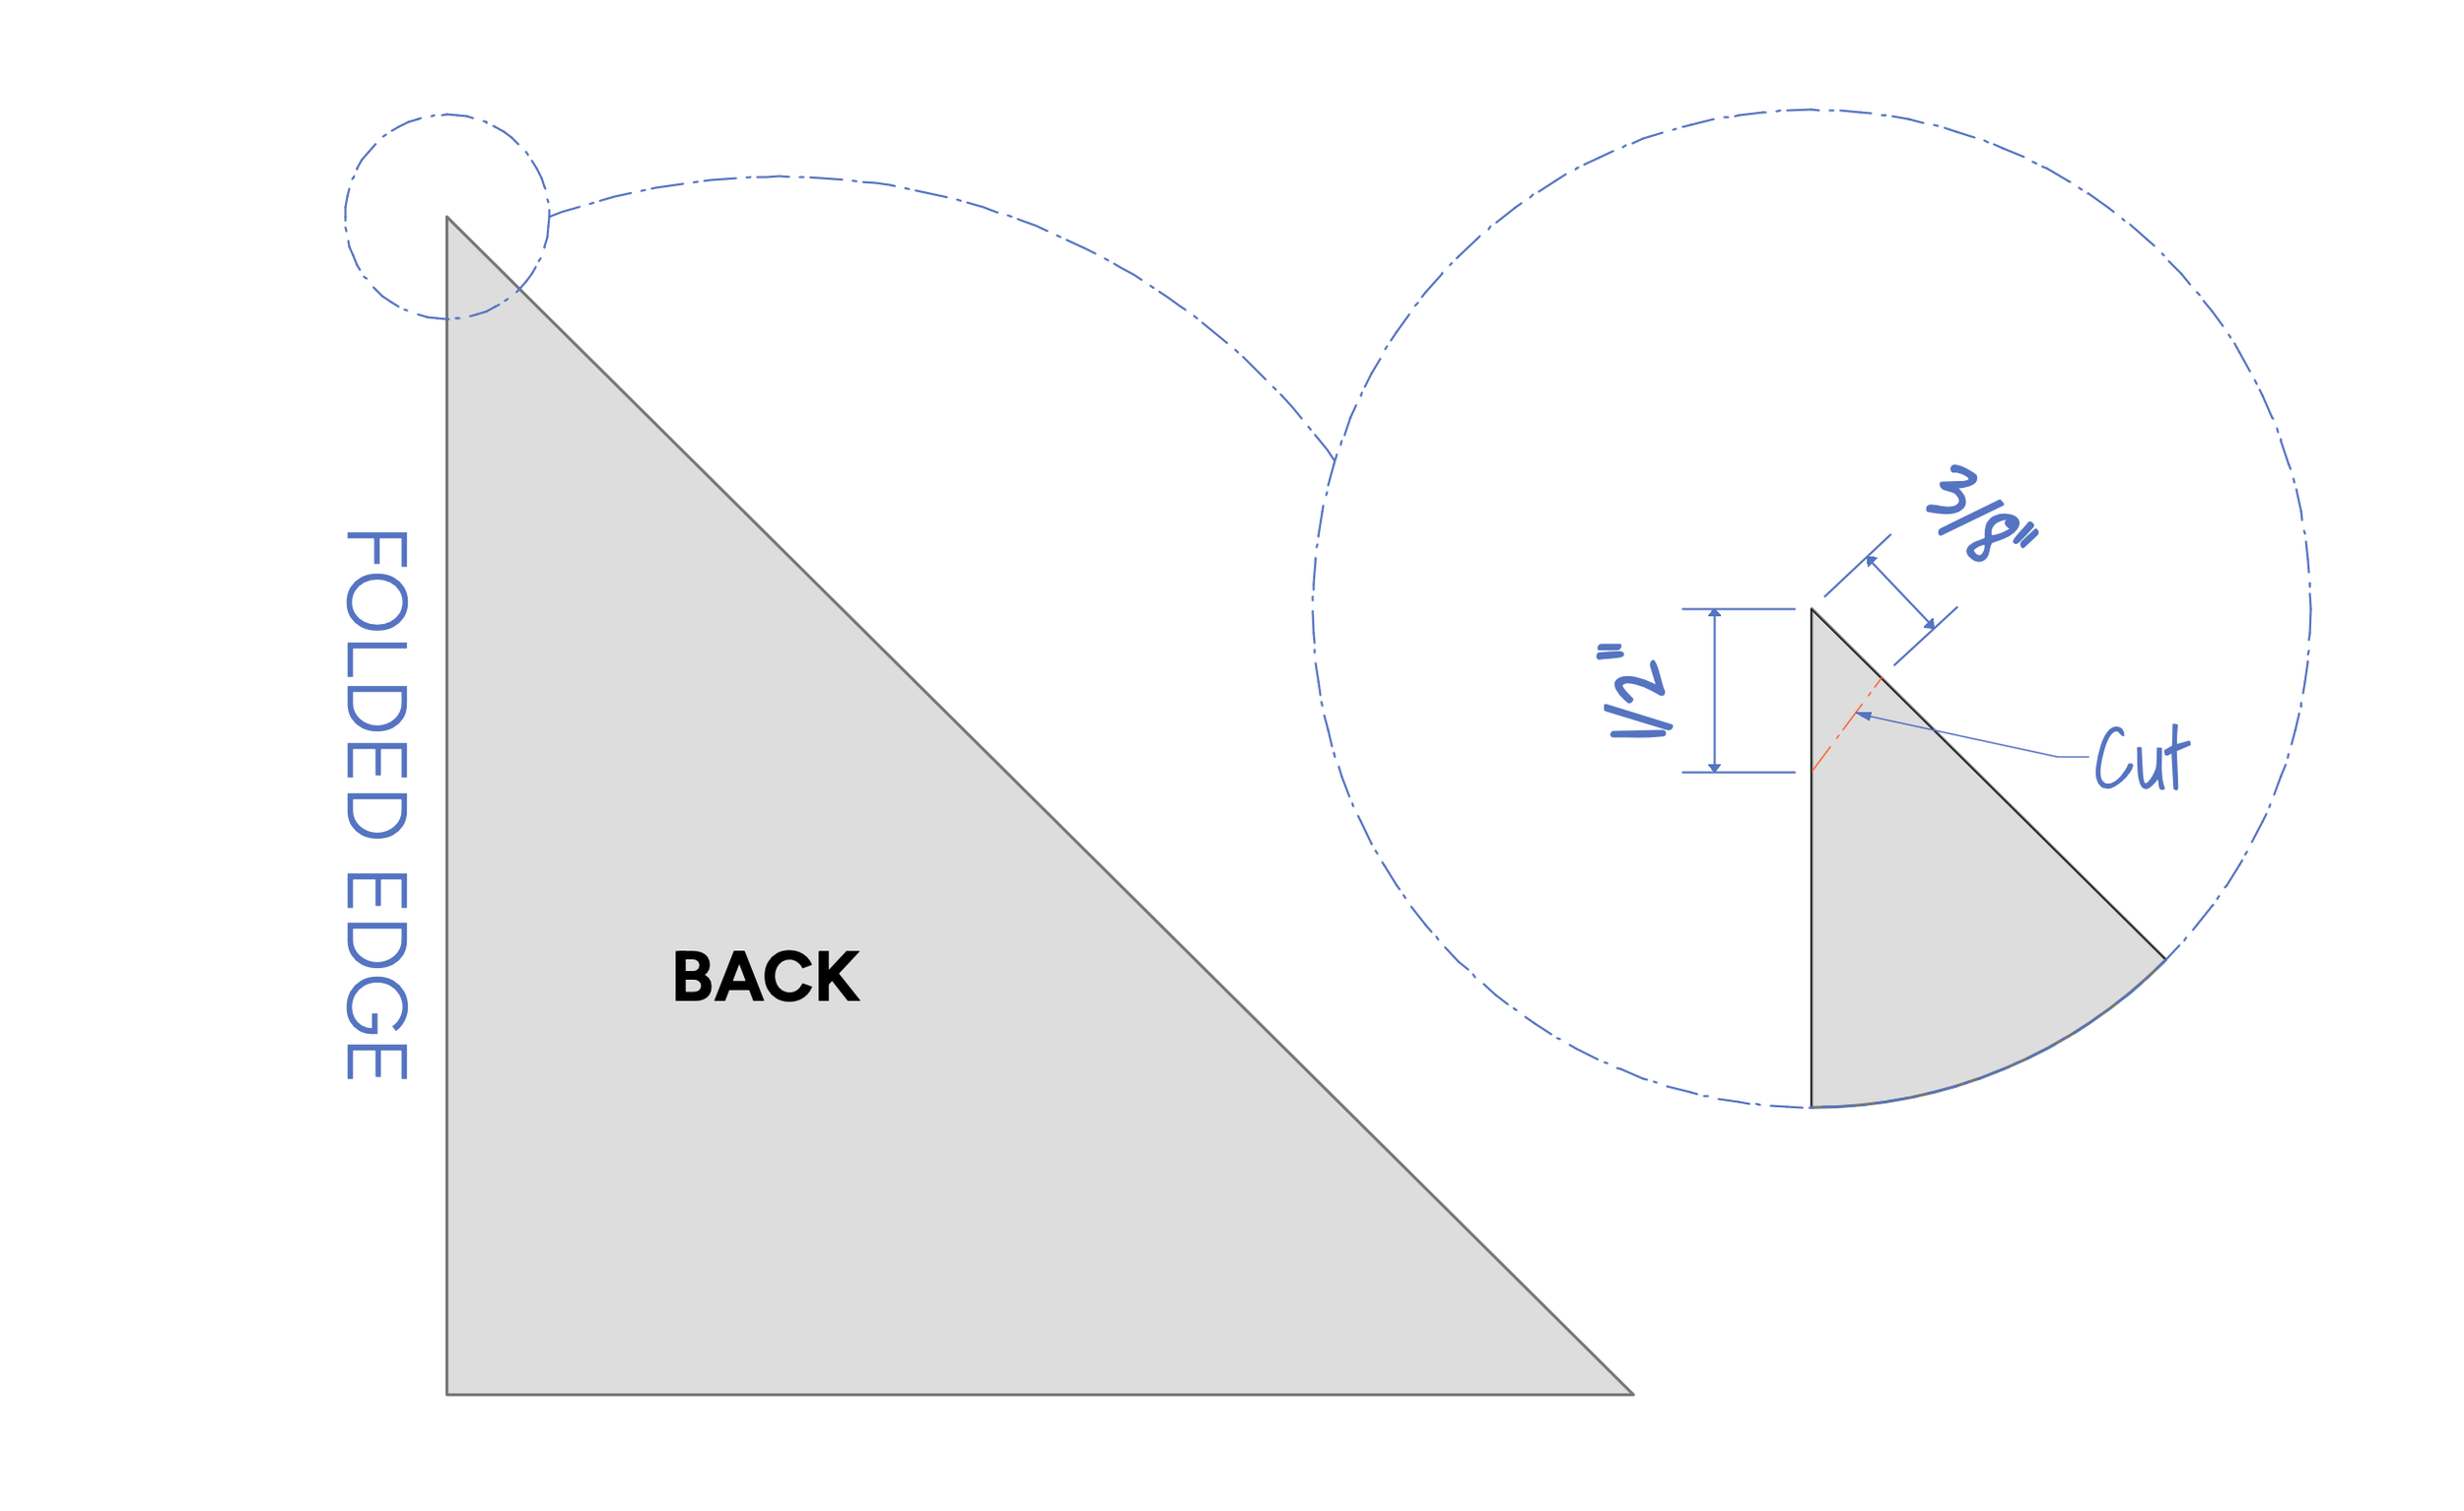
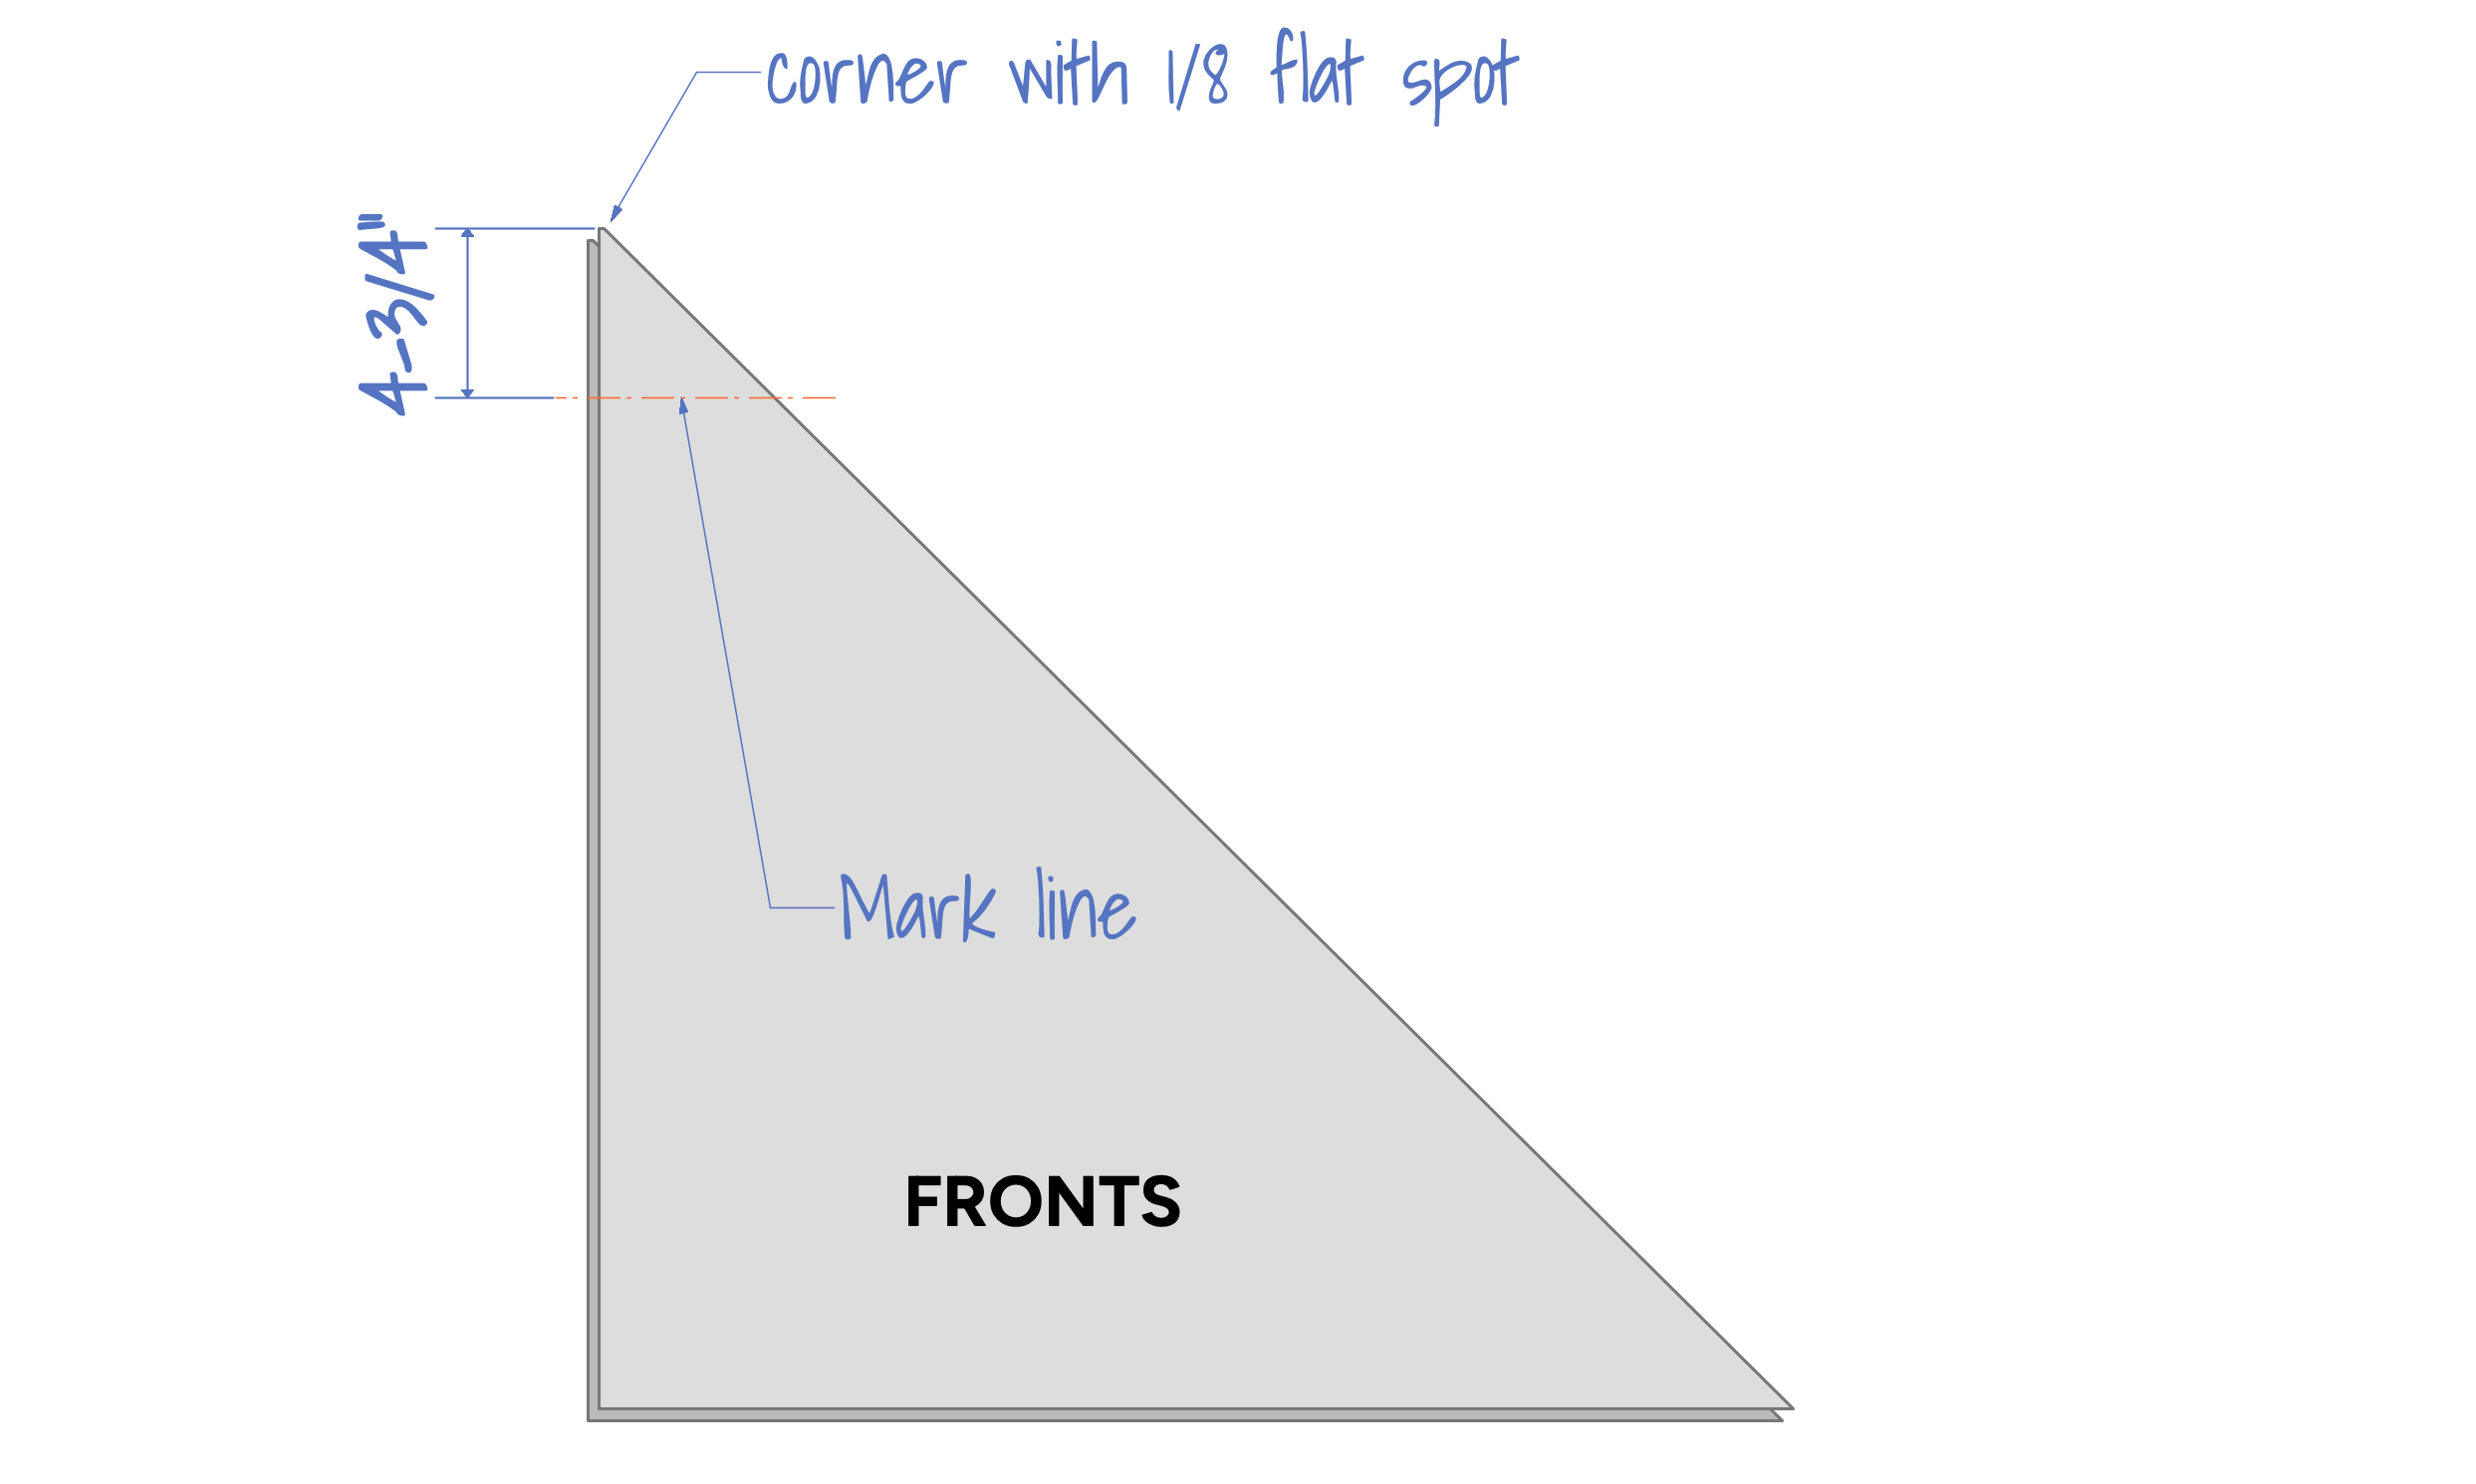
Take the front panels and measure 4-¾” down from the corners with the ⅛” flat spot. Mark a line square to the edge as shown.
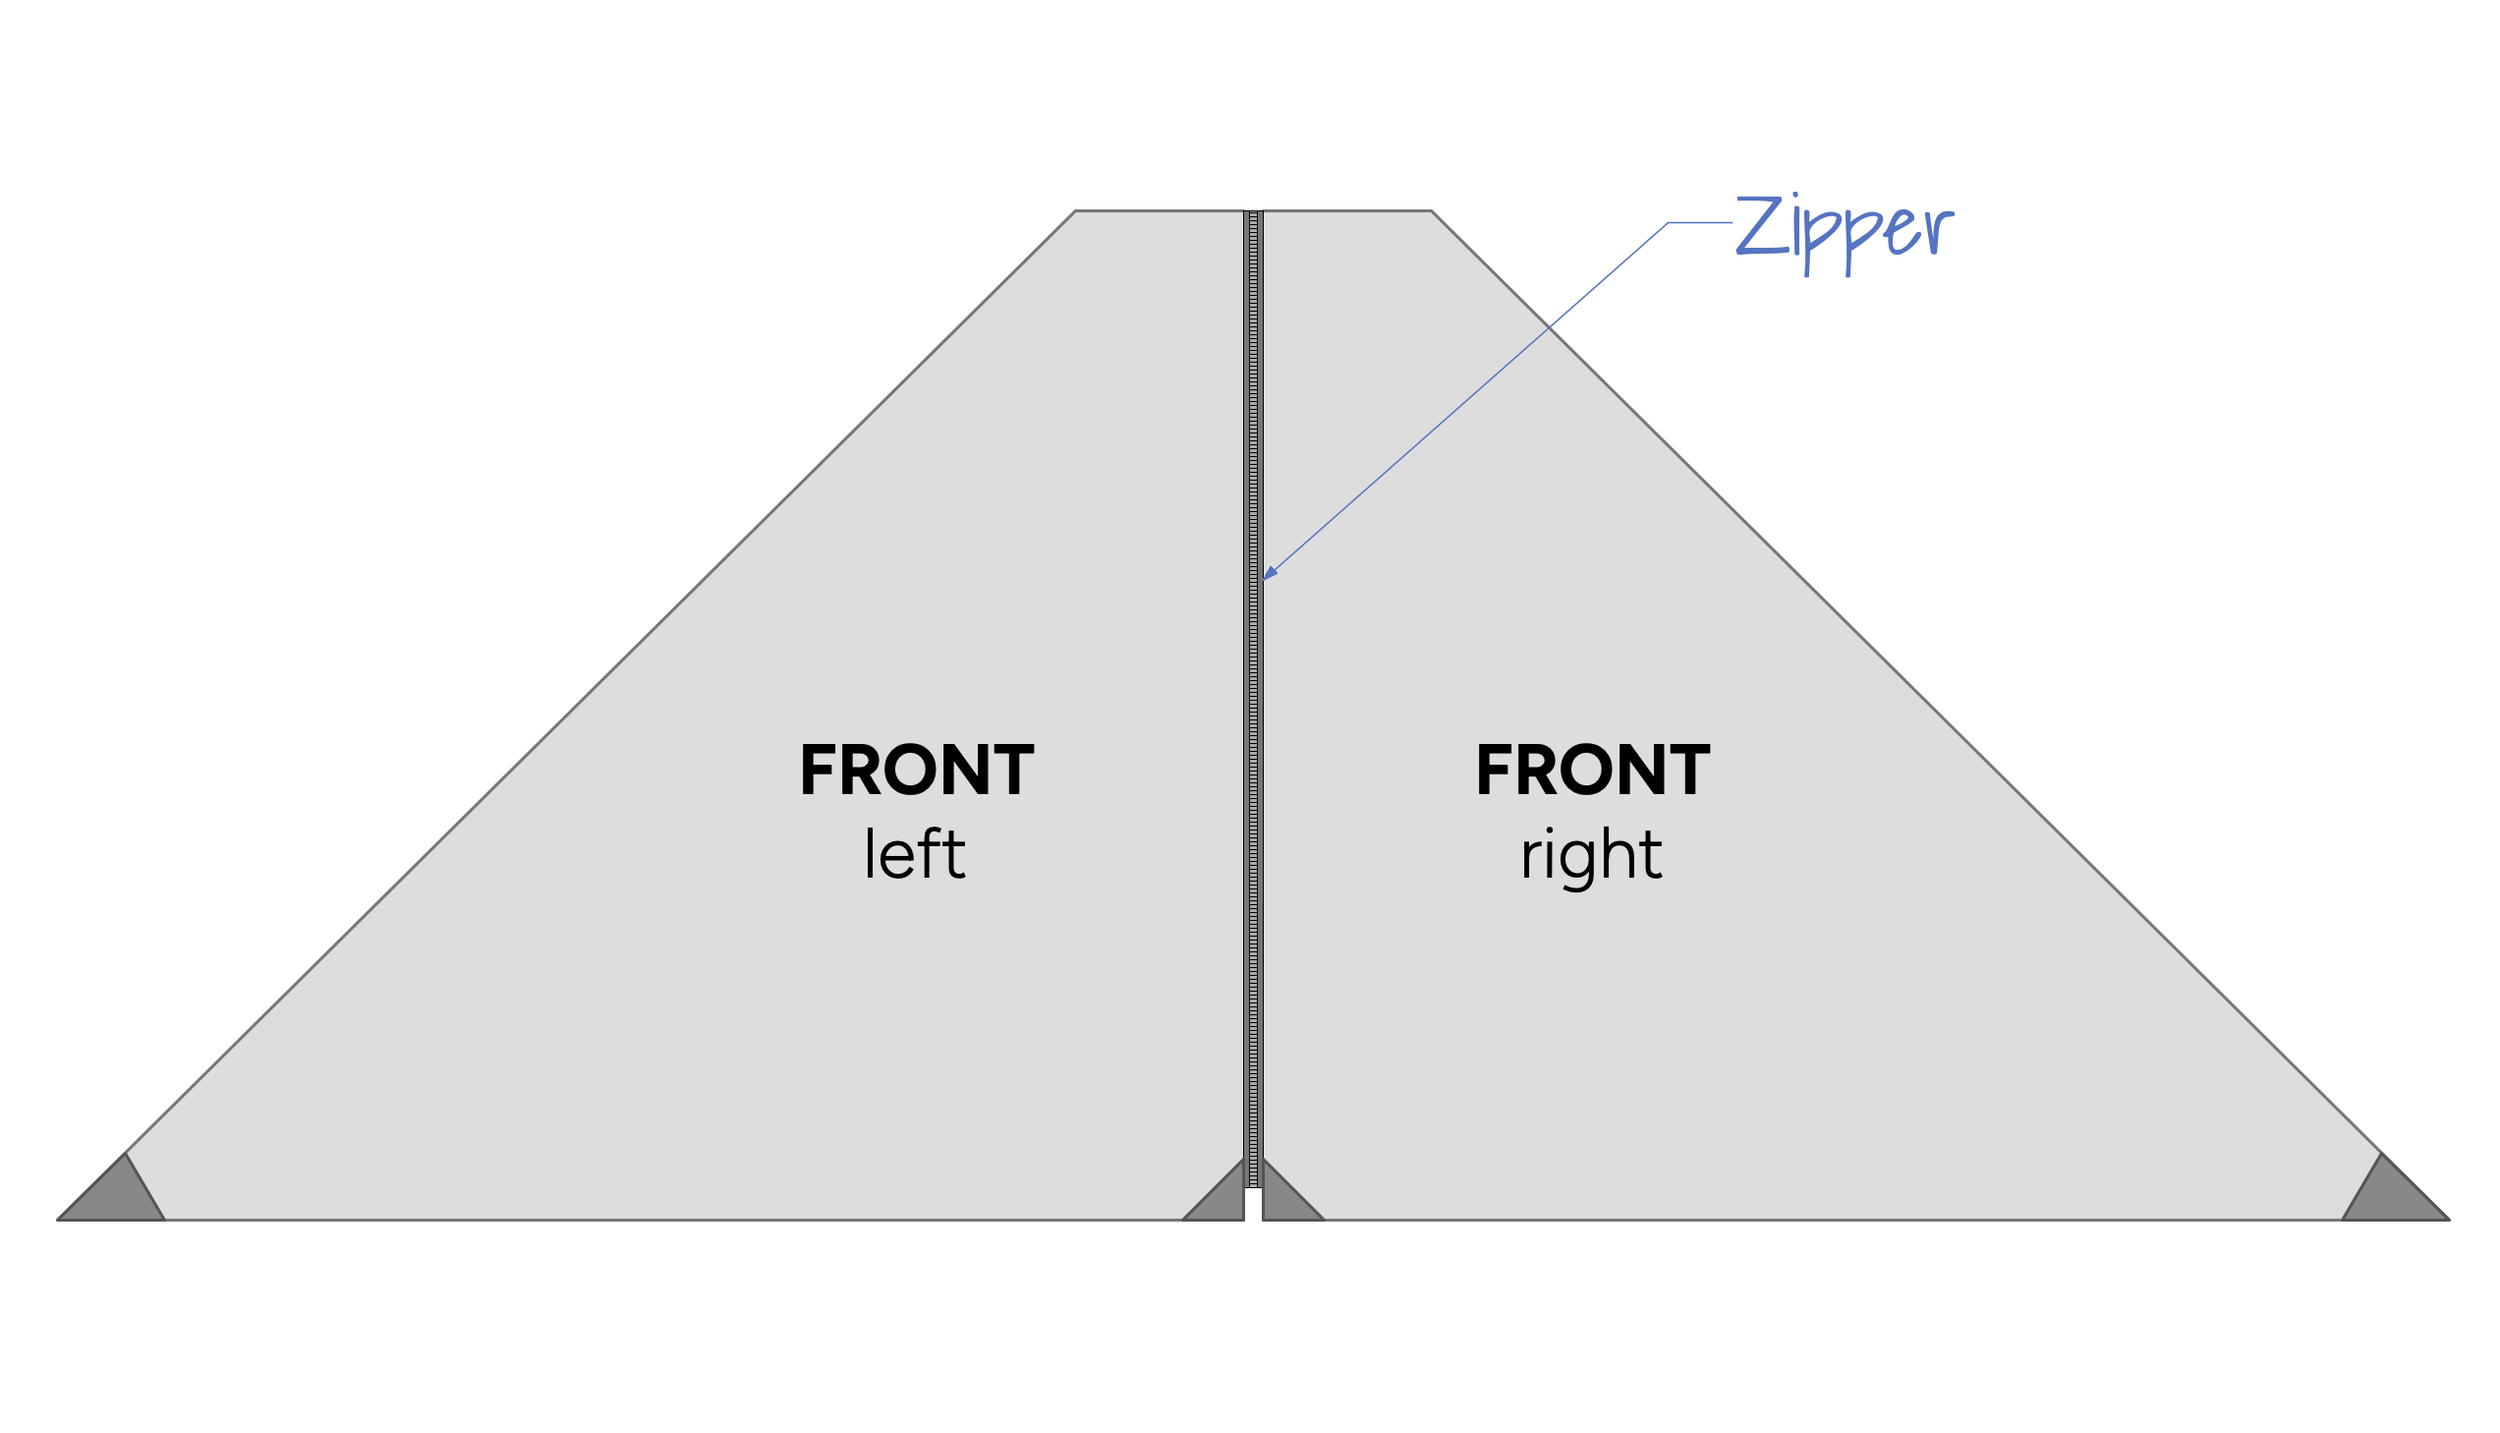
Trim the parts on the line as shown. This will finish the shape of the front panels. There should be a left and a right part as shown.
Cutting out the sides:
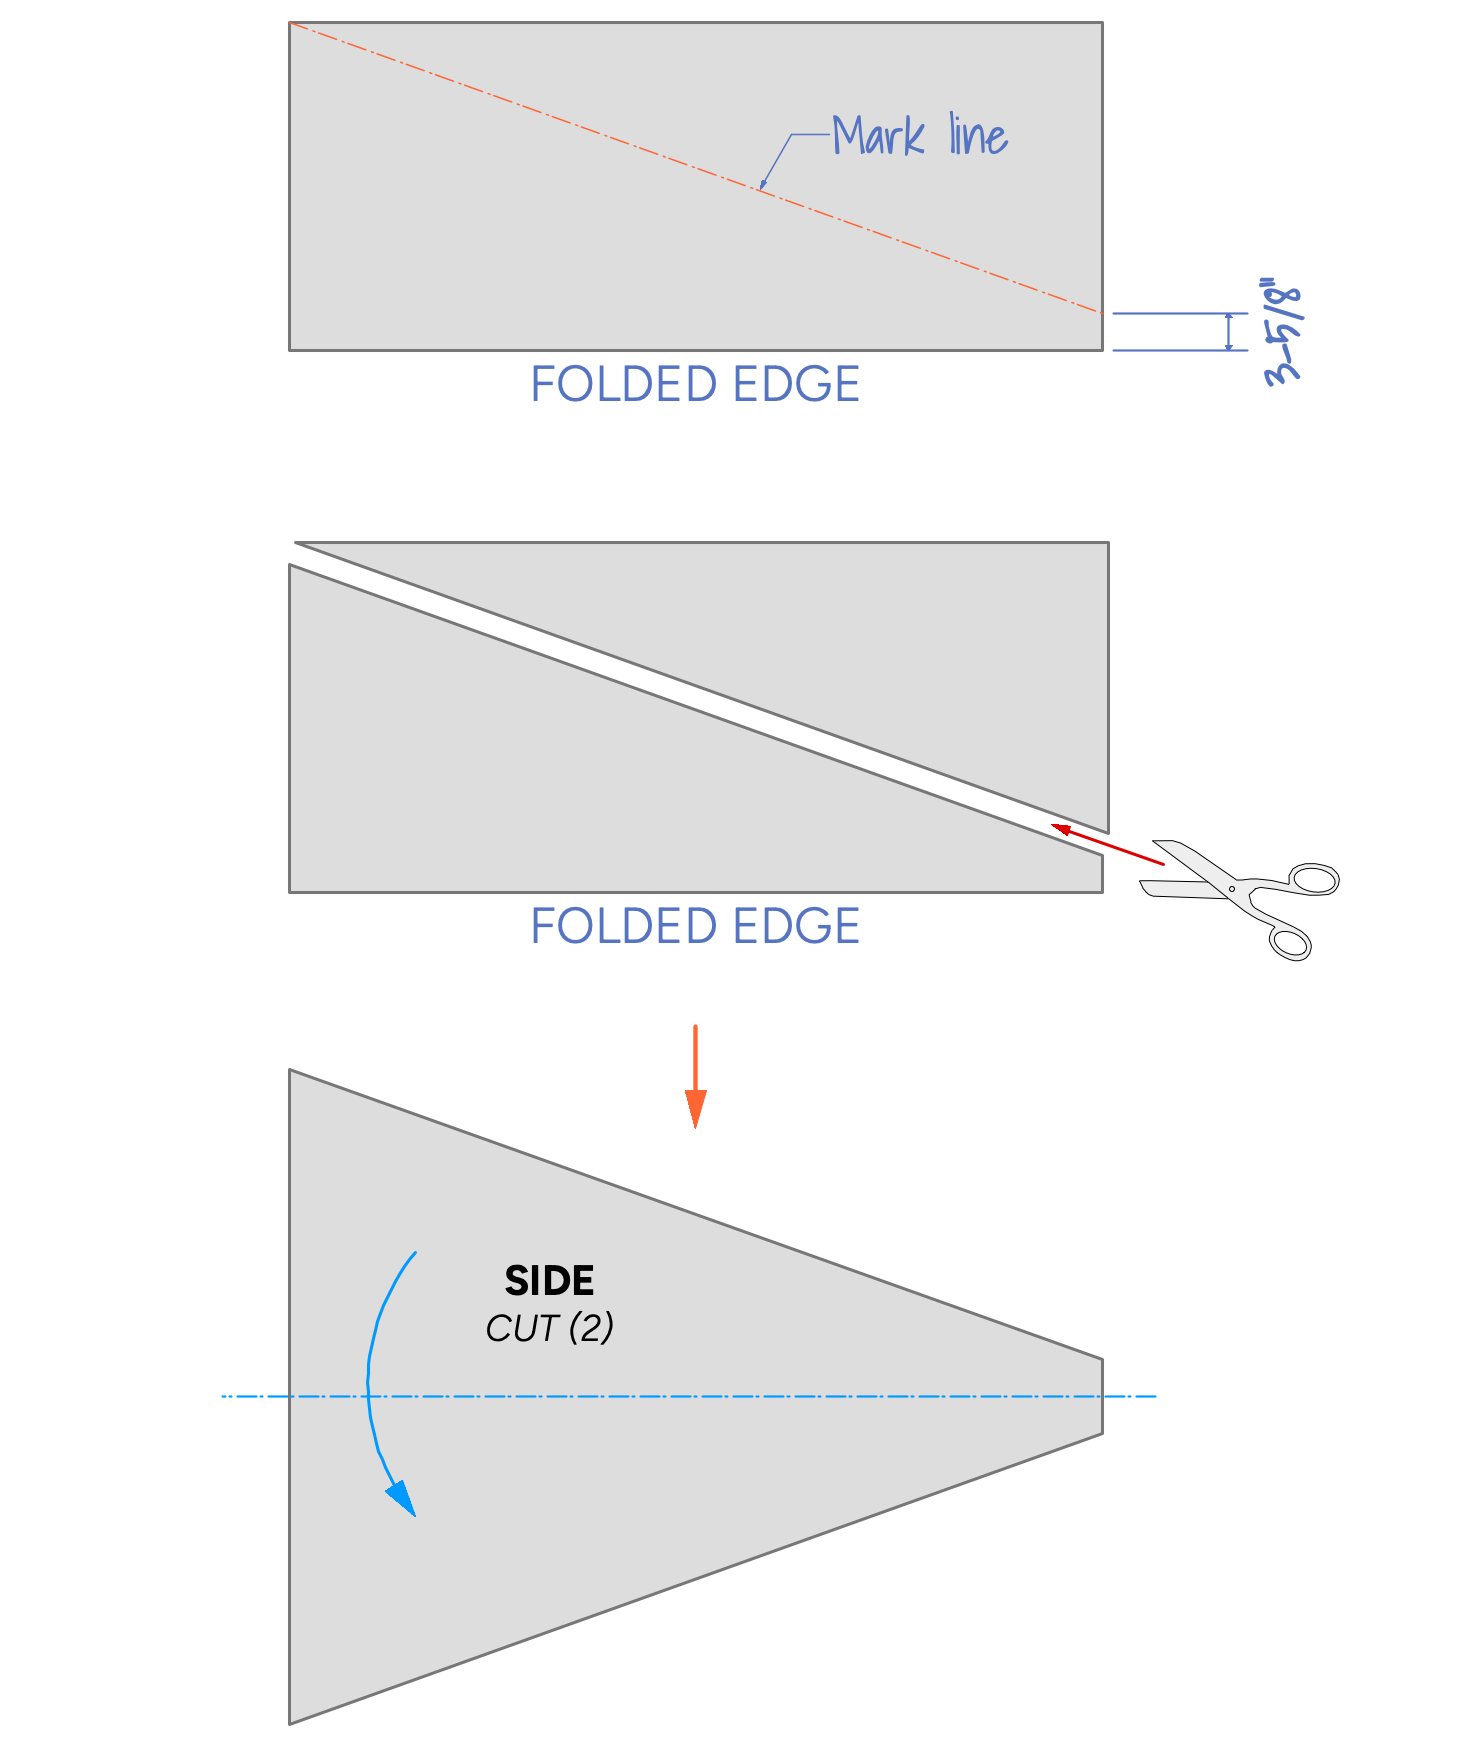
Begin by cutting a rectangle 68-⅝” x 55-⅜”. Fold the rectangle in half so that the long sides meet as shown below.
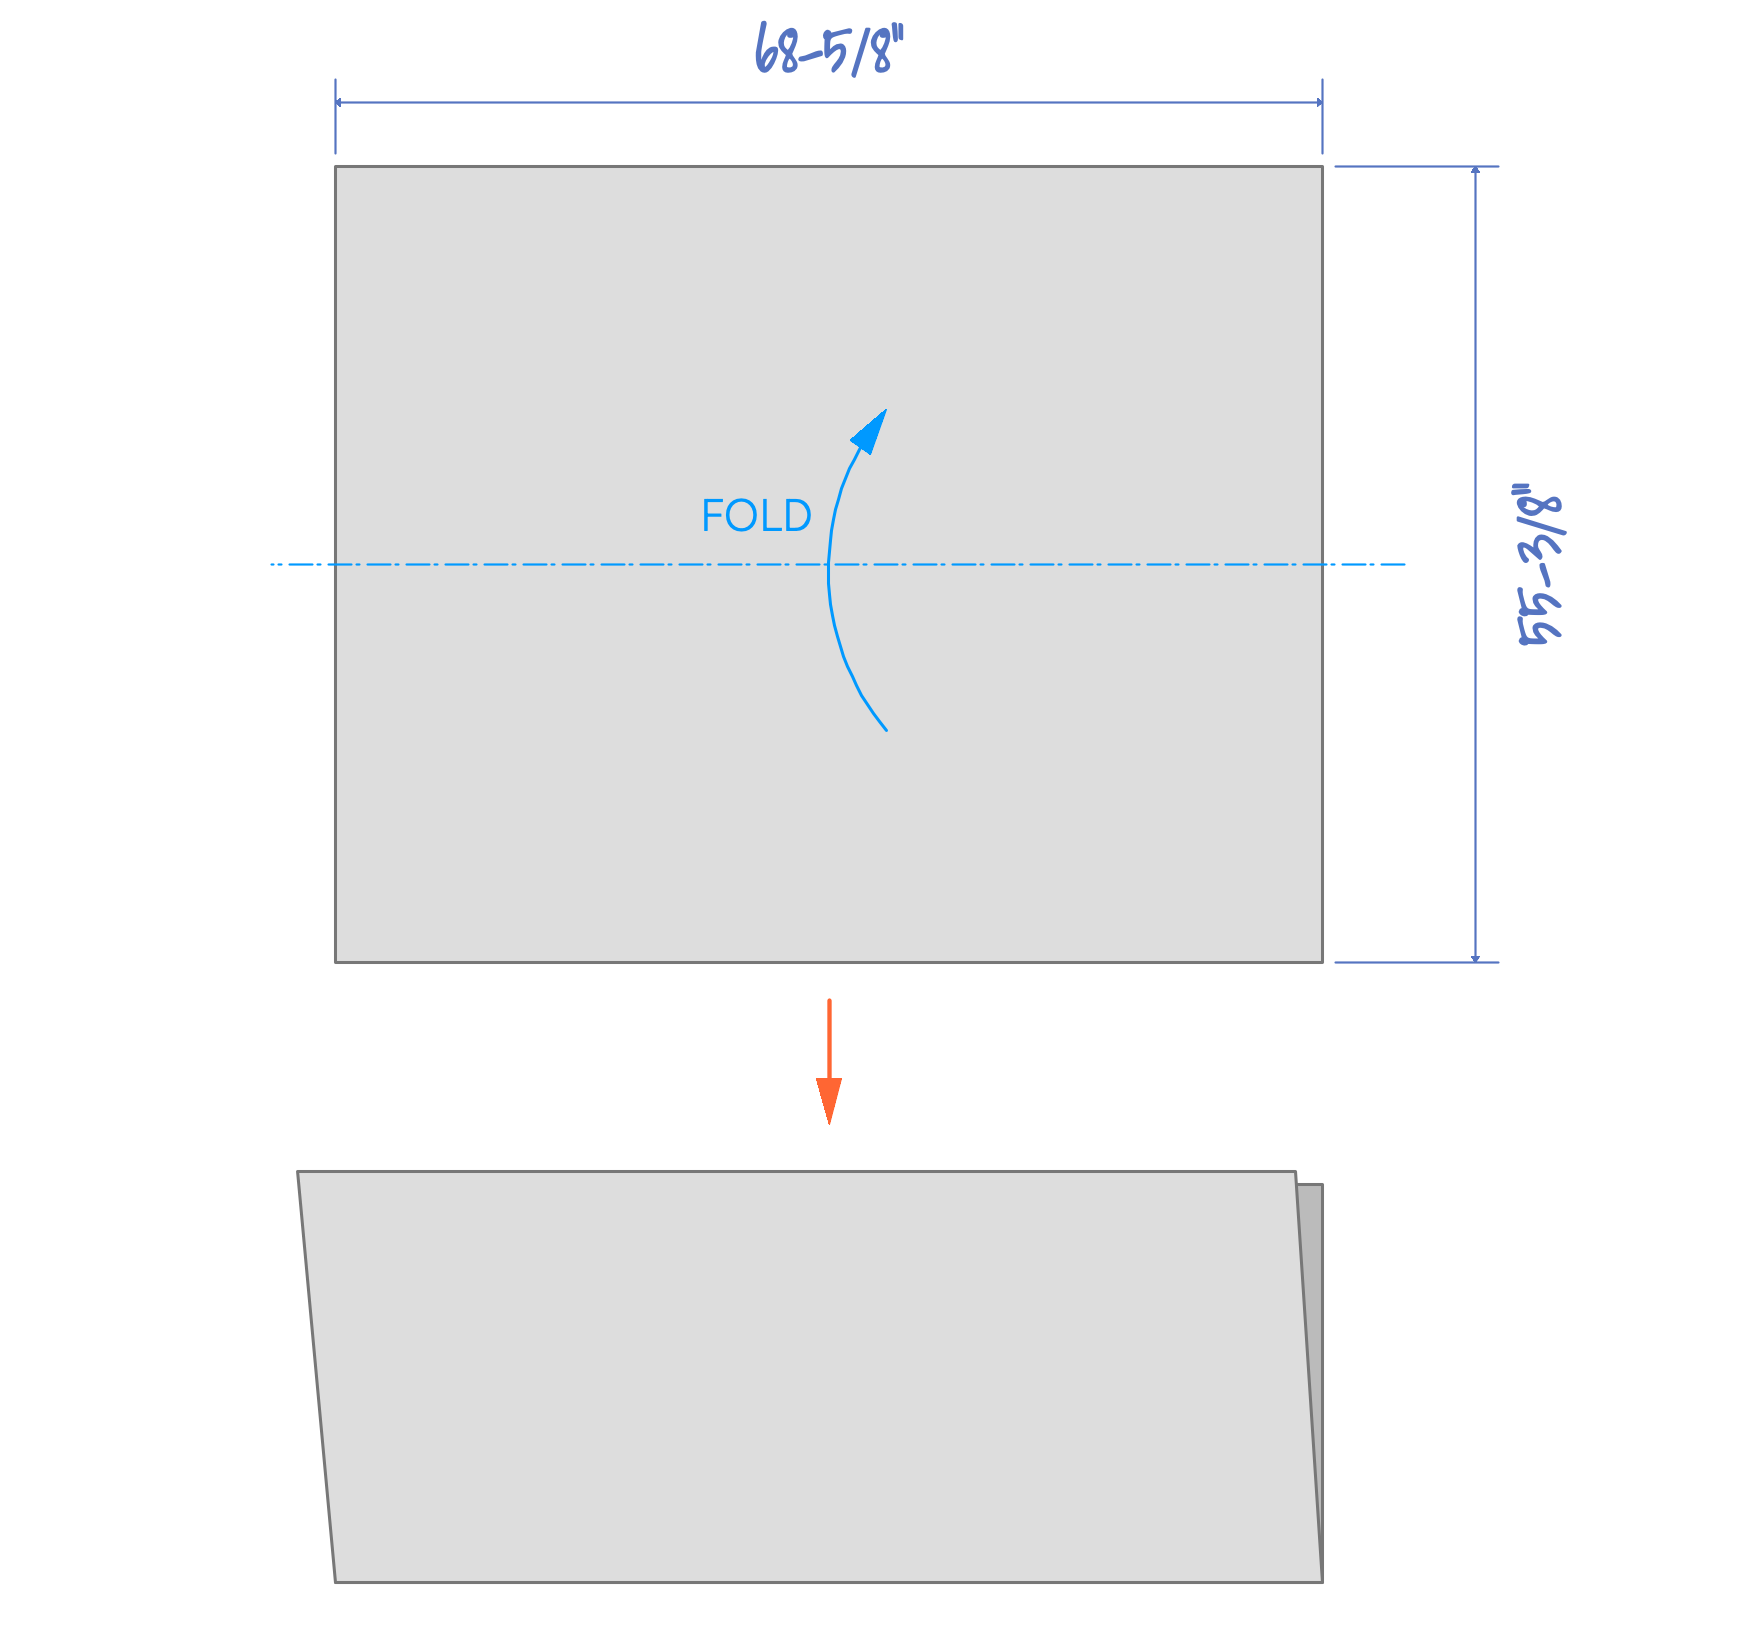
On one end, measure 3-⅝” up from the folded edge as shown and make a mark. Mark a line from the opposite corners to the mark as shown below. Cut along this line. The unfolded part is one of the side panels. You will need to cut 2 sides.
Cutting the door top panel:
Cut a rectangle of fabric 12” x 6”. Fold the fabric in half so that short sides are aligned as shown below. Make a mark 1/4” down from the top on the folded edge as shown. Make a second mark 1/8” in from the right side as shown and mark a line between the two points. Cut along the marked line as shown.
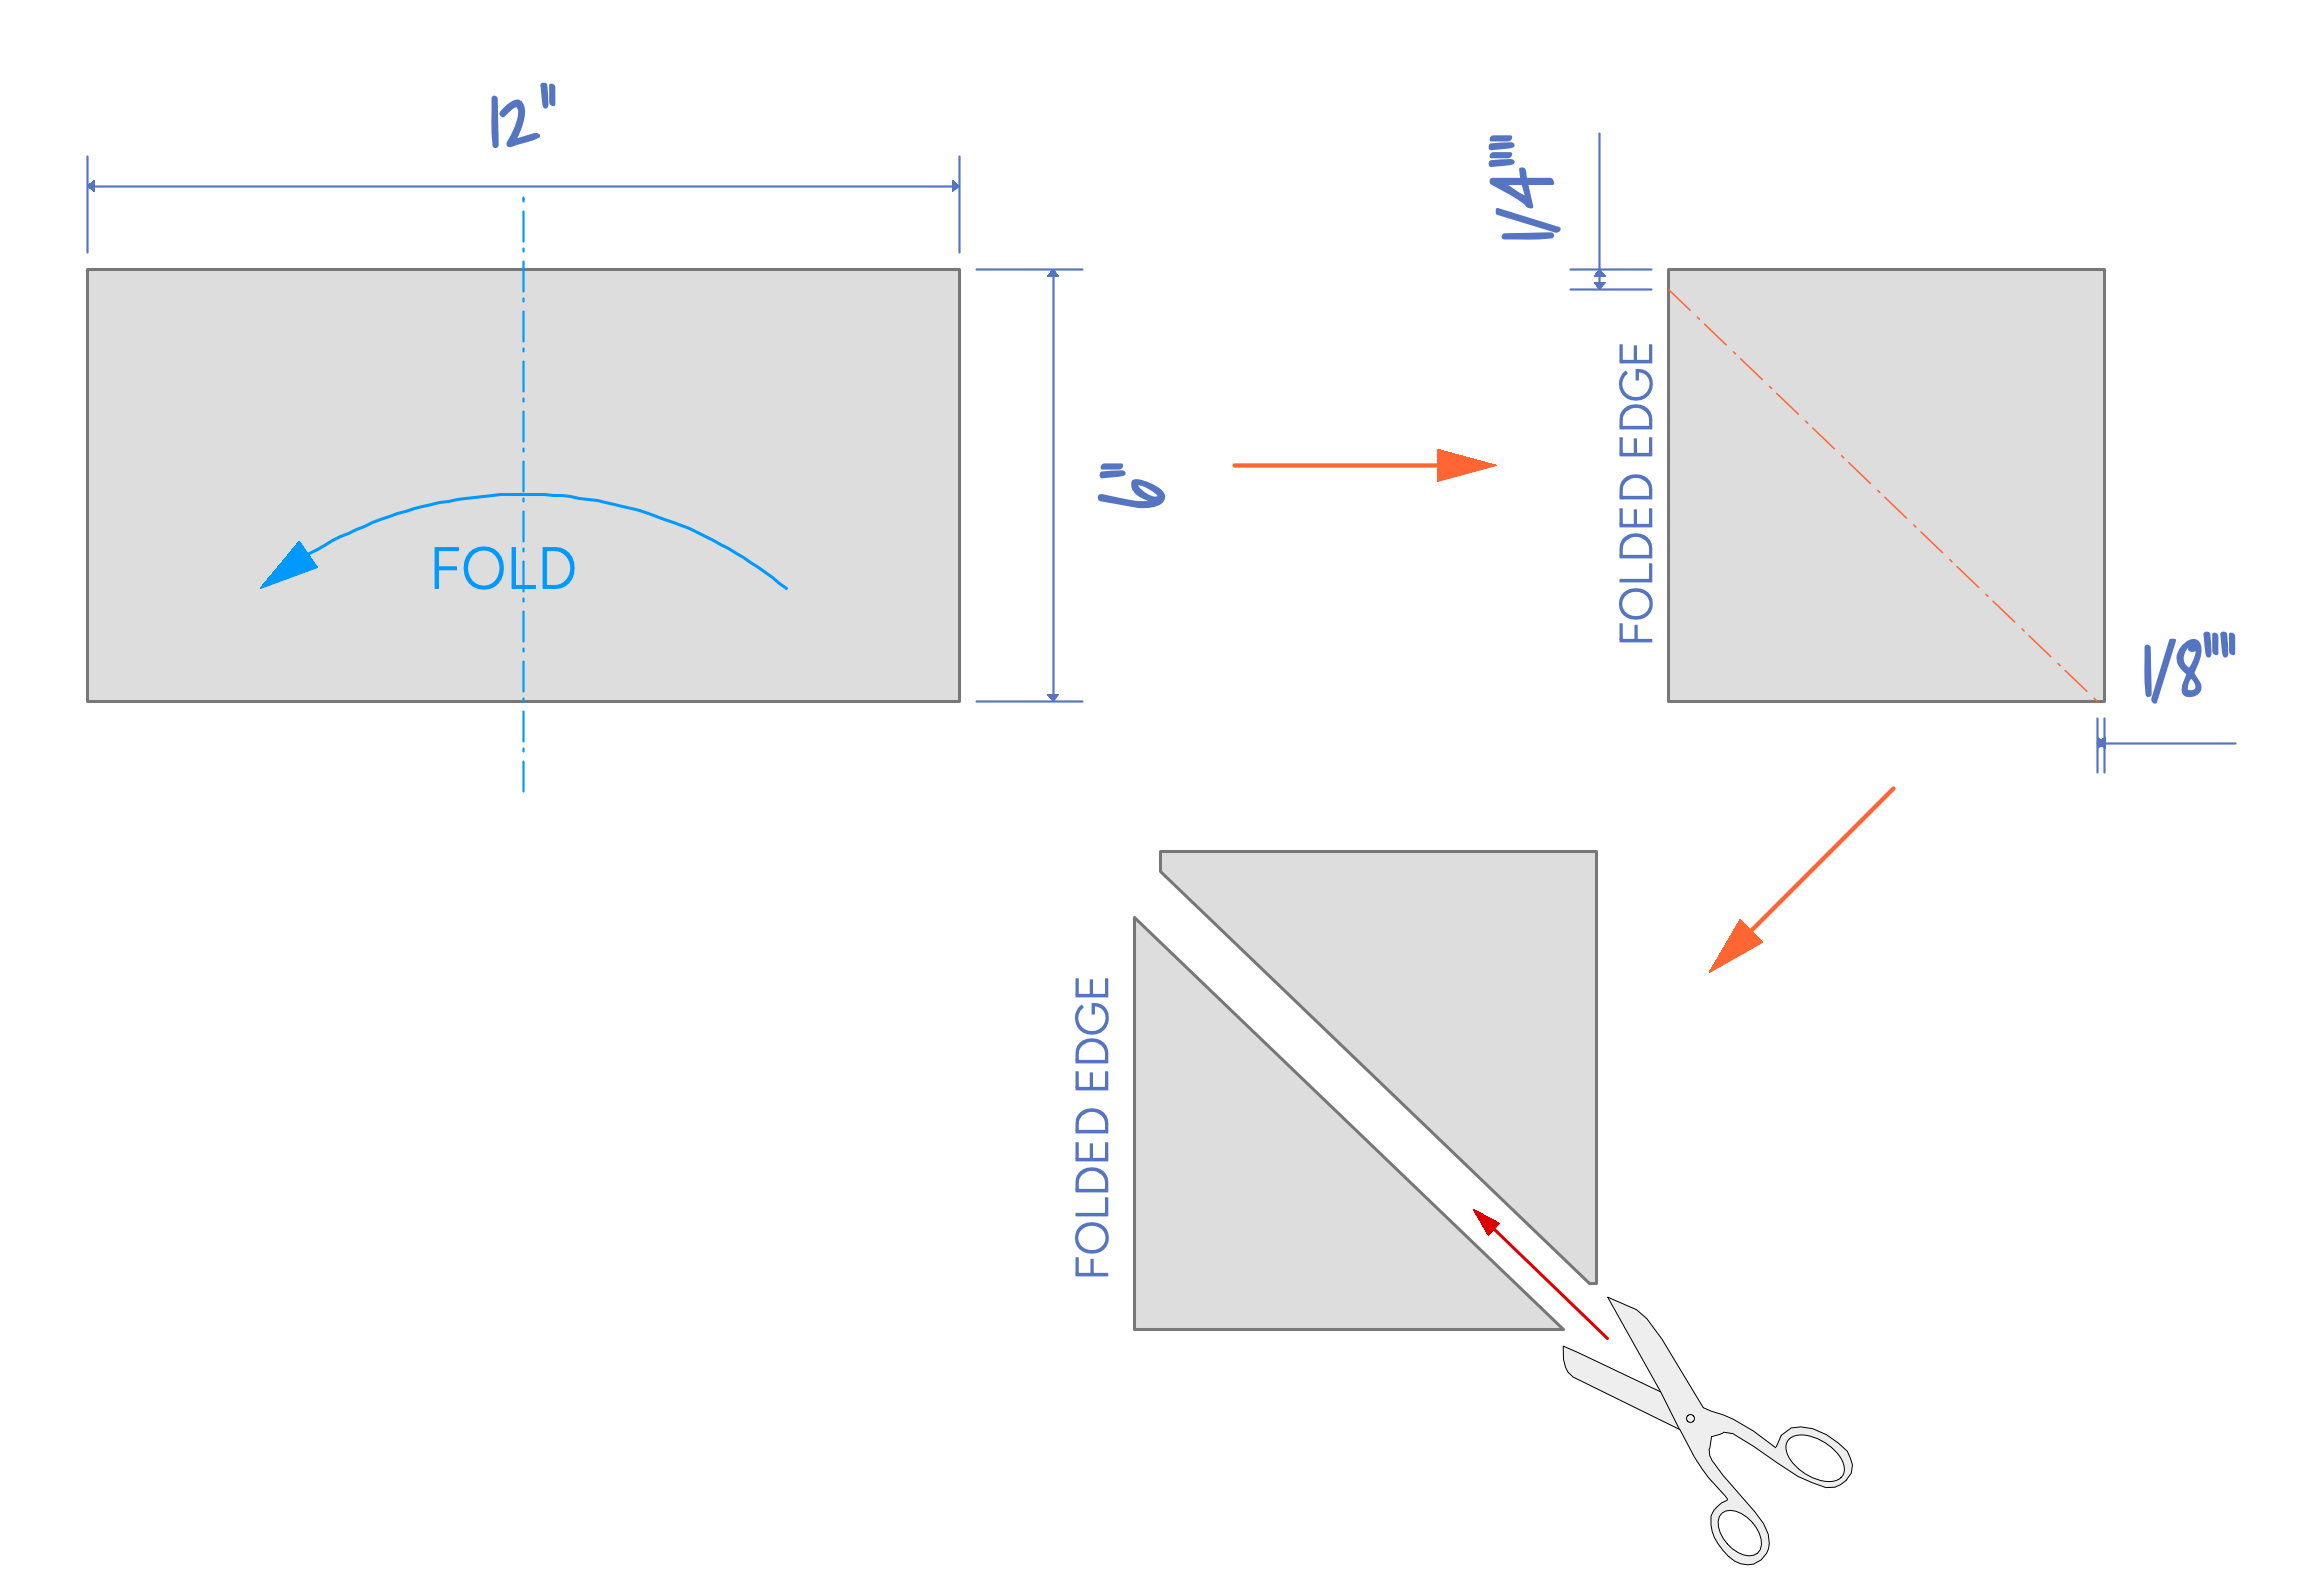
With the door top panel still folded in half, mark and cut the top corner as shown. When unfolded the door top panel should look as shown below.
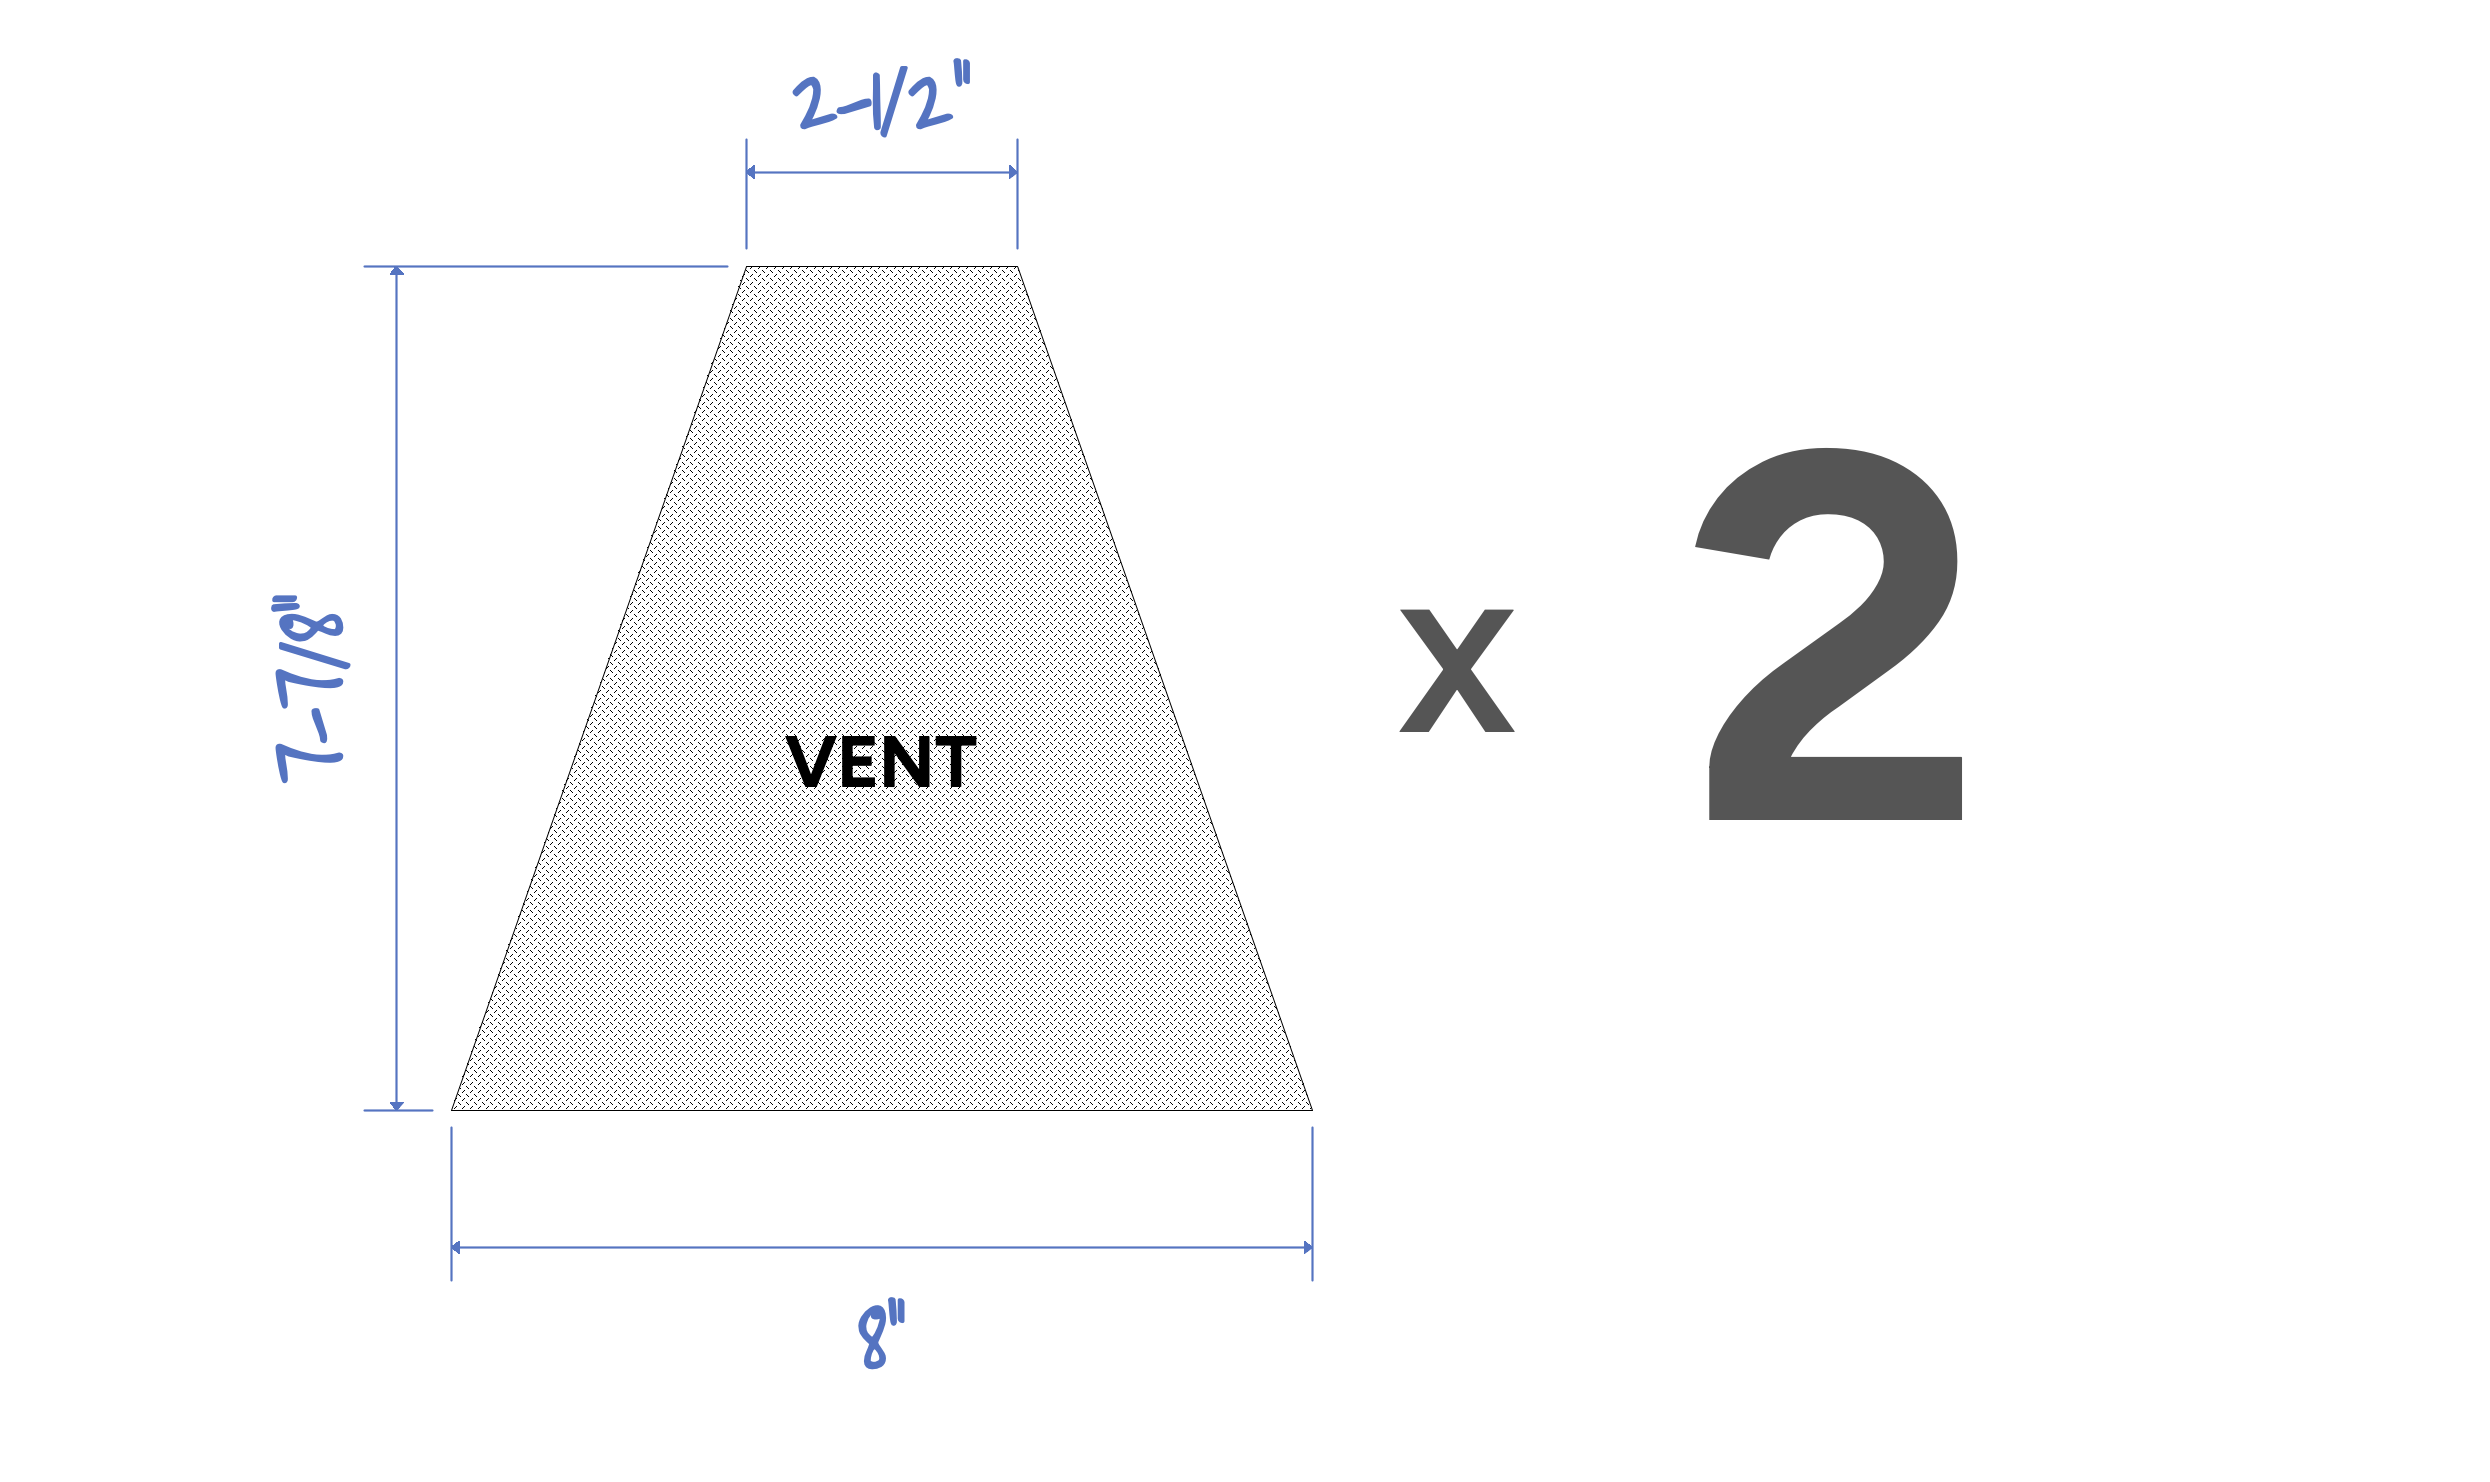
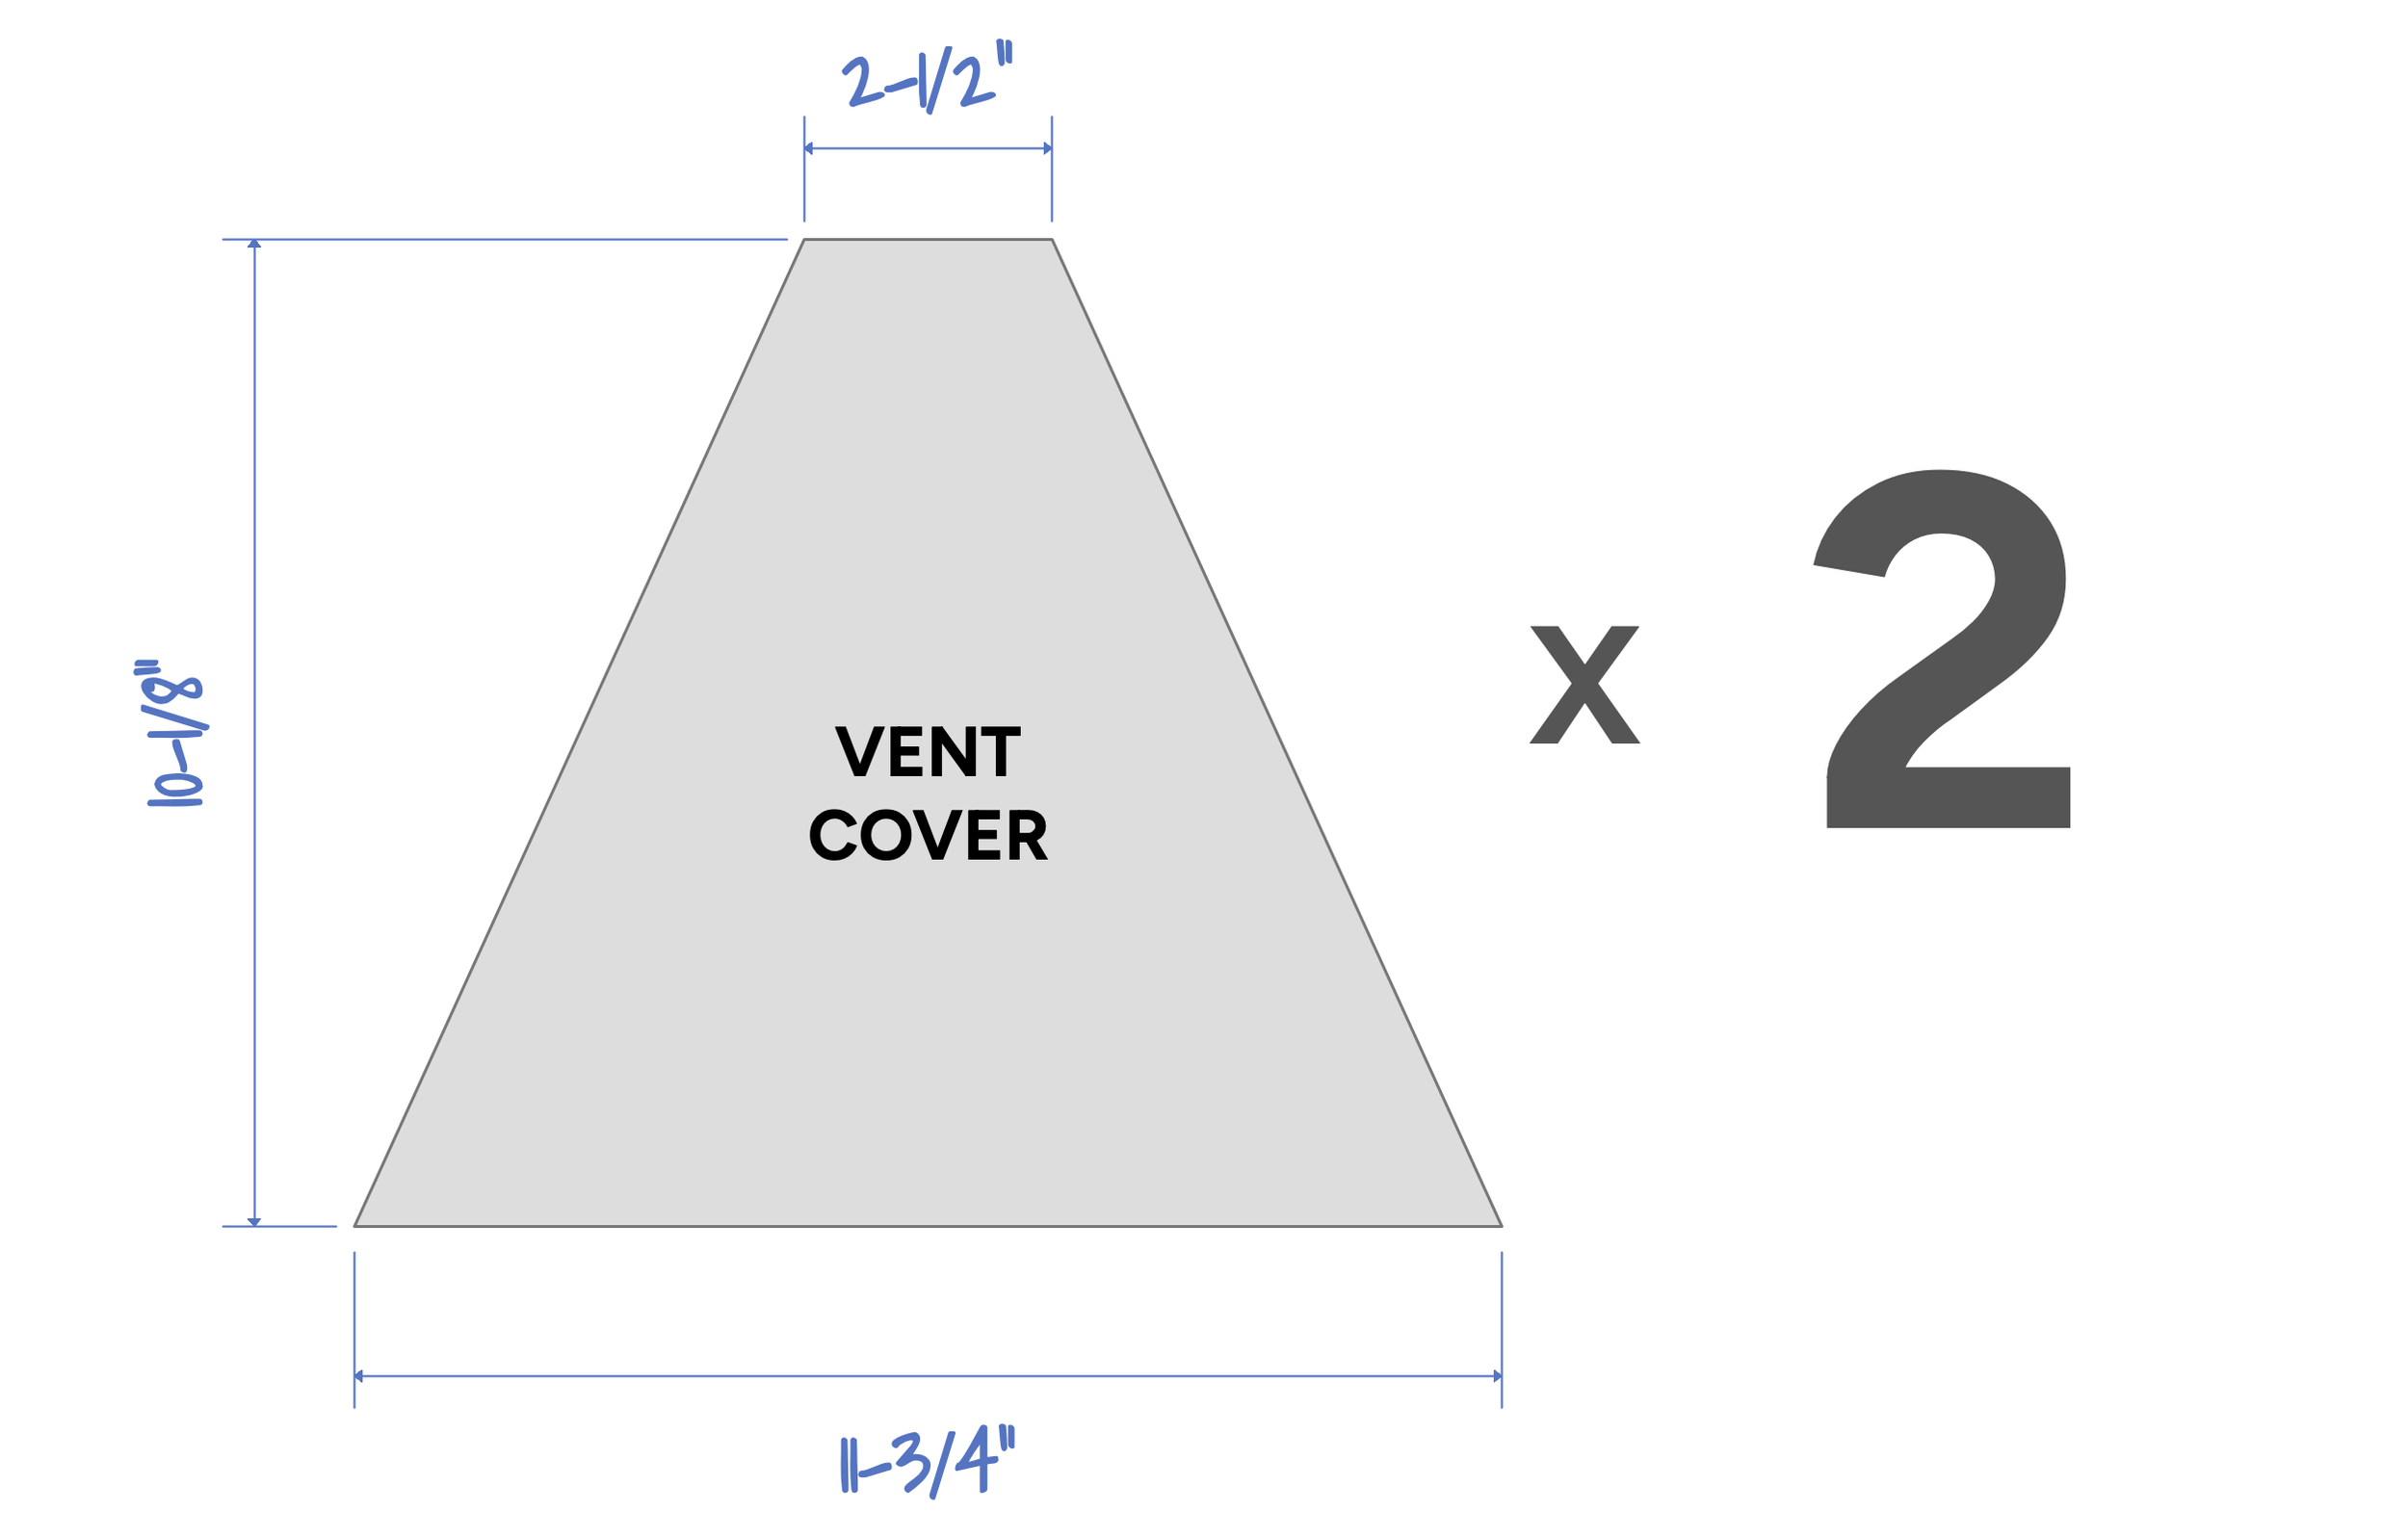
Cutting the vents and vent covers:
Cut the vents from No-see-um netting to the dimensions shown. Two vents are needed.
Cut the vent covers from the same fabric as the tent panels, to the dimensions shown. Two vent covers are needed.
Reinforcement patches:
The corners, and guy-out points are reinforced with a second layer of fabric. It can be the same fabric used for the rest of the tent or a contrasting fabric. For this project I wanted to avoid the extra bulk and steps of folding a hem on the reinforcement patches. Instead I cut out the patches using a soldering iron, heat sealing the edges in the process. Time will tell if the edges start to unravel, but as of now they seem to be holding up well, and I much prefer the less bulky patches.
See the dimensions of the different patches below. Take special note of which edges align with the edges of the tarp. It’s easy to mix them up. Also take note of the left and right versions that are needed.
If you decided to put hems on the interior edges of your patches, you'll need to remember to add material for the hem.
Side Panel Reinforcement Patches:
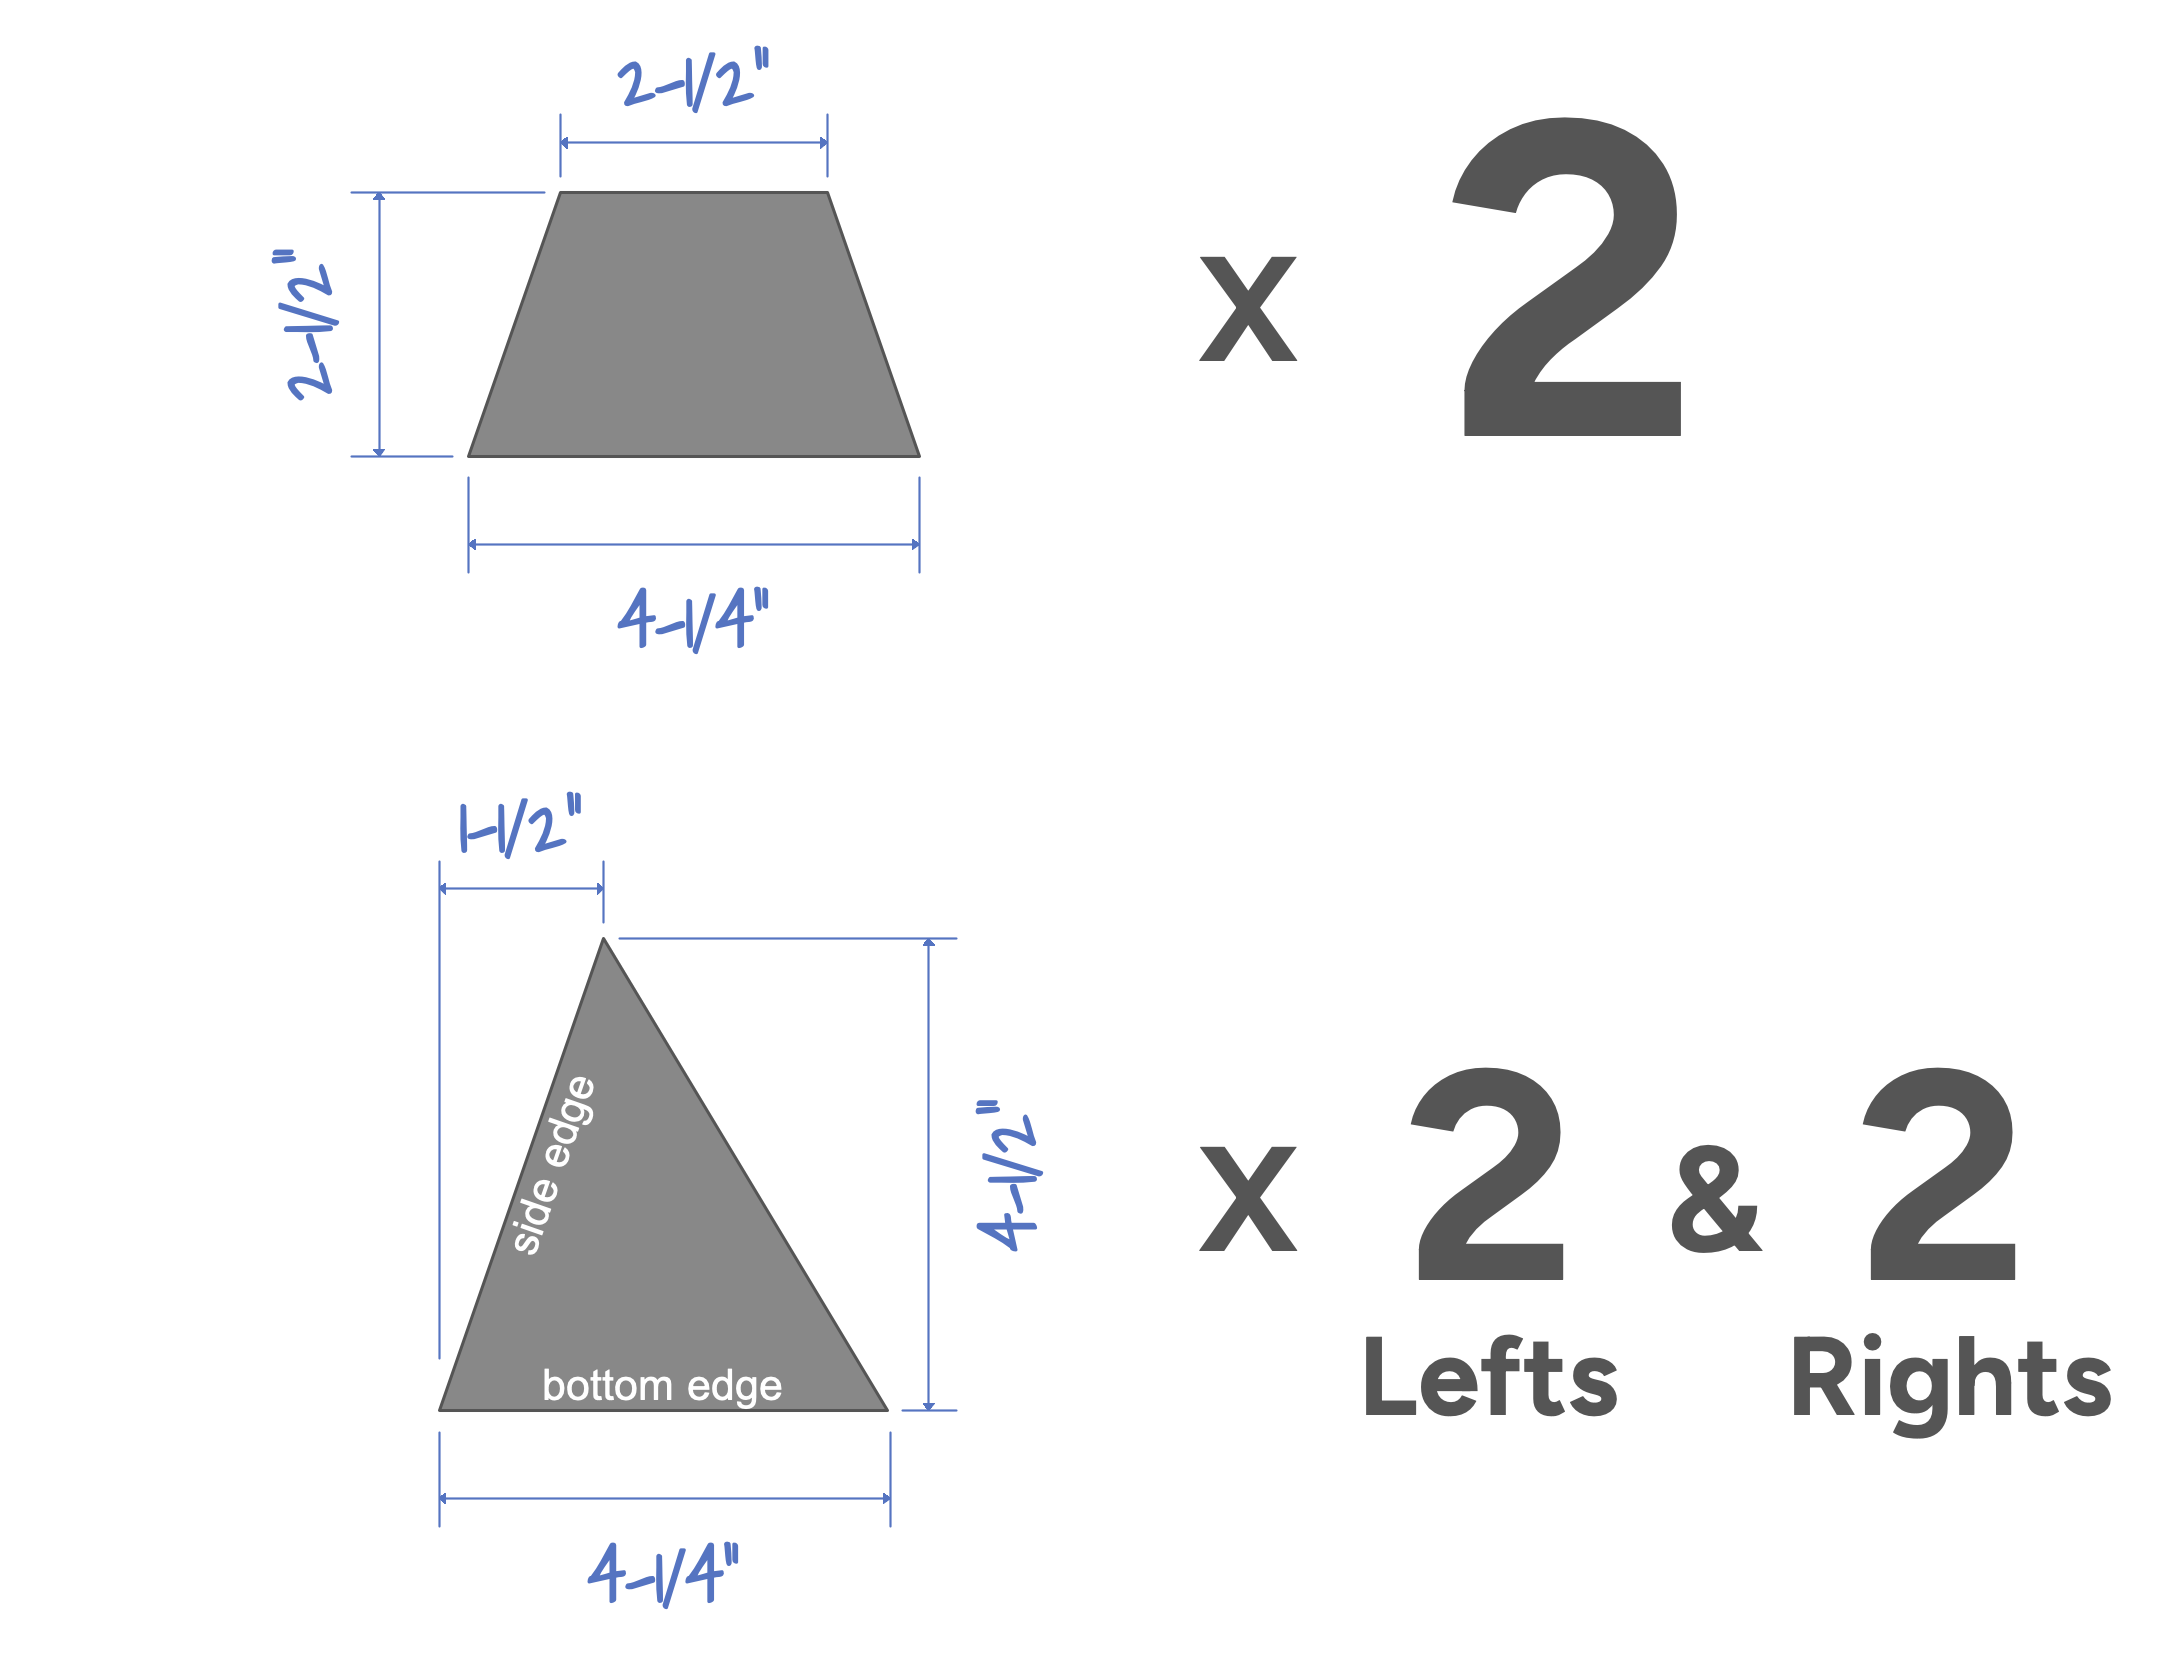
Front and Back Panel Reinforcement Patches:
Preparing the back panel for assembly:
Stitch the reinforcement patches to the back panel as shown below. The edge of the patch that faces the interior of the panel should be stitched right next to the edge. The exterior edges can be stitched with a ¼” seam allowance. I found it helpful to use super 77 spray adhesive to hold the patches in place while stitching.
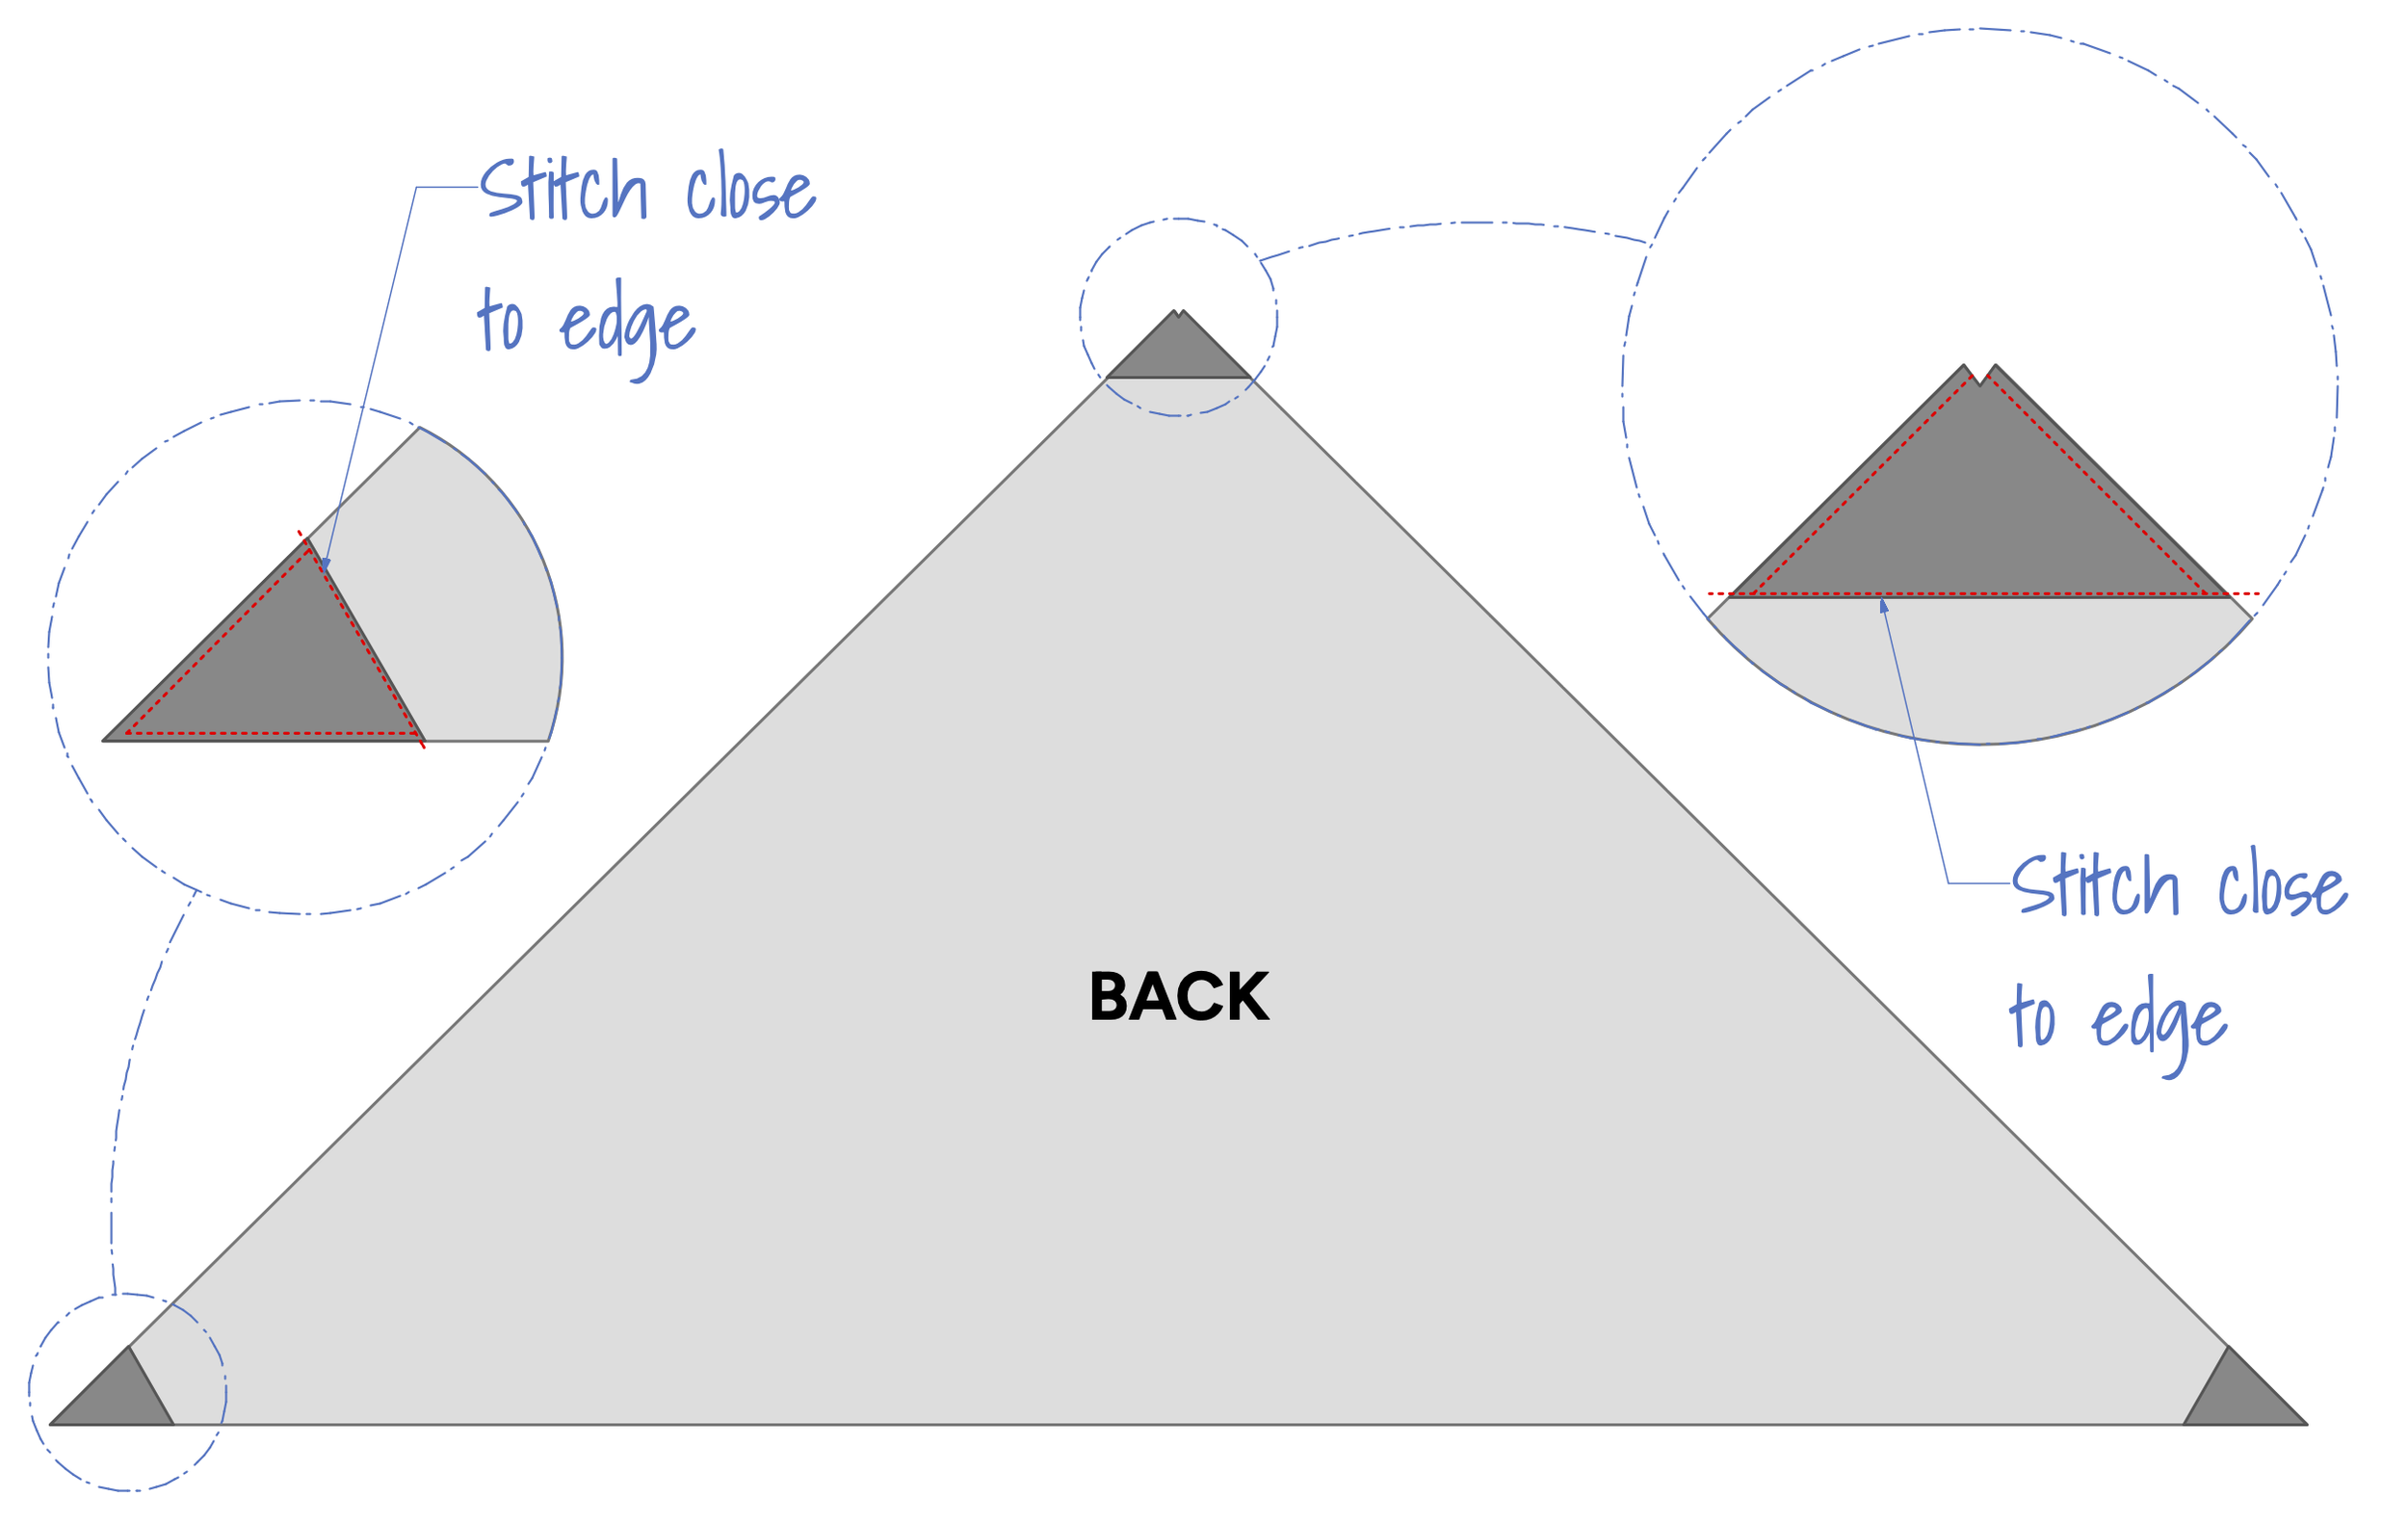
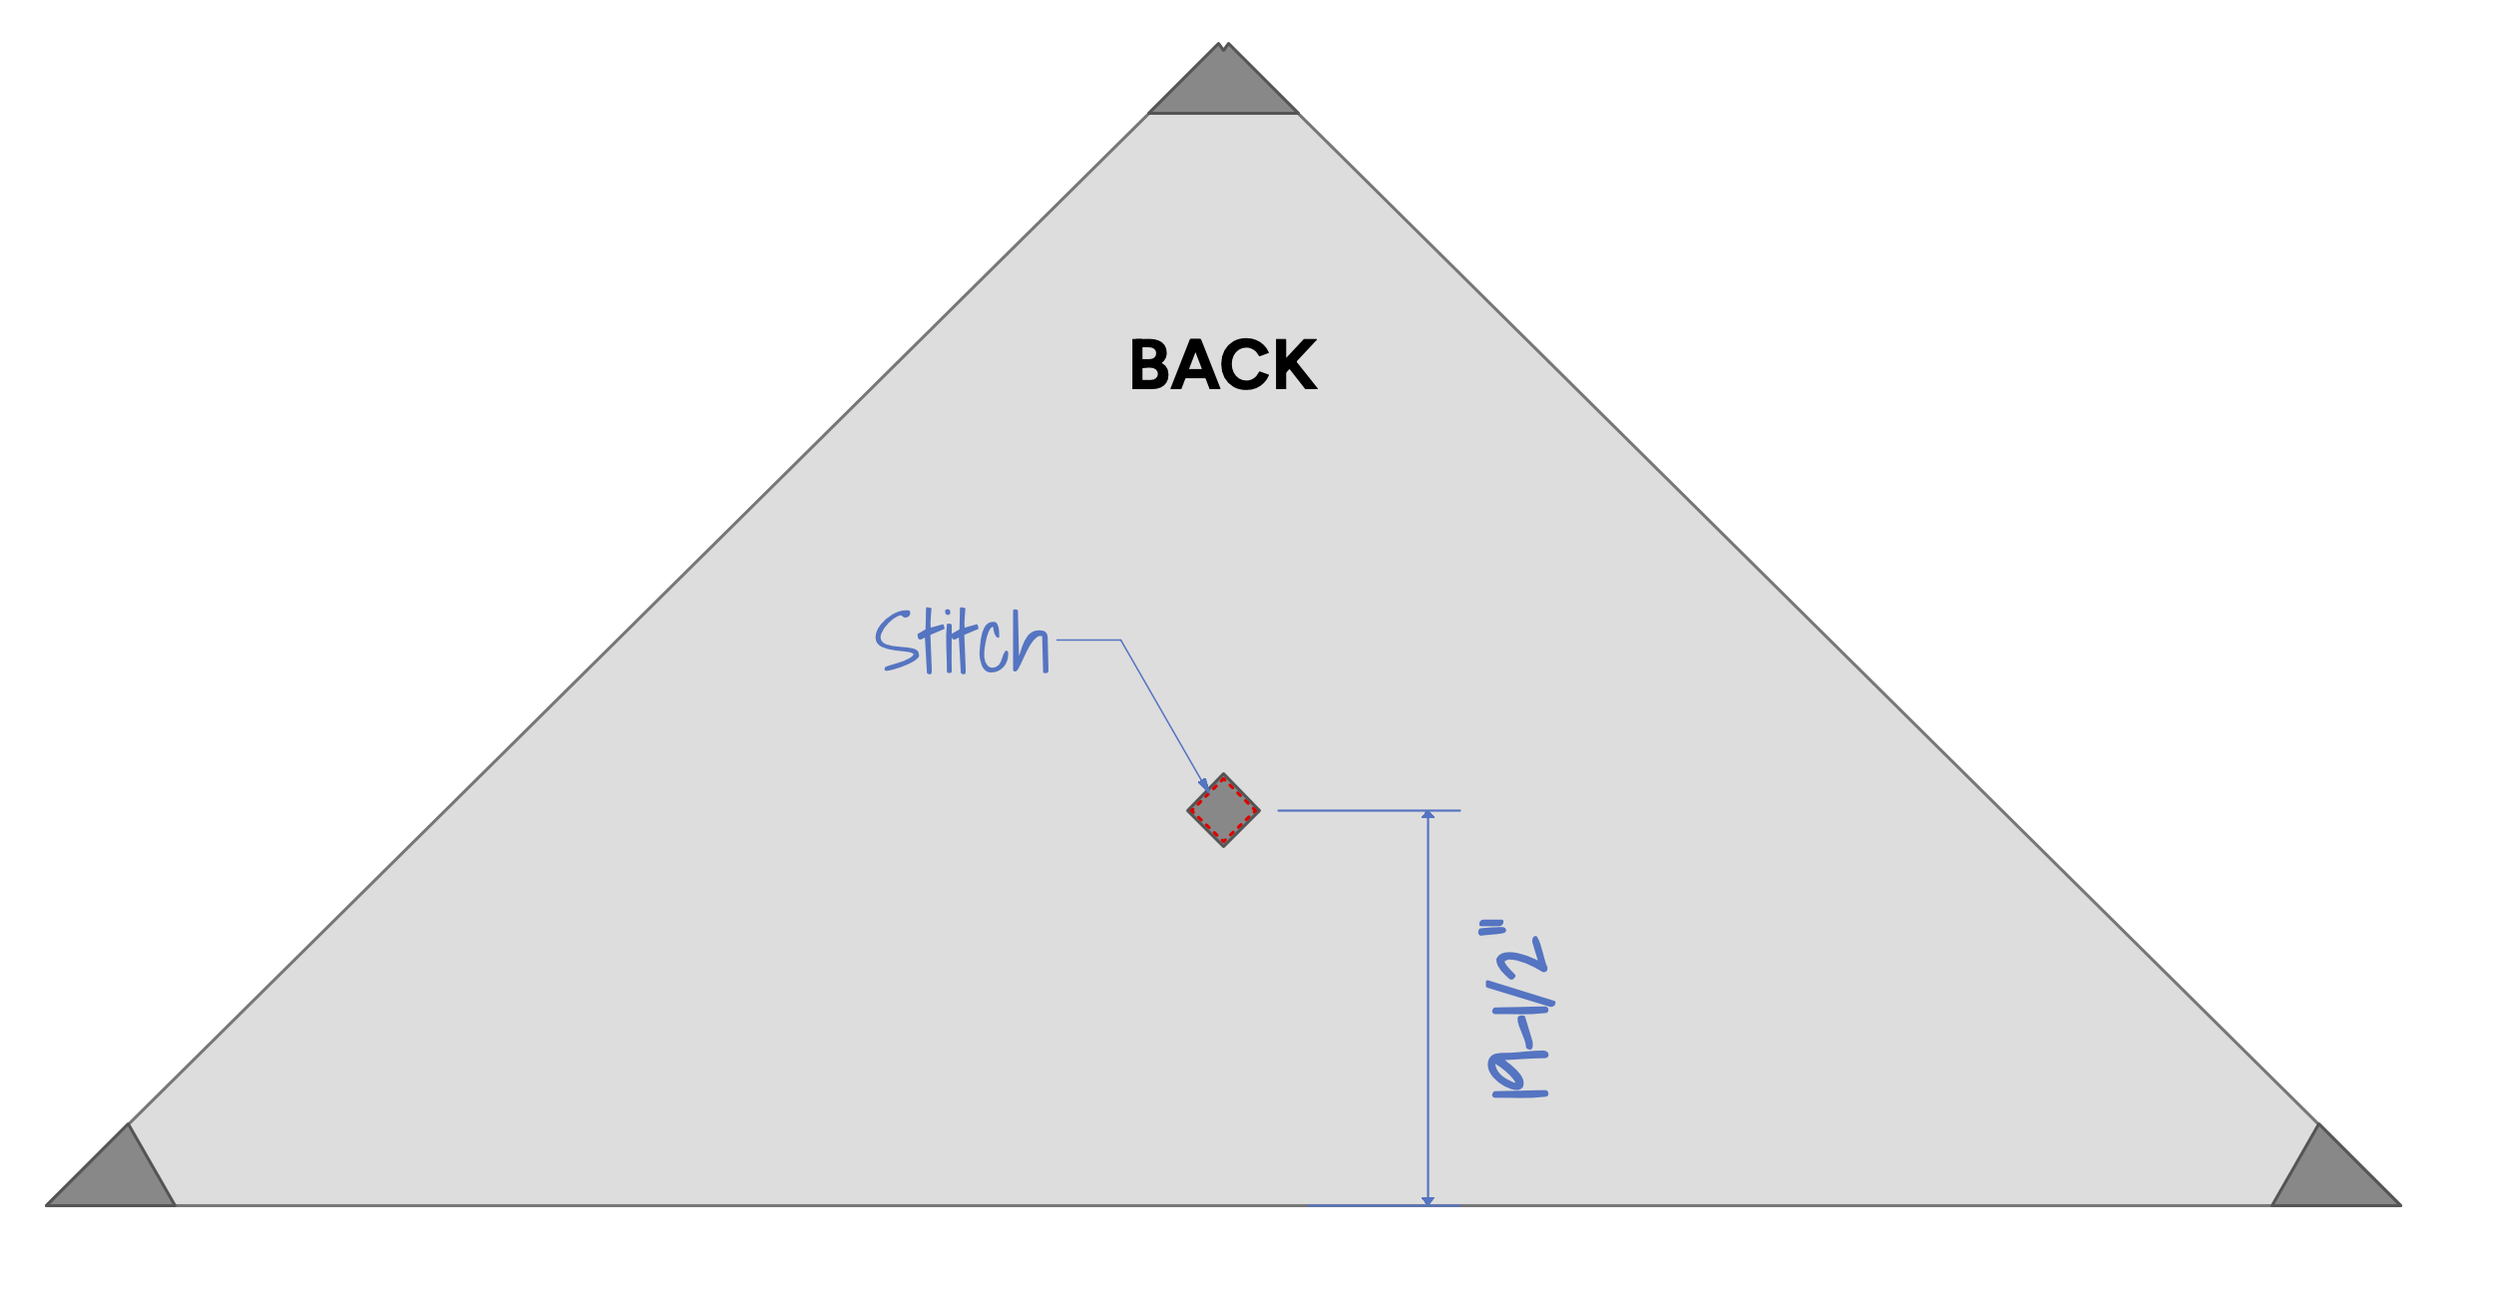
Place the center of the guy-out reinforcement patch 19-½” up from the bottom edge and centered left to right on the back panel as shown below. Stitch in place, stitching right next to the edge of the patch.
Once the patches have been stitched in place, the ⅜” double fold hem can be folded into the bottom edge of the tarp and stitched in place as shown below.

Preparing the sides for assembly:
Prepare the side vents for installation by stitching the top reinforcement patch to the vent mesh as shown below. The top edge and sides should be aligned as shown.
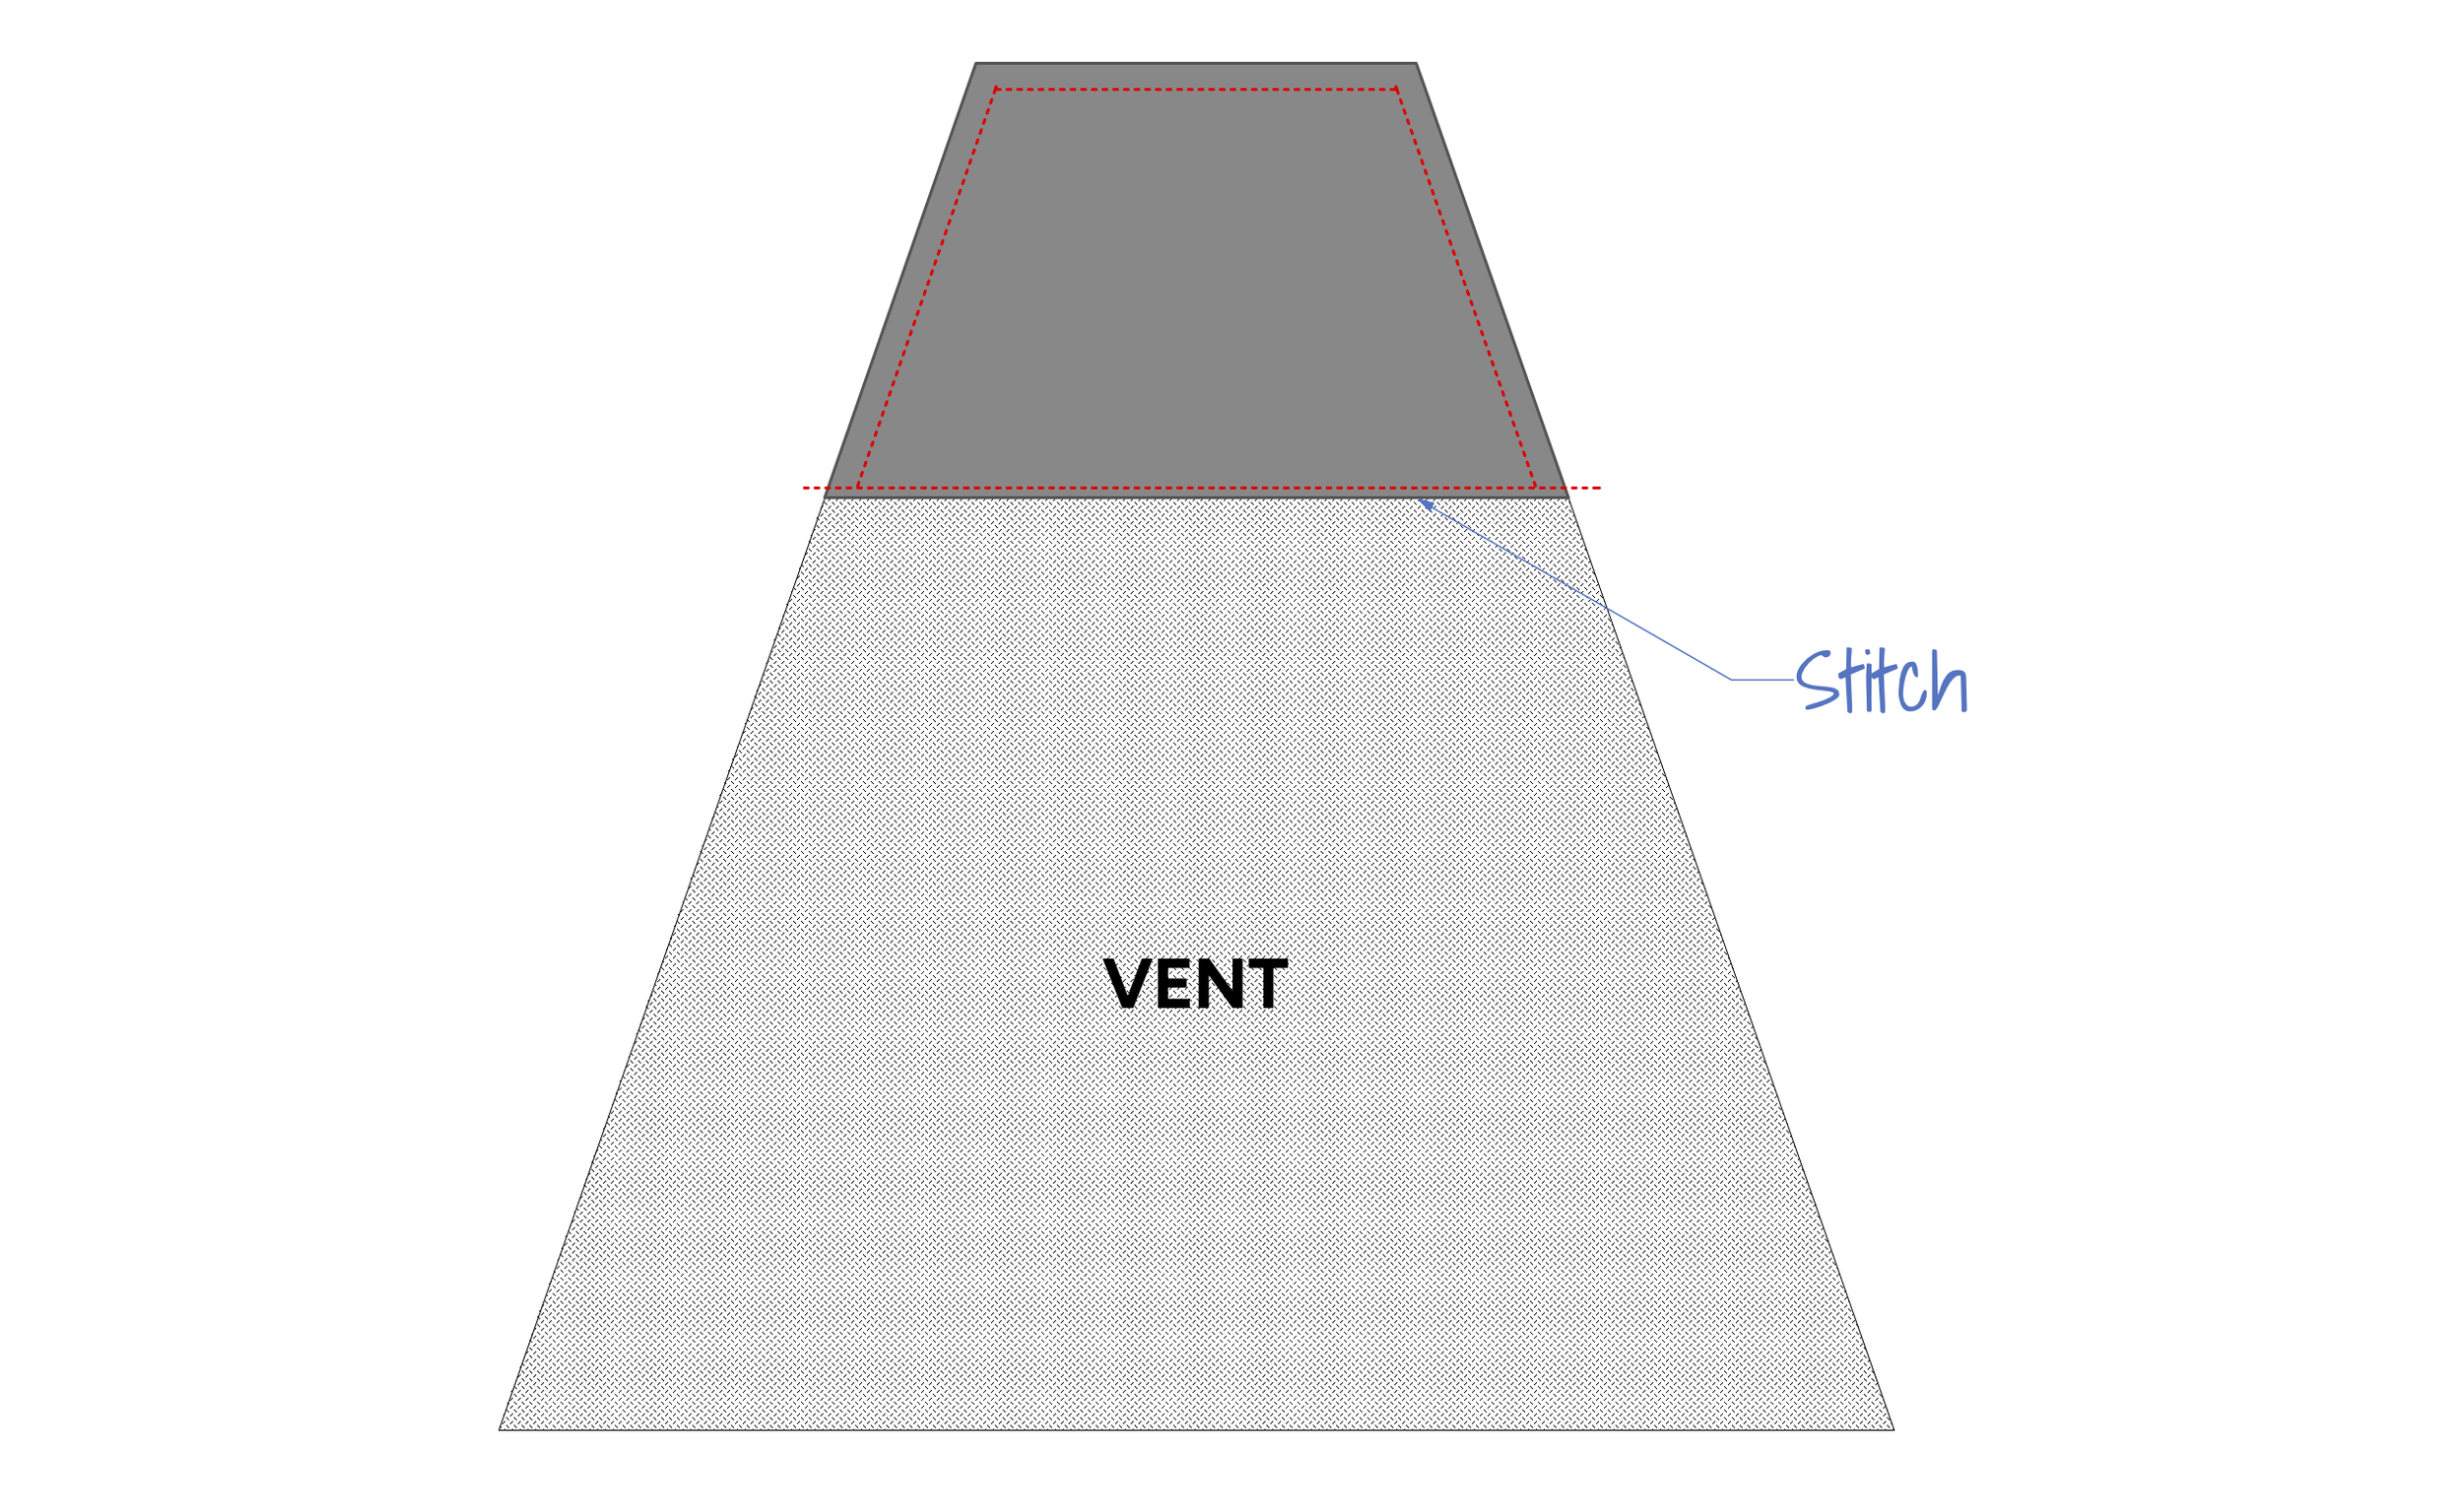
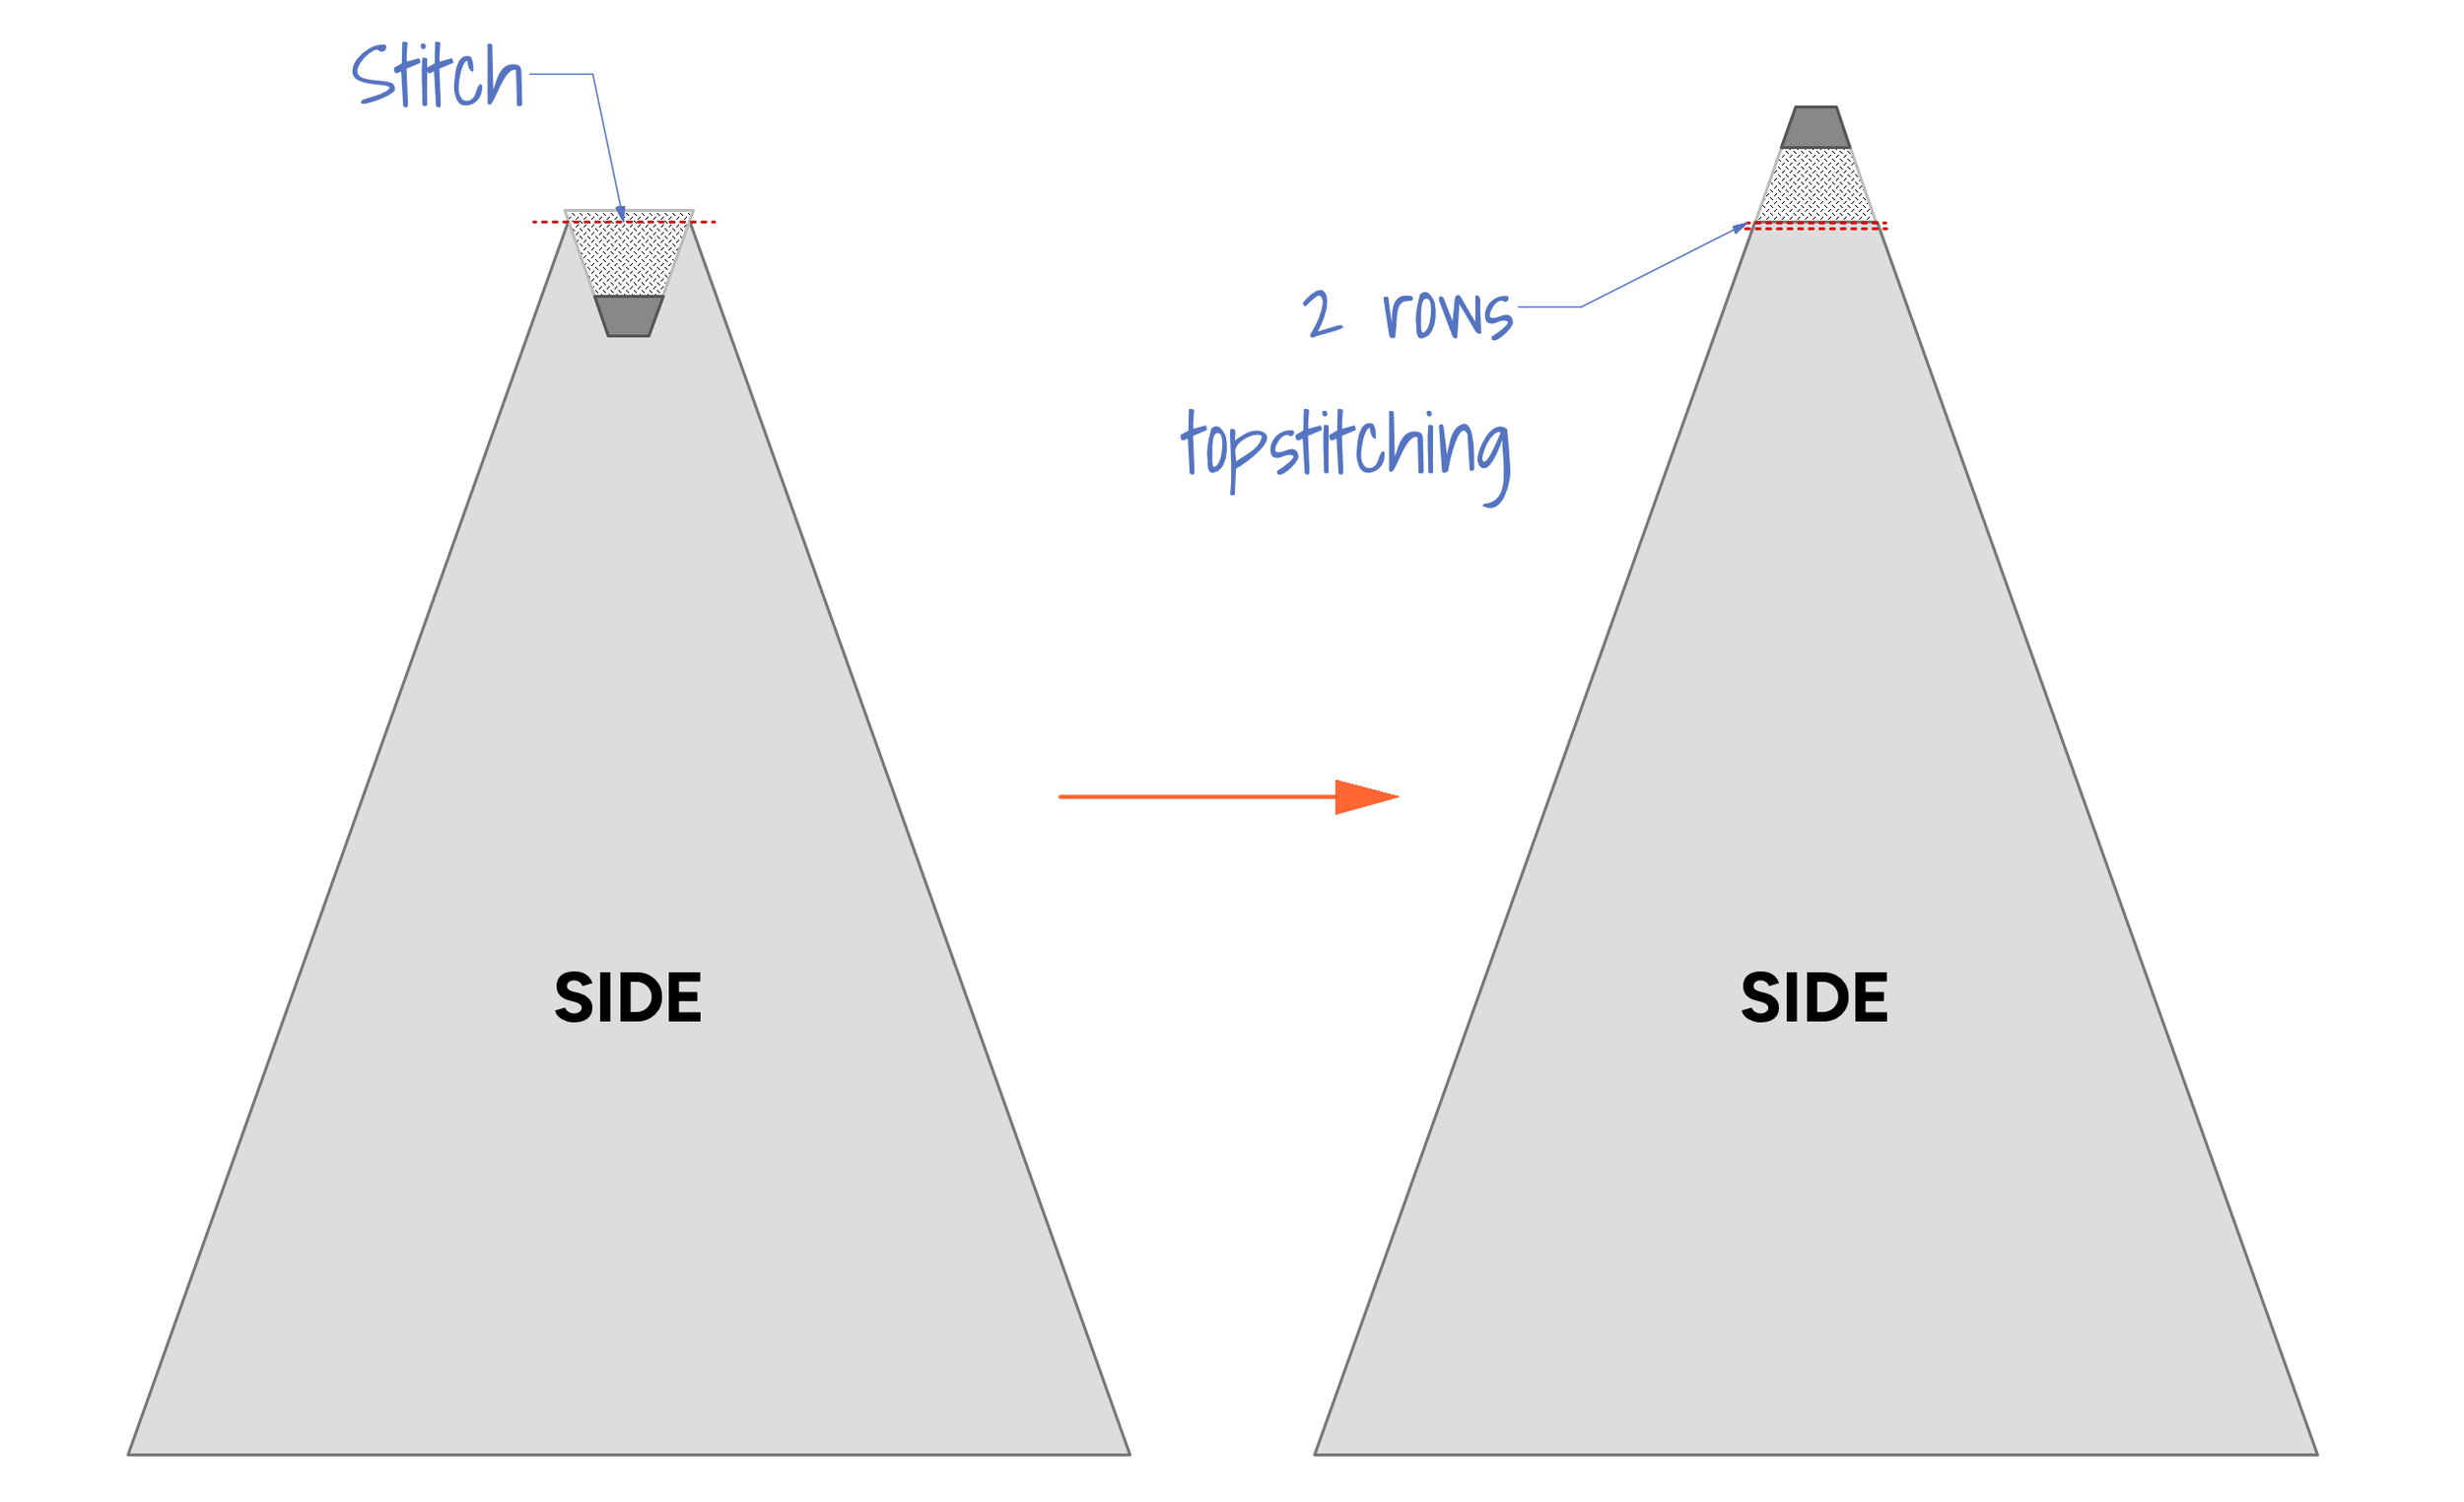
Pin the vent mesh to the top edge of the side panel, with the parts centered. The side of the mesh without the reinforcement patch should be against the right side of the side panel. Stitch the mesh in place as shown, using a ½” seam allowance. Fold the parts open and press the seam allowance down toward the side panel. Top stitch the seam allowance in place stitching ⅛” from seam. Sew a second row of topstitching ¼” from the first as shown.
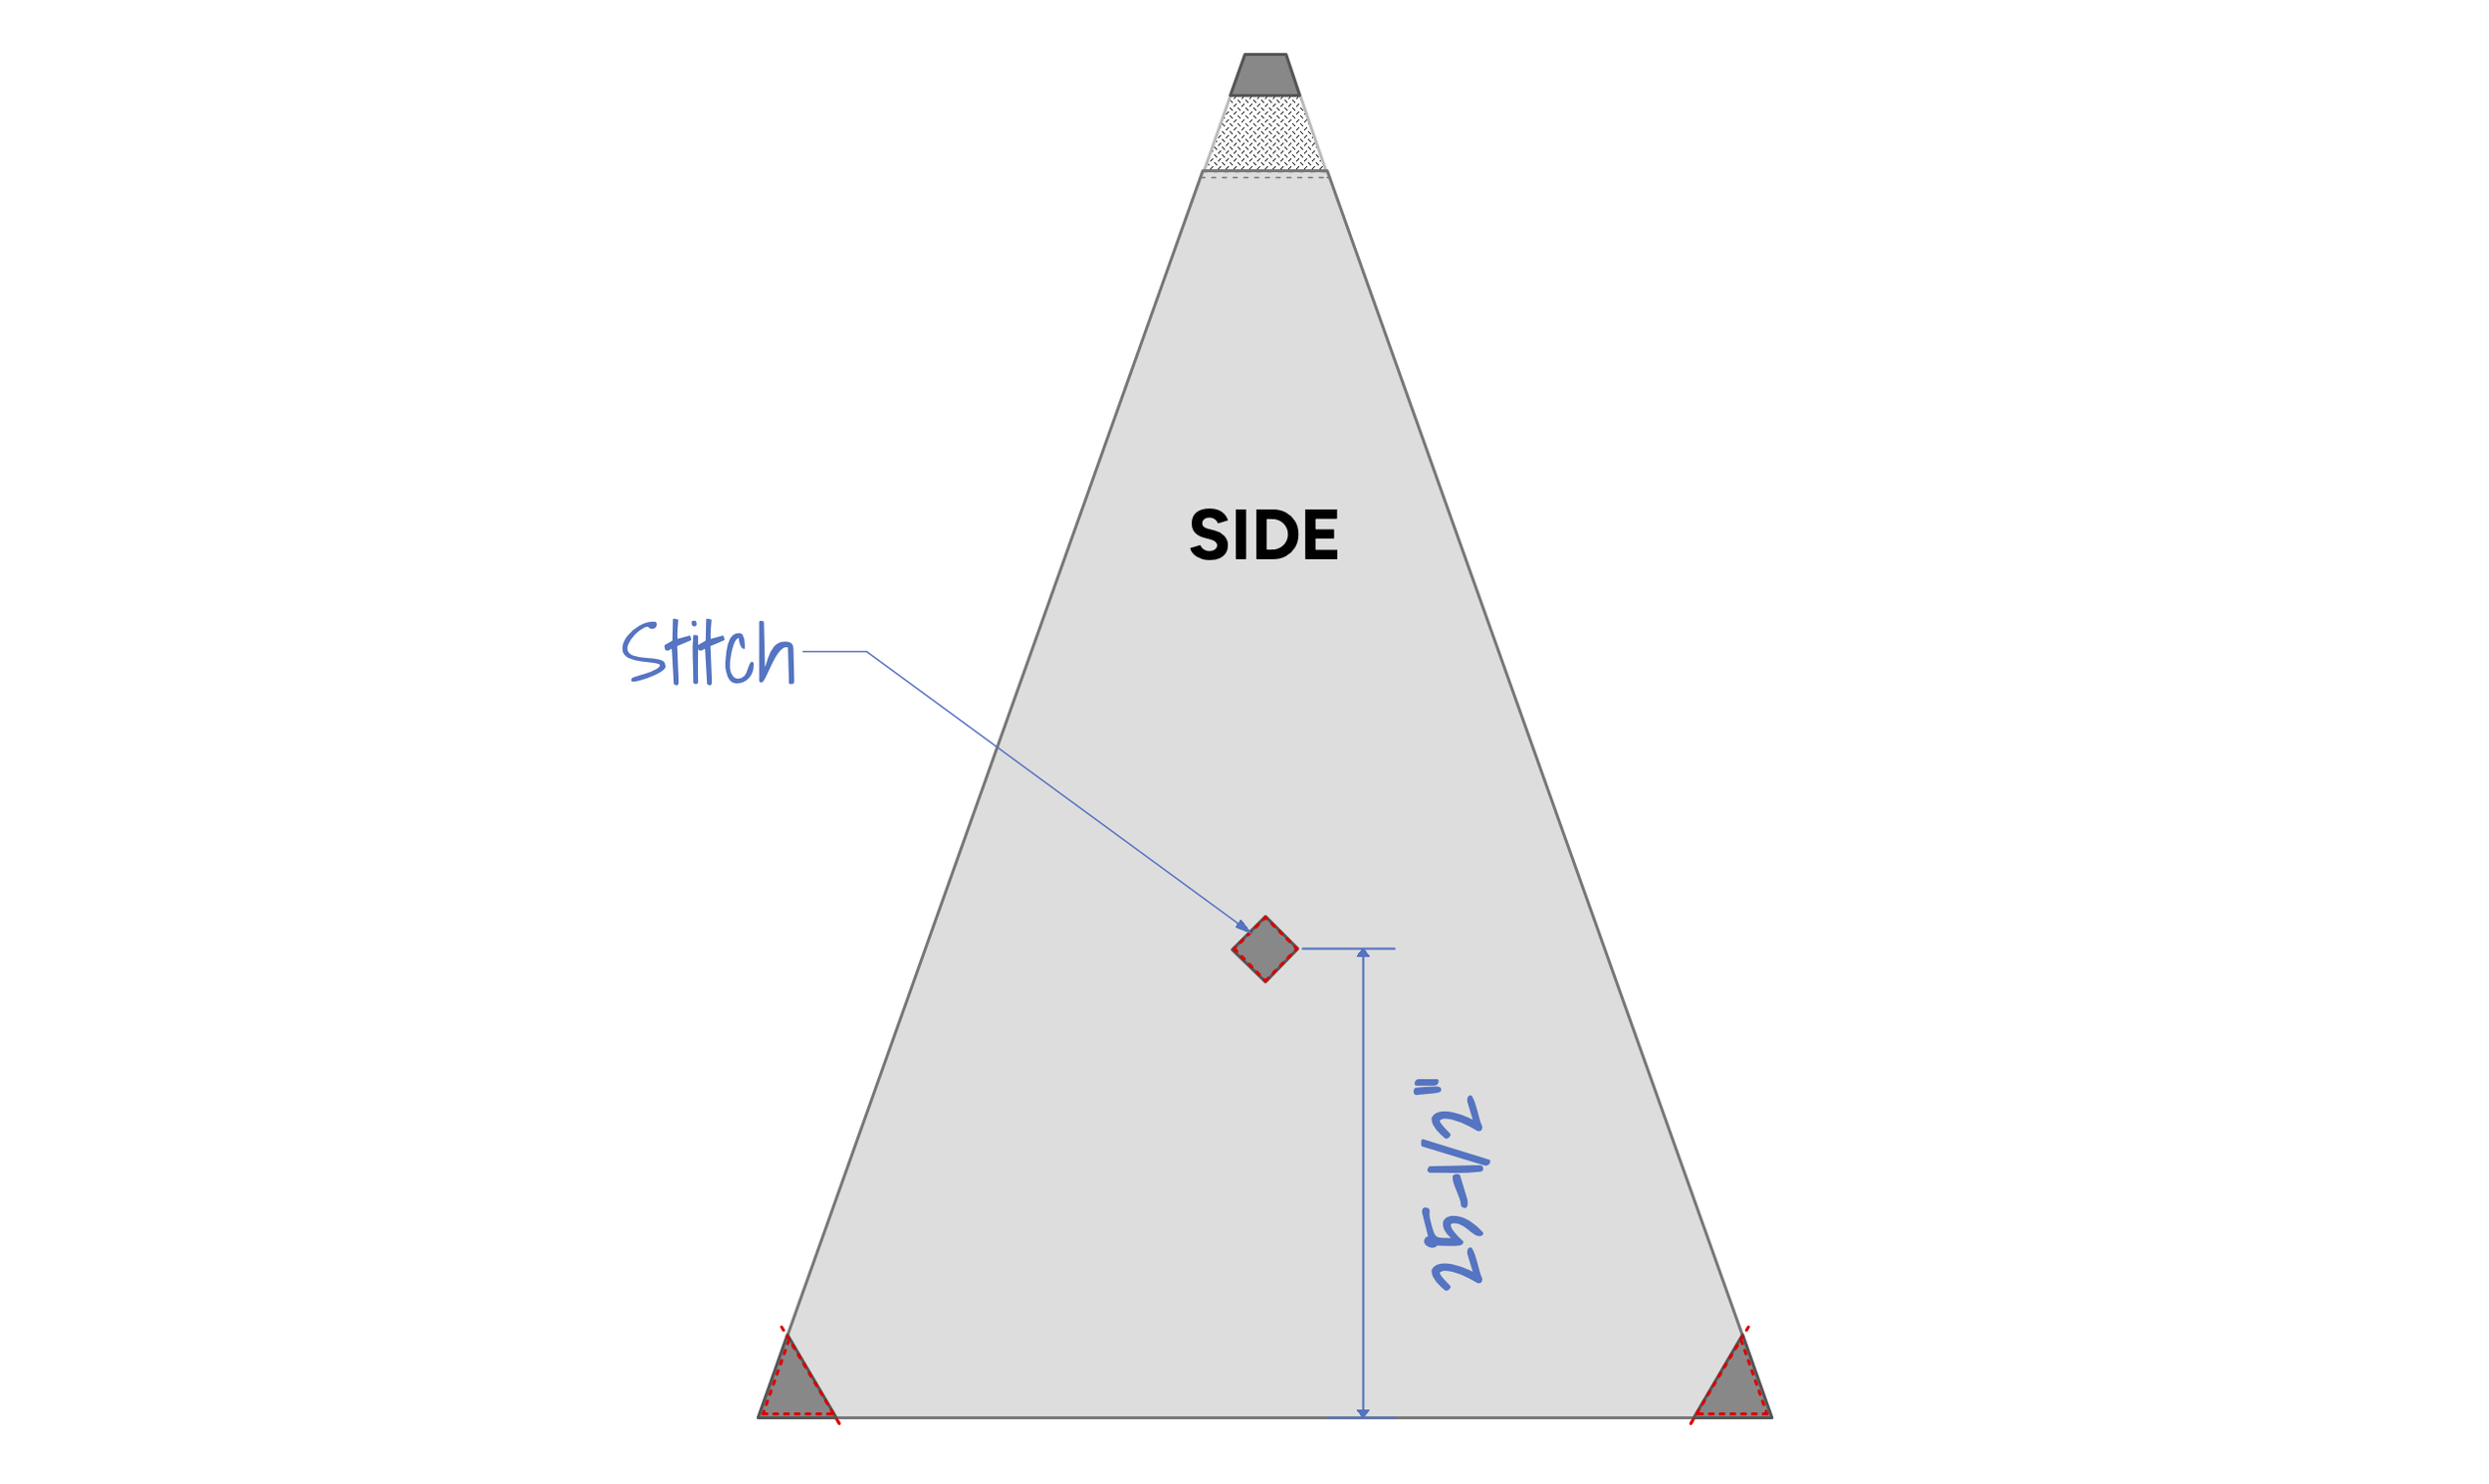
Place the center of the guy-out reinforcement patch 25-½” up from the bottom edge and centered left to right on the side panel as shown below. Stitch in place, stitching right next to the edge of the patch. Stitch the lower reinforcement patches to the side panel as shown below. The edge of the patch that faces the interior of the panel should be stitched right next to the edge. The exterior edges can be stitched with a ¼” seam allowance.
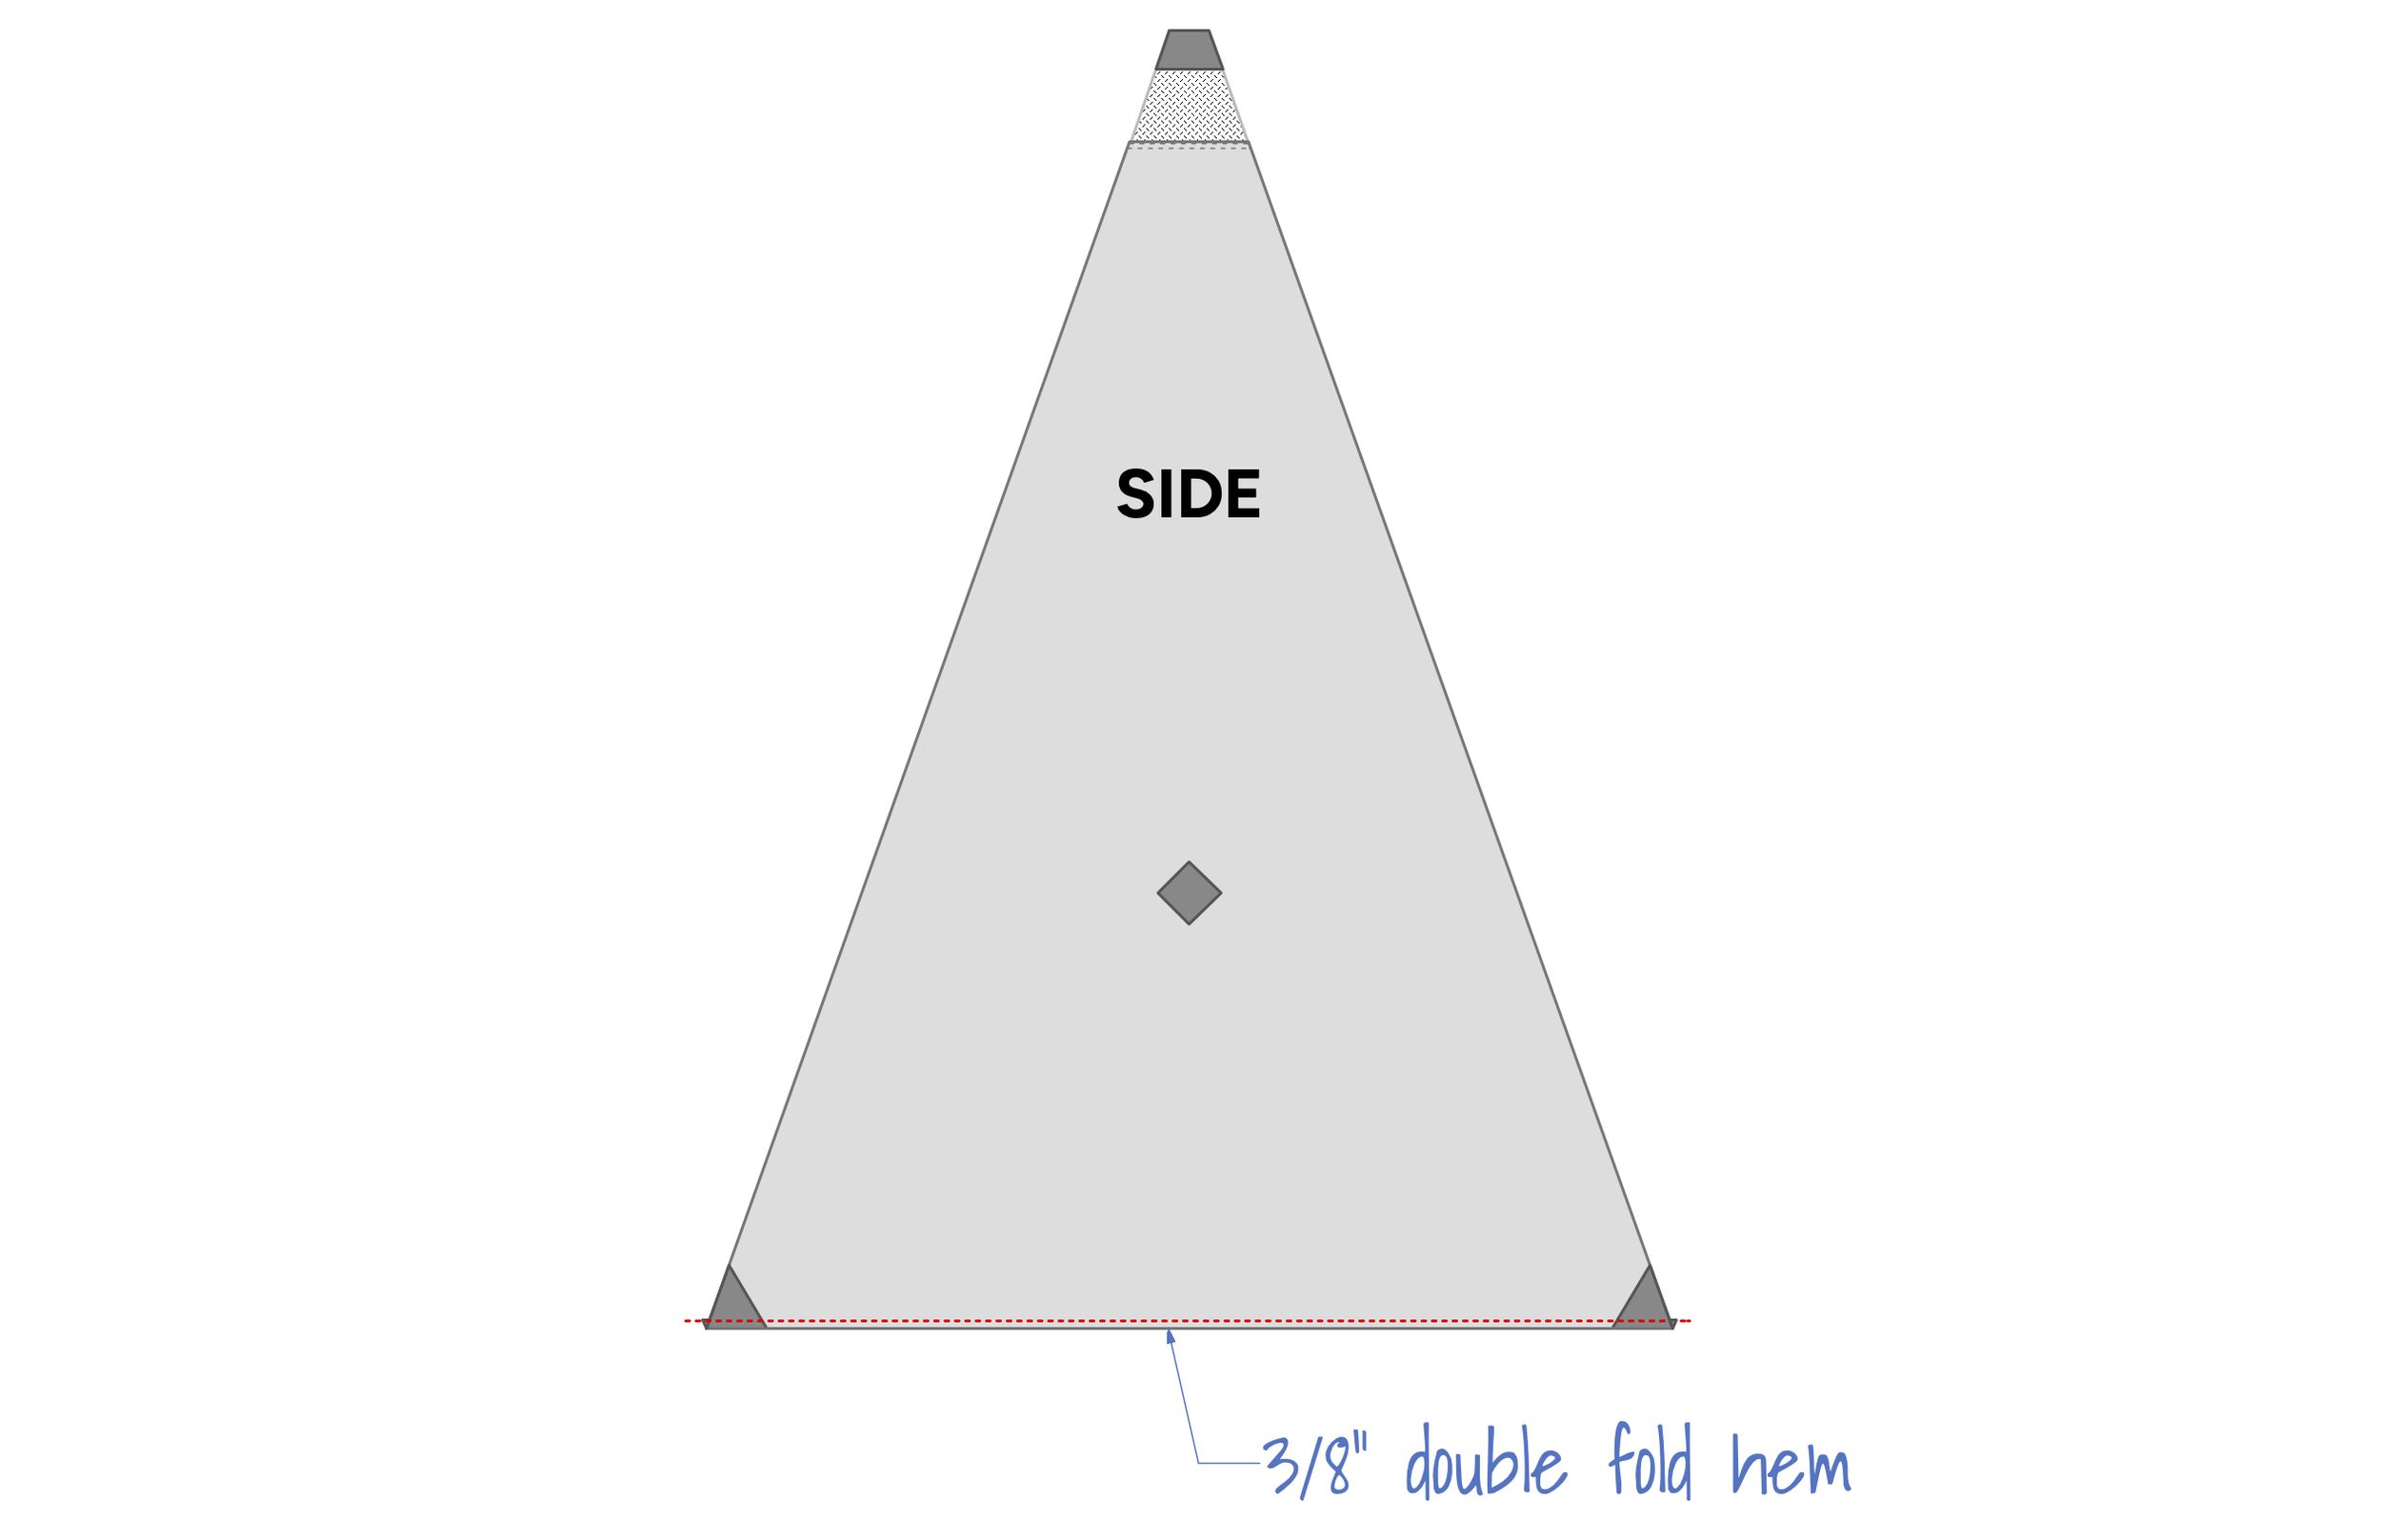
Once the patches have been stitched in place, the ⅜” double fold hem can be folded into the bottom edge of the tarp and stitched in place as shown below.
Preparing the front panels and door:
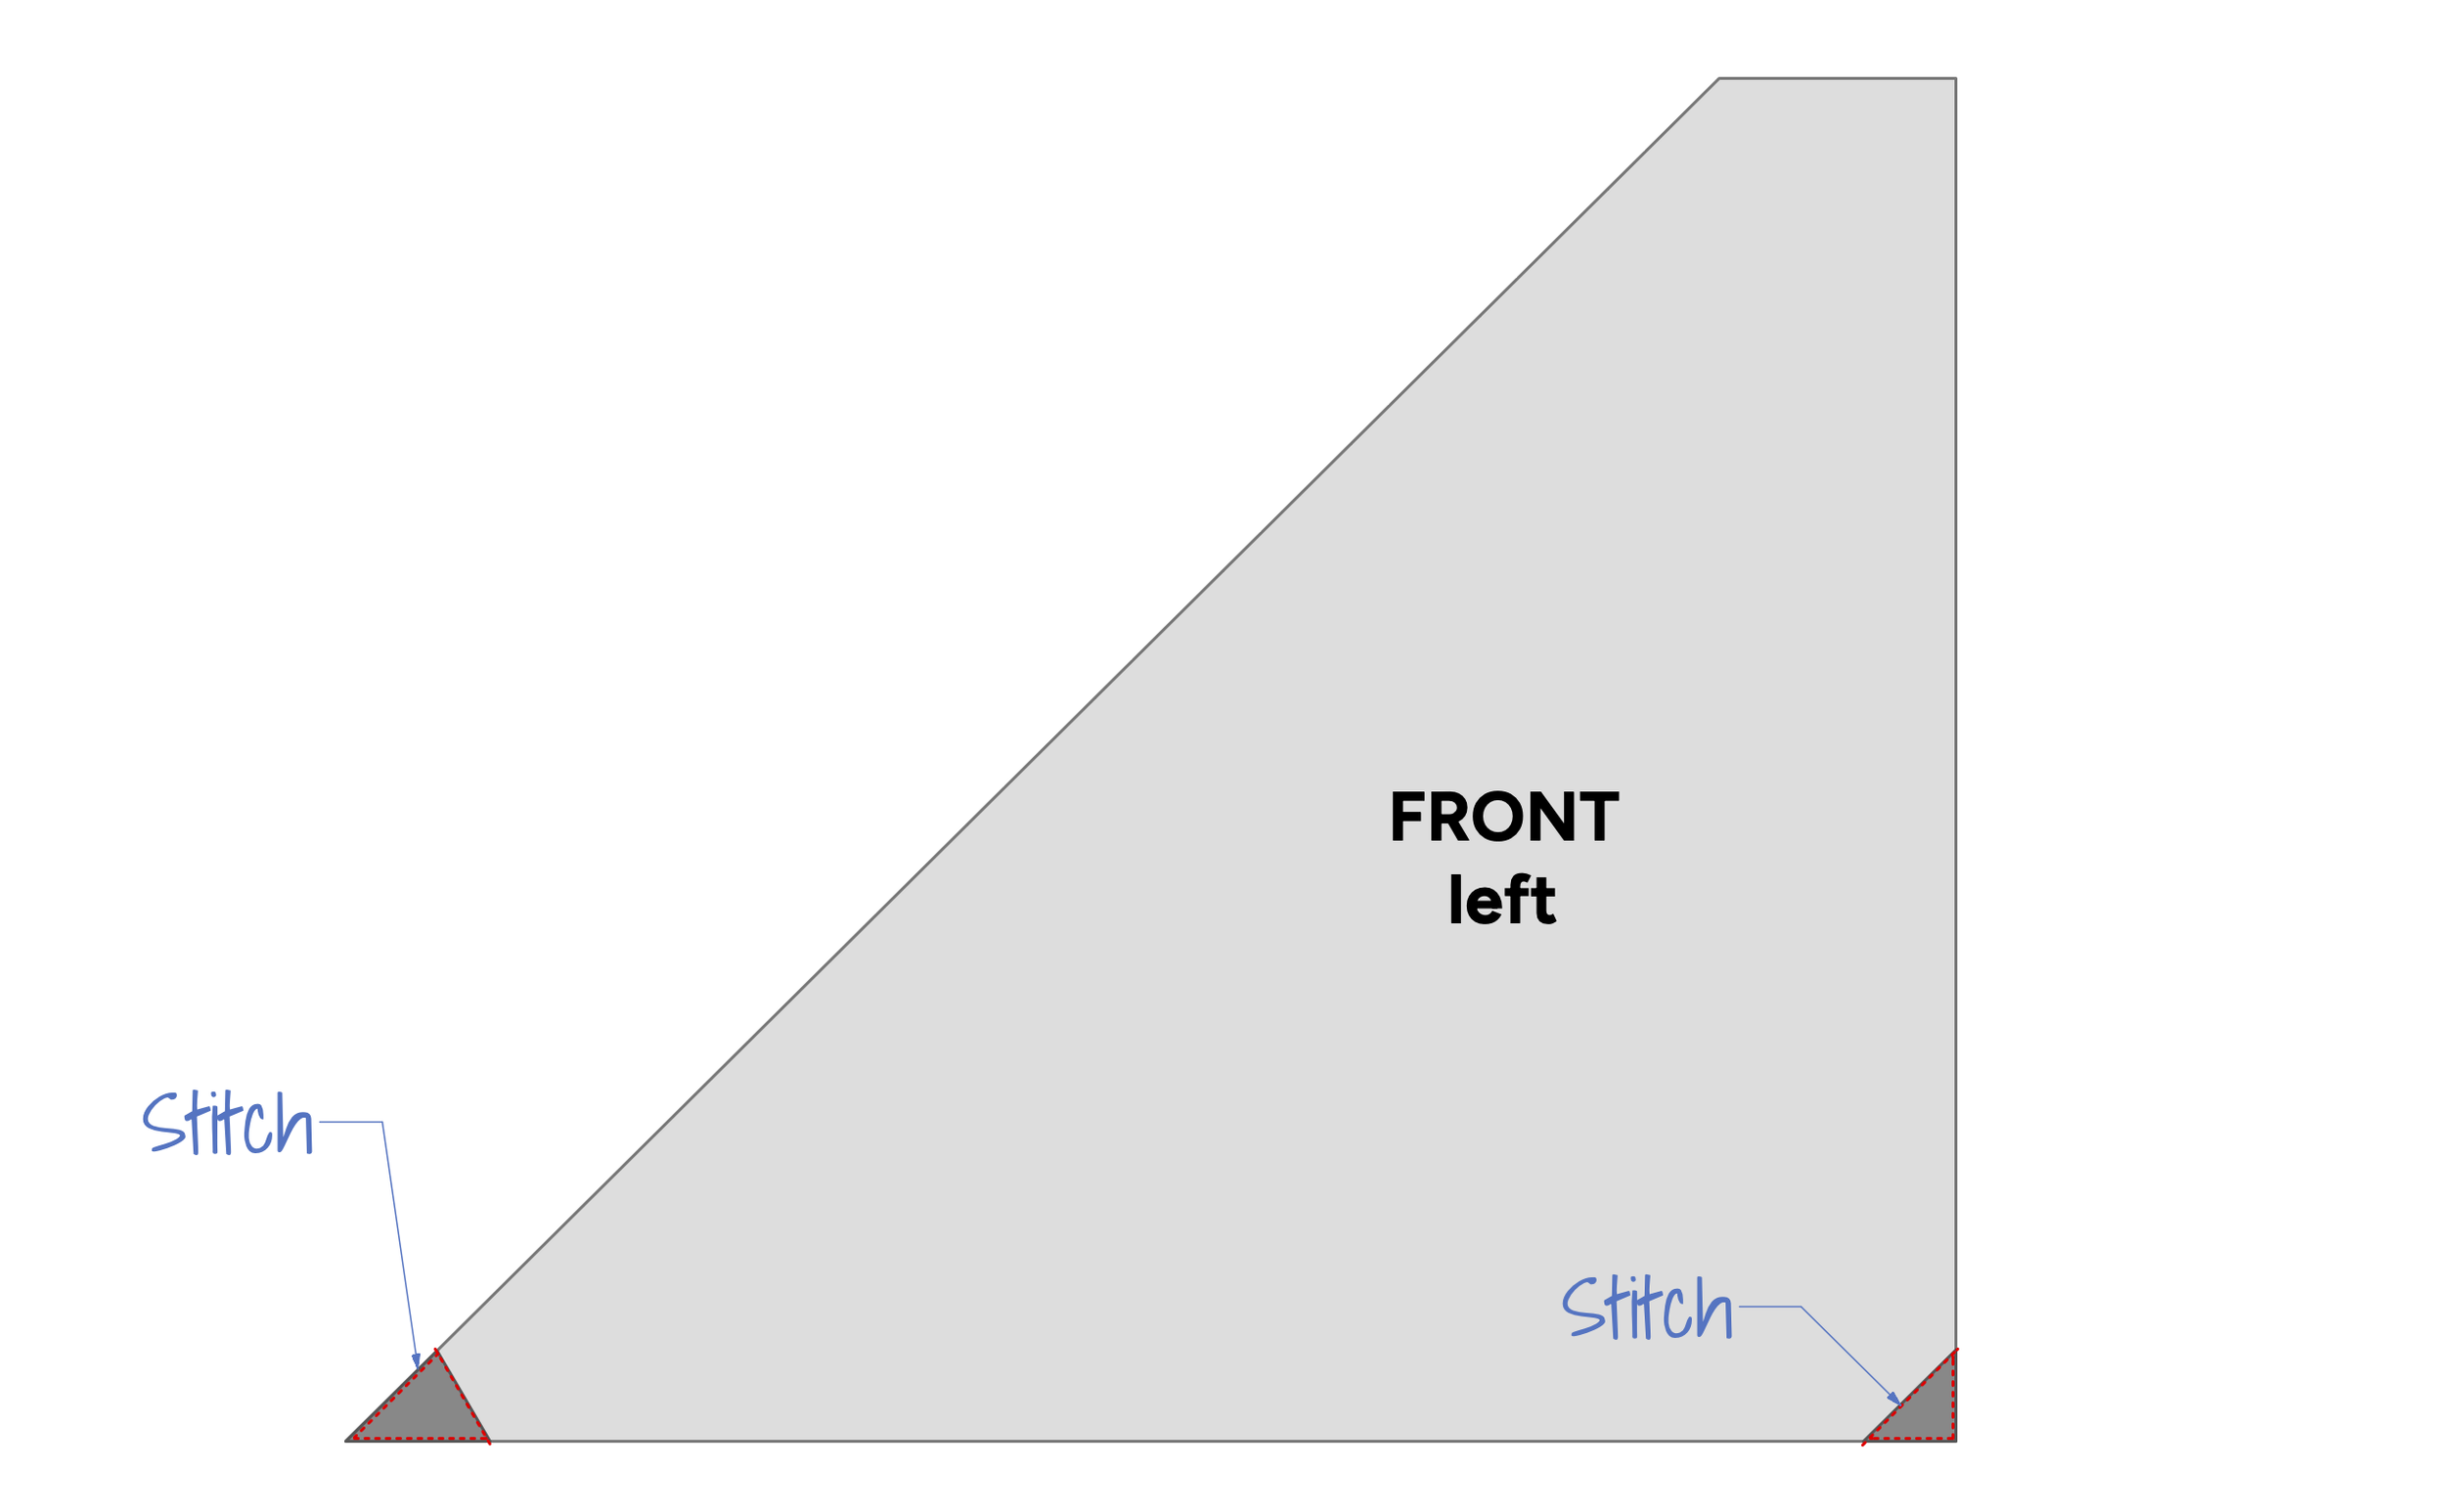
Stitch the lower reinforcement patches to the front panels as shown below. The edge of the patch that faces the interior of the panel should be stitched right next to the edge. The exterior edges can be stitched with a ¼” seam allowance. Repeat for both the left and right front panels.
Install the 51-1/4” long zipper between the two front panels, using a 5/16” seam allowance. The zipper should be placed flush with the top of the panels as shown. The lower edge of the panels will hang past the zipper.
Note: The parts were designed to use a #3 zipper with a width of 1”. If you are using a zipper of a different size the seam allowance may have to be adjusted.
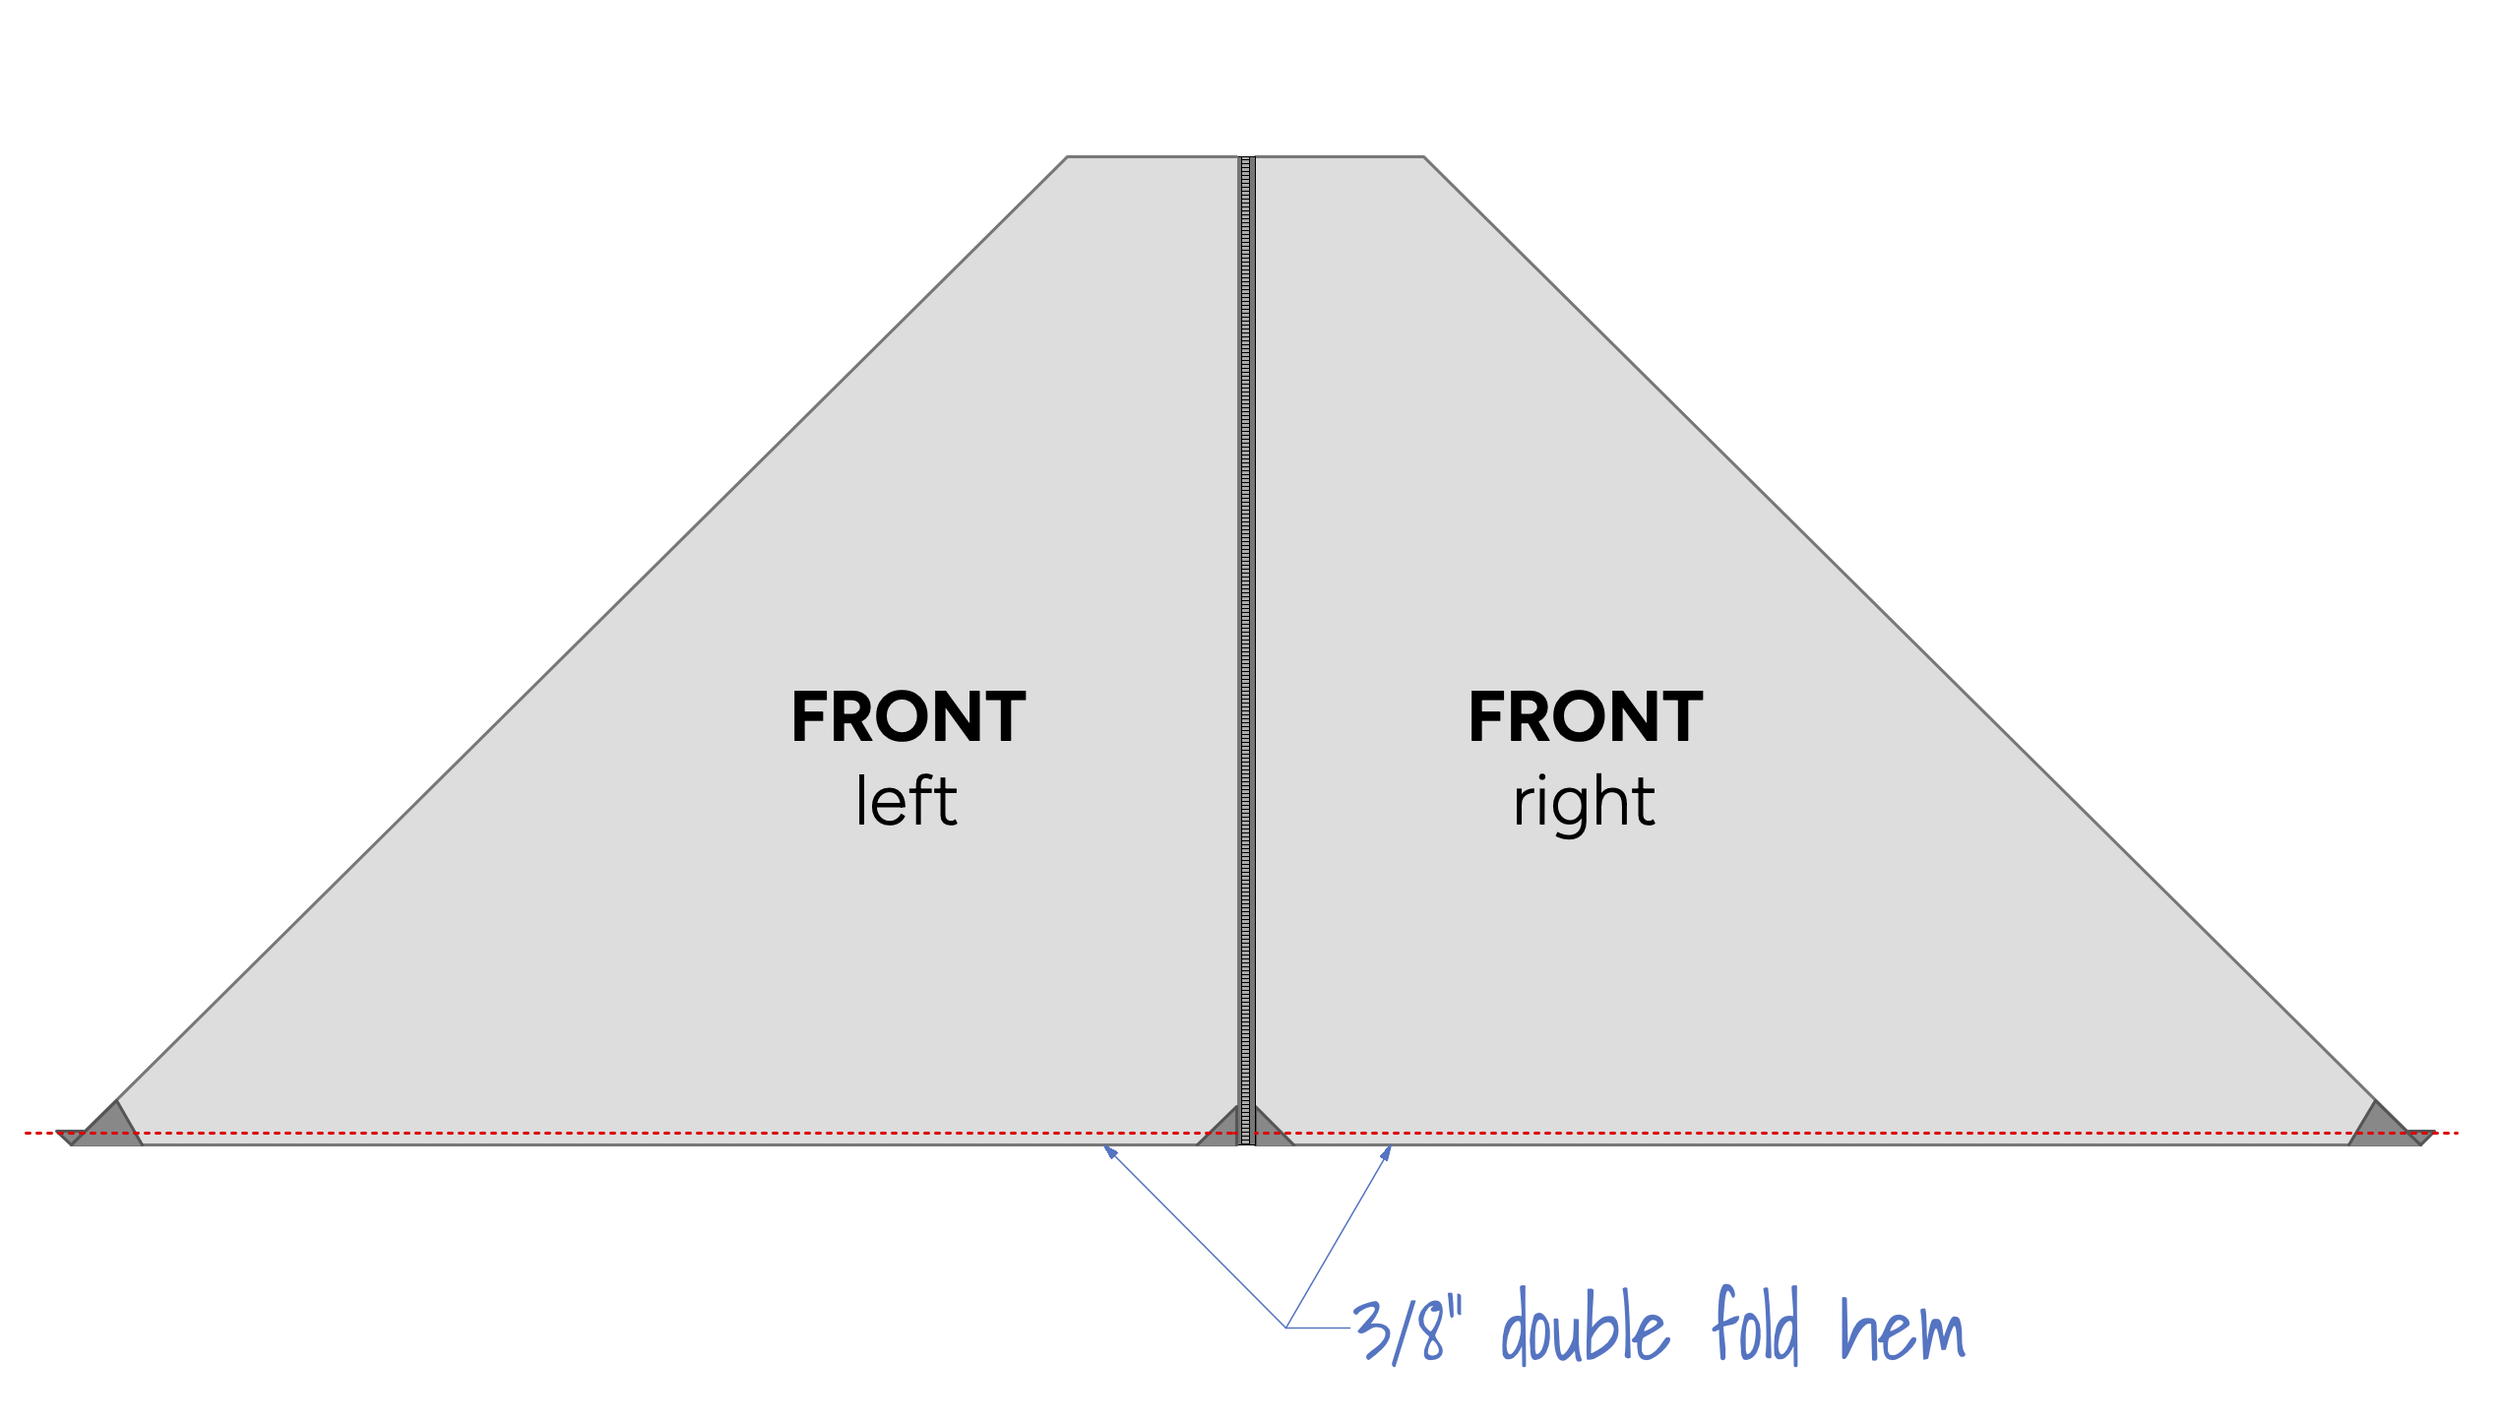
Fold a ⅜” double fold hem on the bottom edge of the front panels and stitch in place as shown.
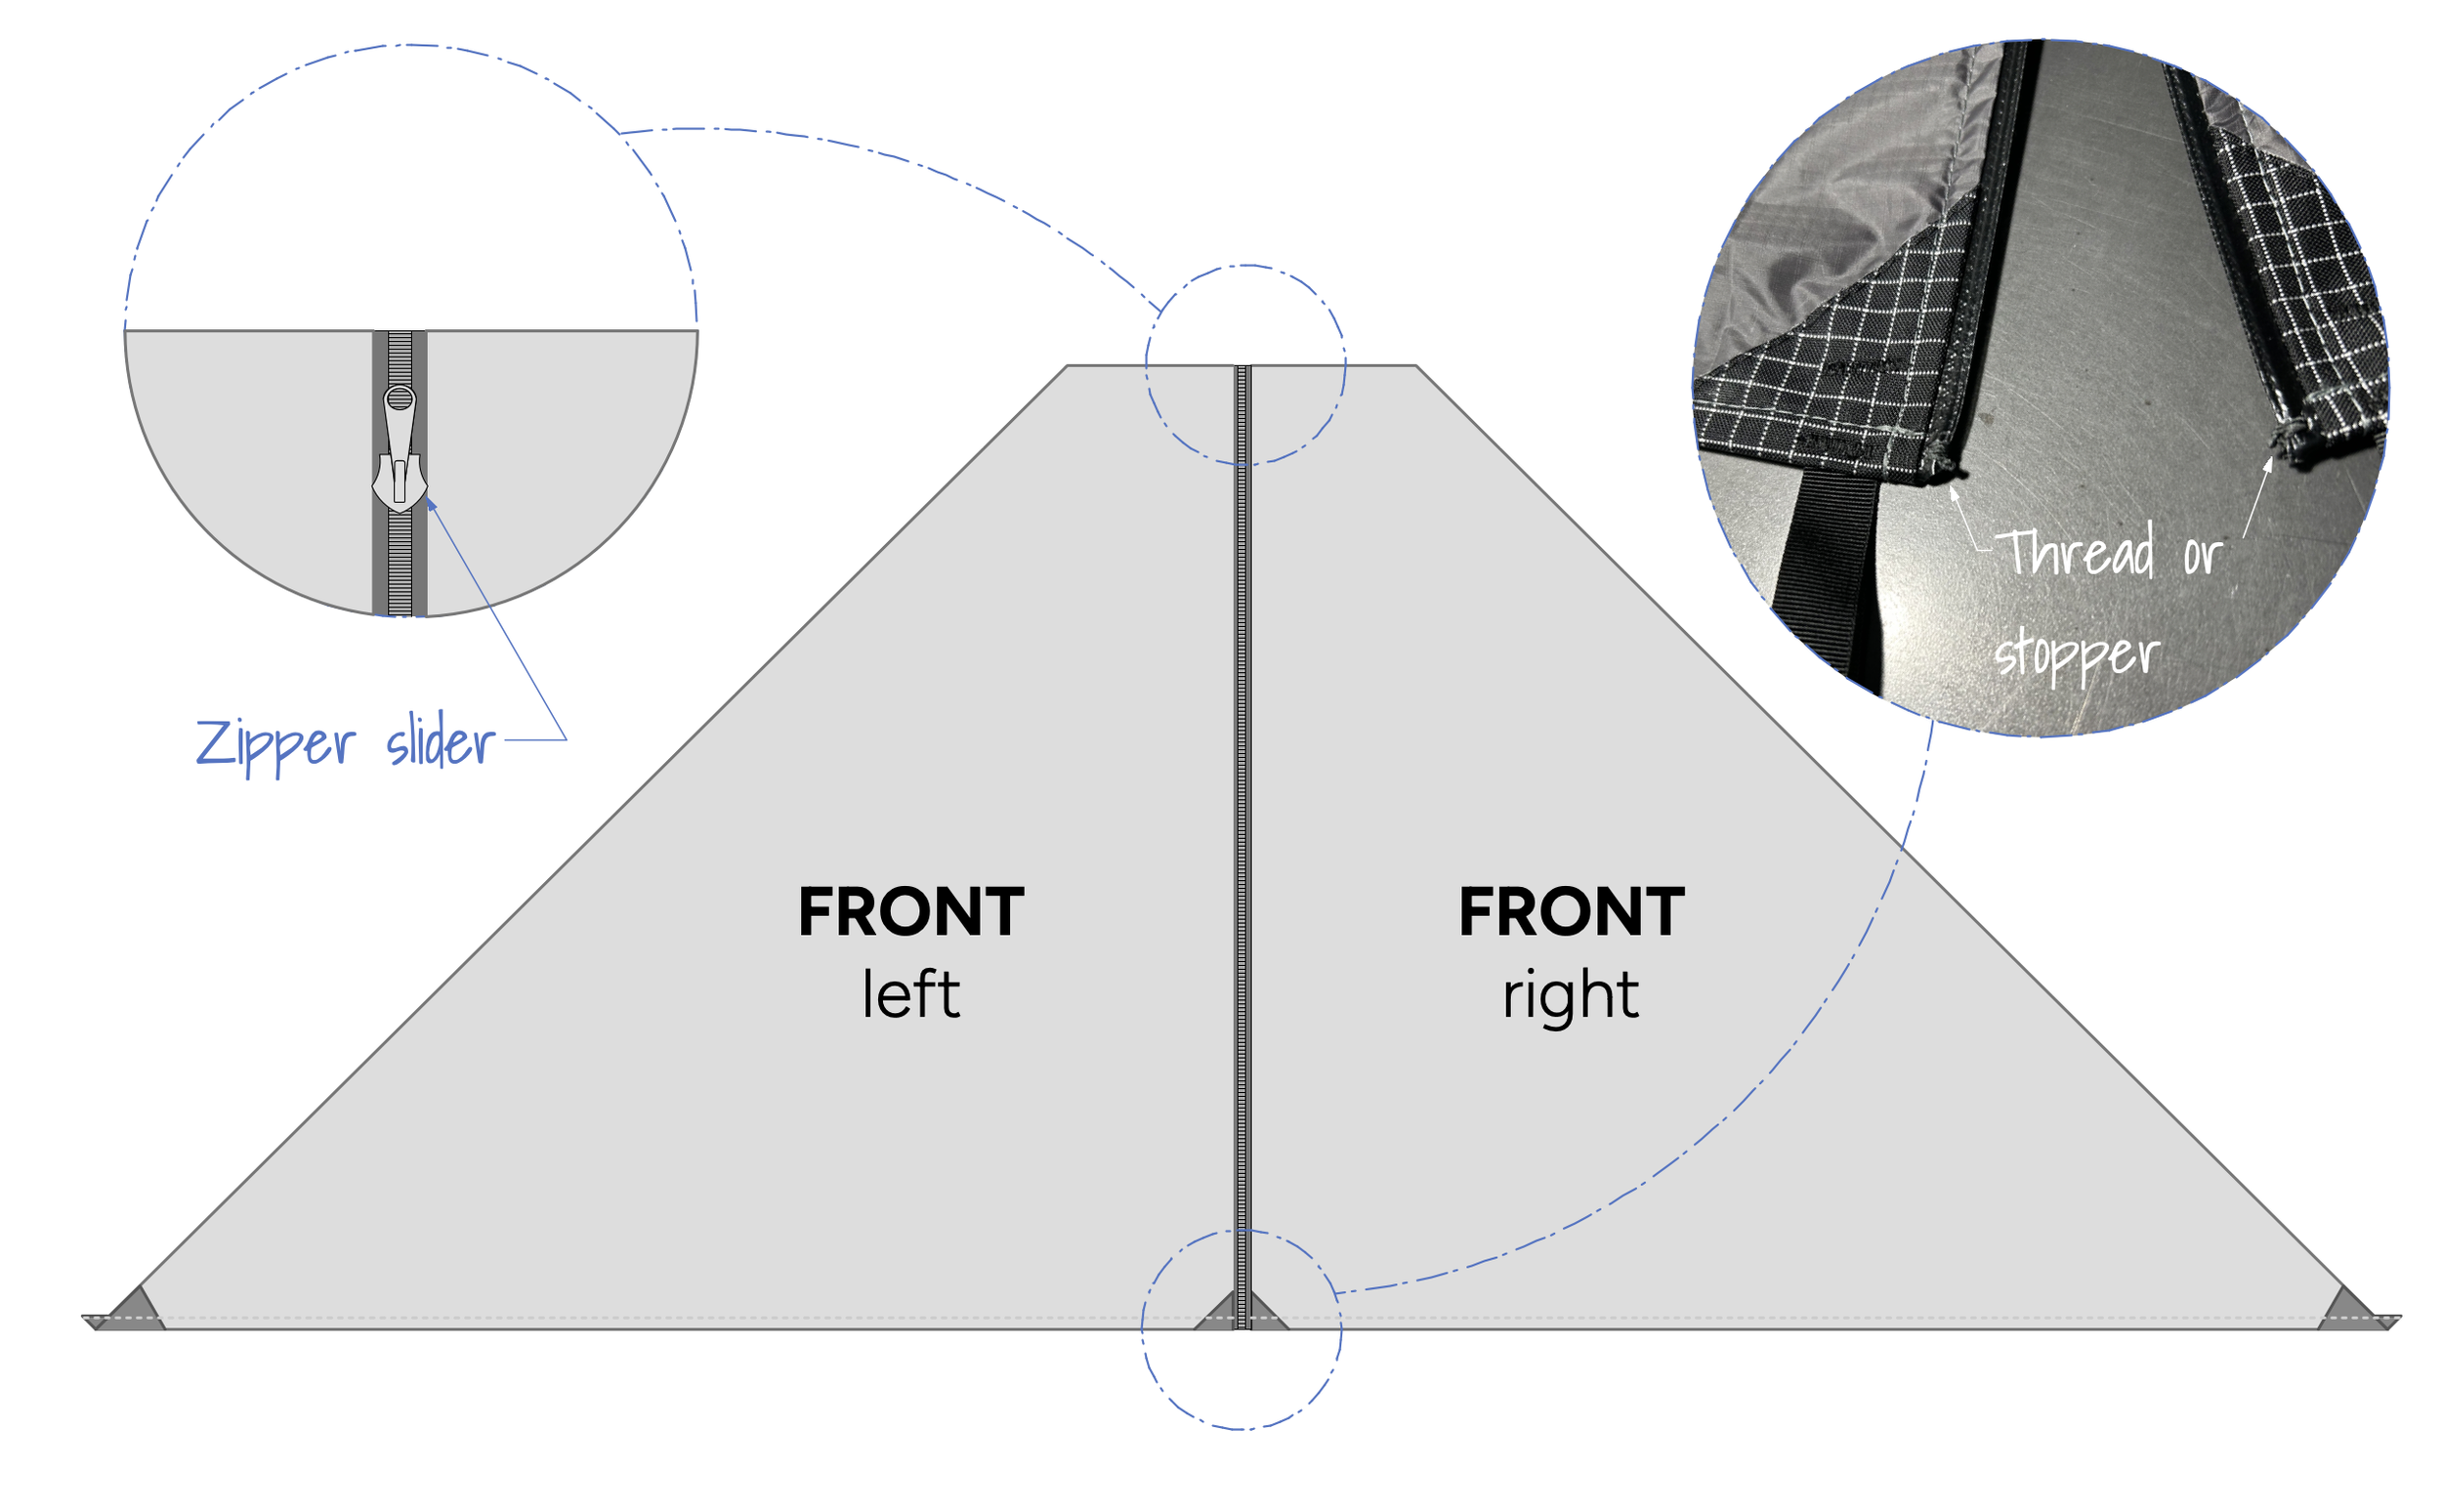
Install the zipper slider onto the zipper from the top edge as shown below. The bottom edge of the zipper will need to have zipper stops installed to keep the slider from pulling off. You can get these from most places that sell zippers. I didn’t have any on hand so I ended up using a needle and thread to make a stop at the end of the zipper. After sewing several loops around the zipper teeth I applied some fray check to the thread to further reinforce it. So far it seems to be working well.
Preparing the door top:
Stitch the upper reinforcement patch to the door top as shown below. The edge of the patch that faces the interior of the panel should be stitched right next to the edge. The exterior edges can be stitched with a ¼” seam allowance.
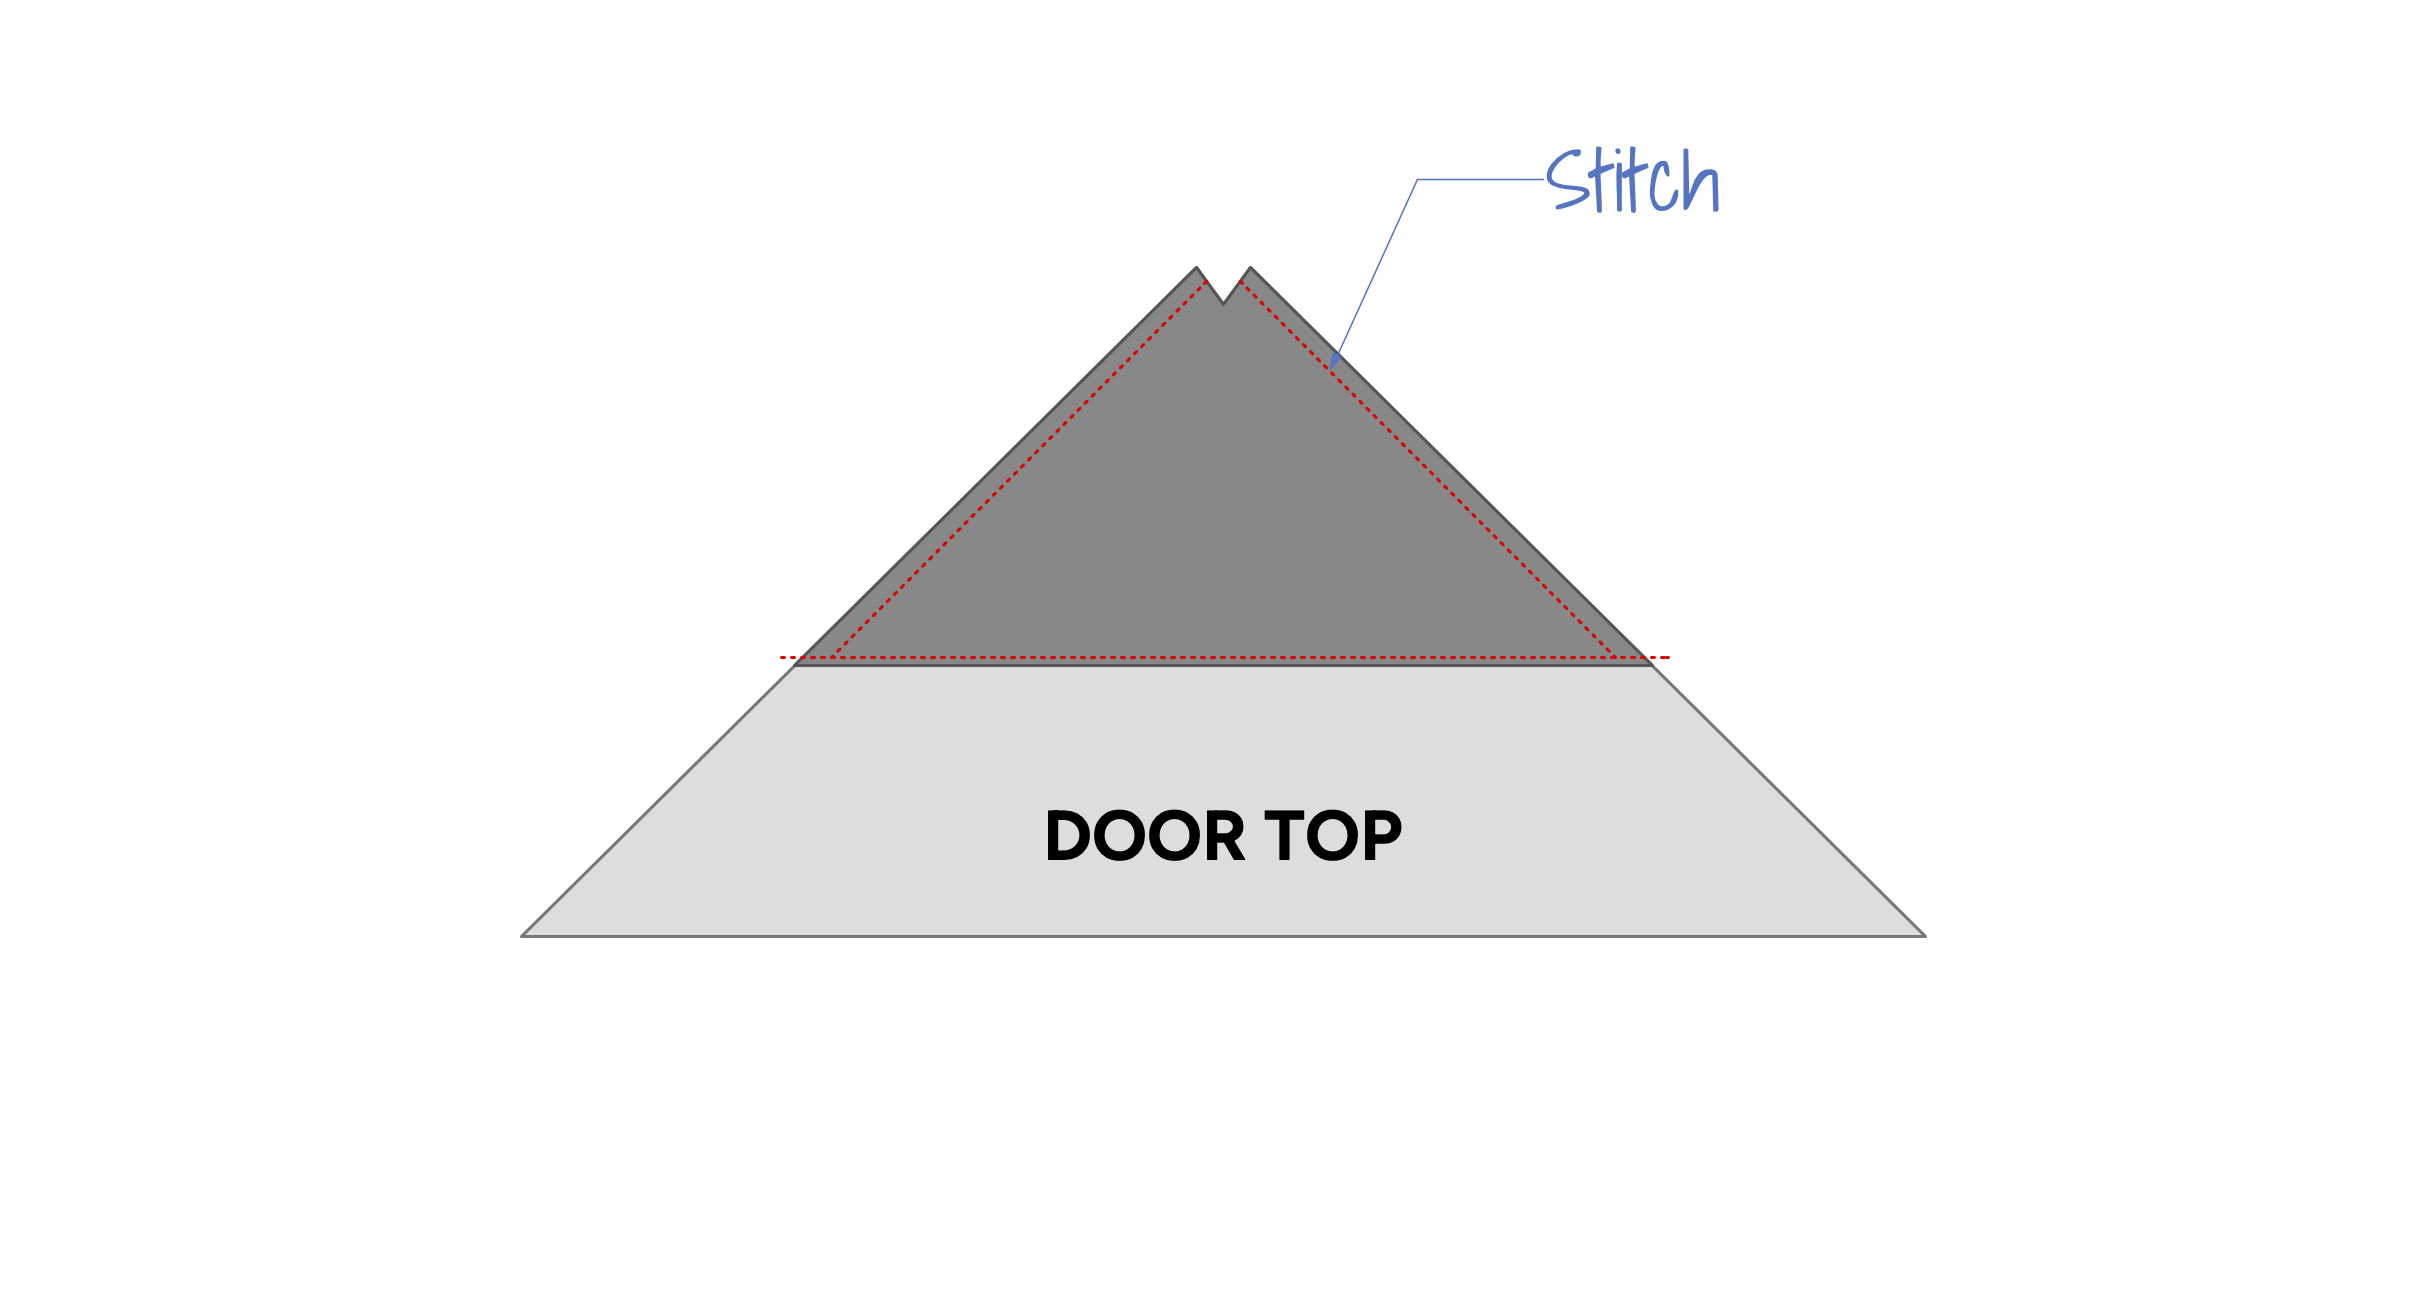
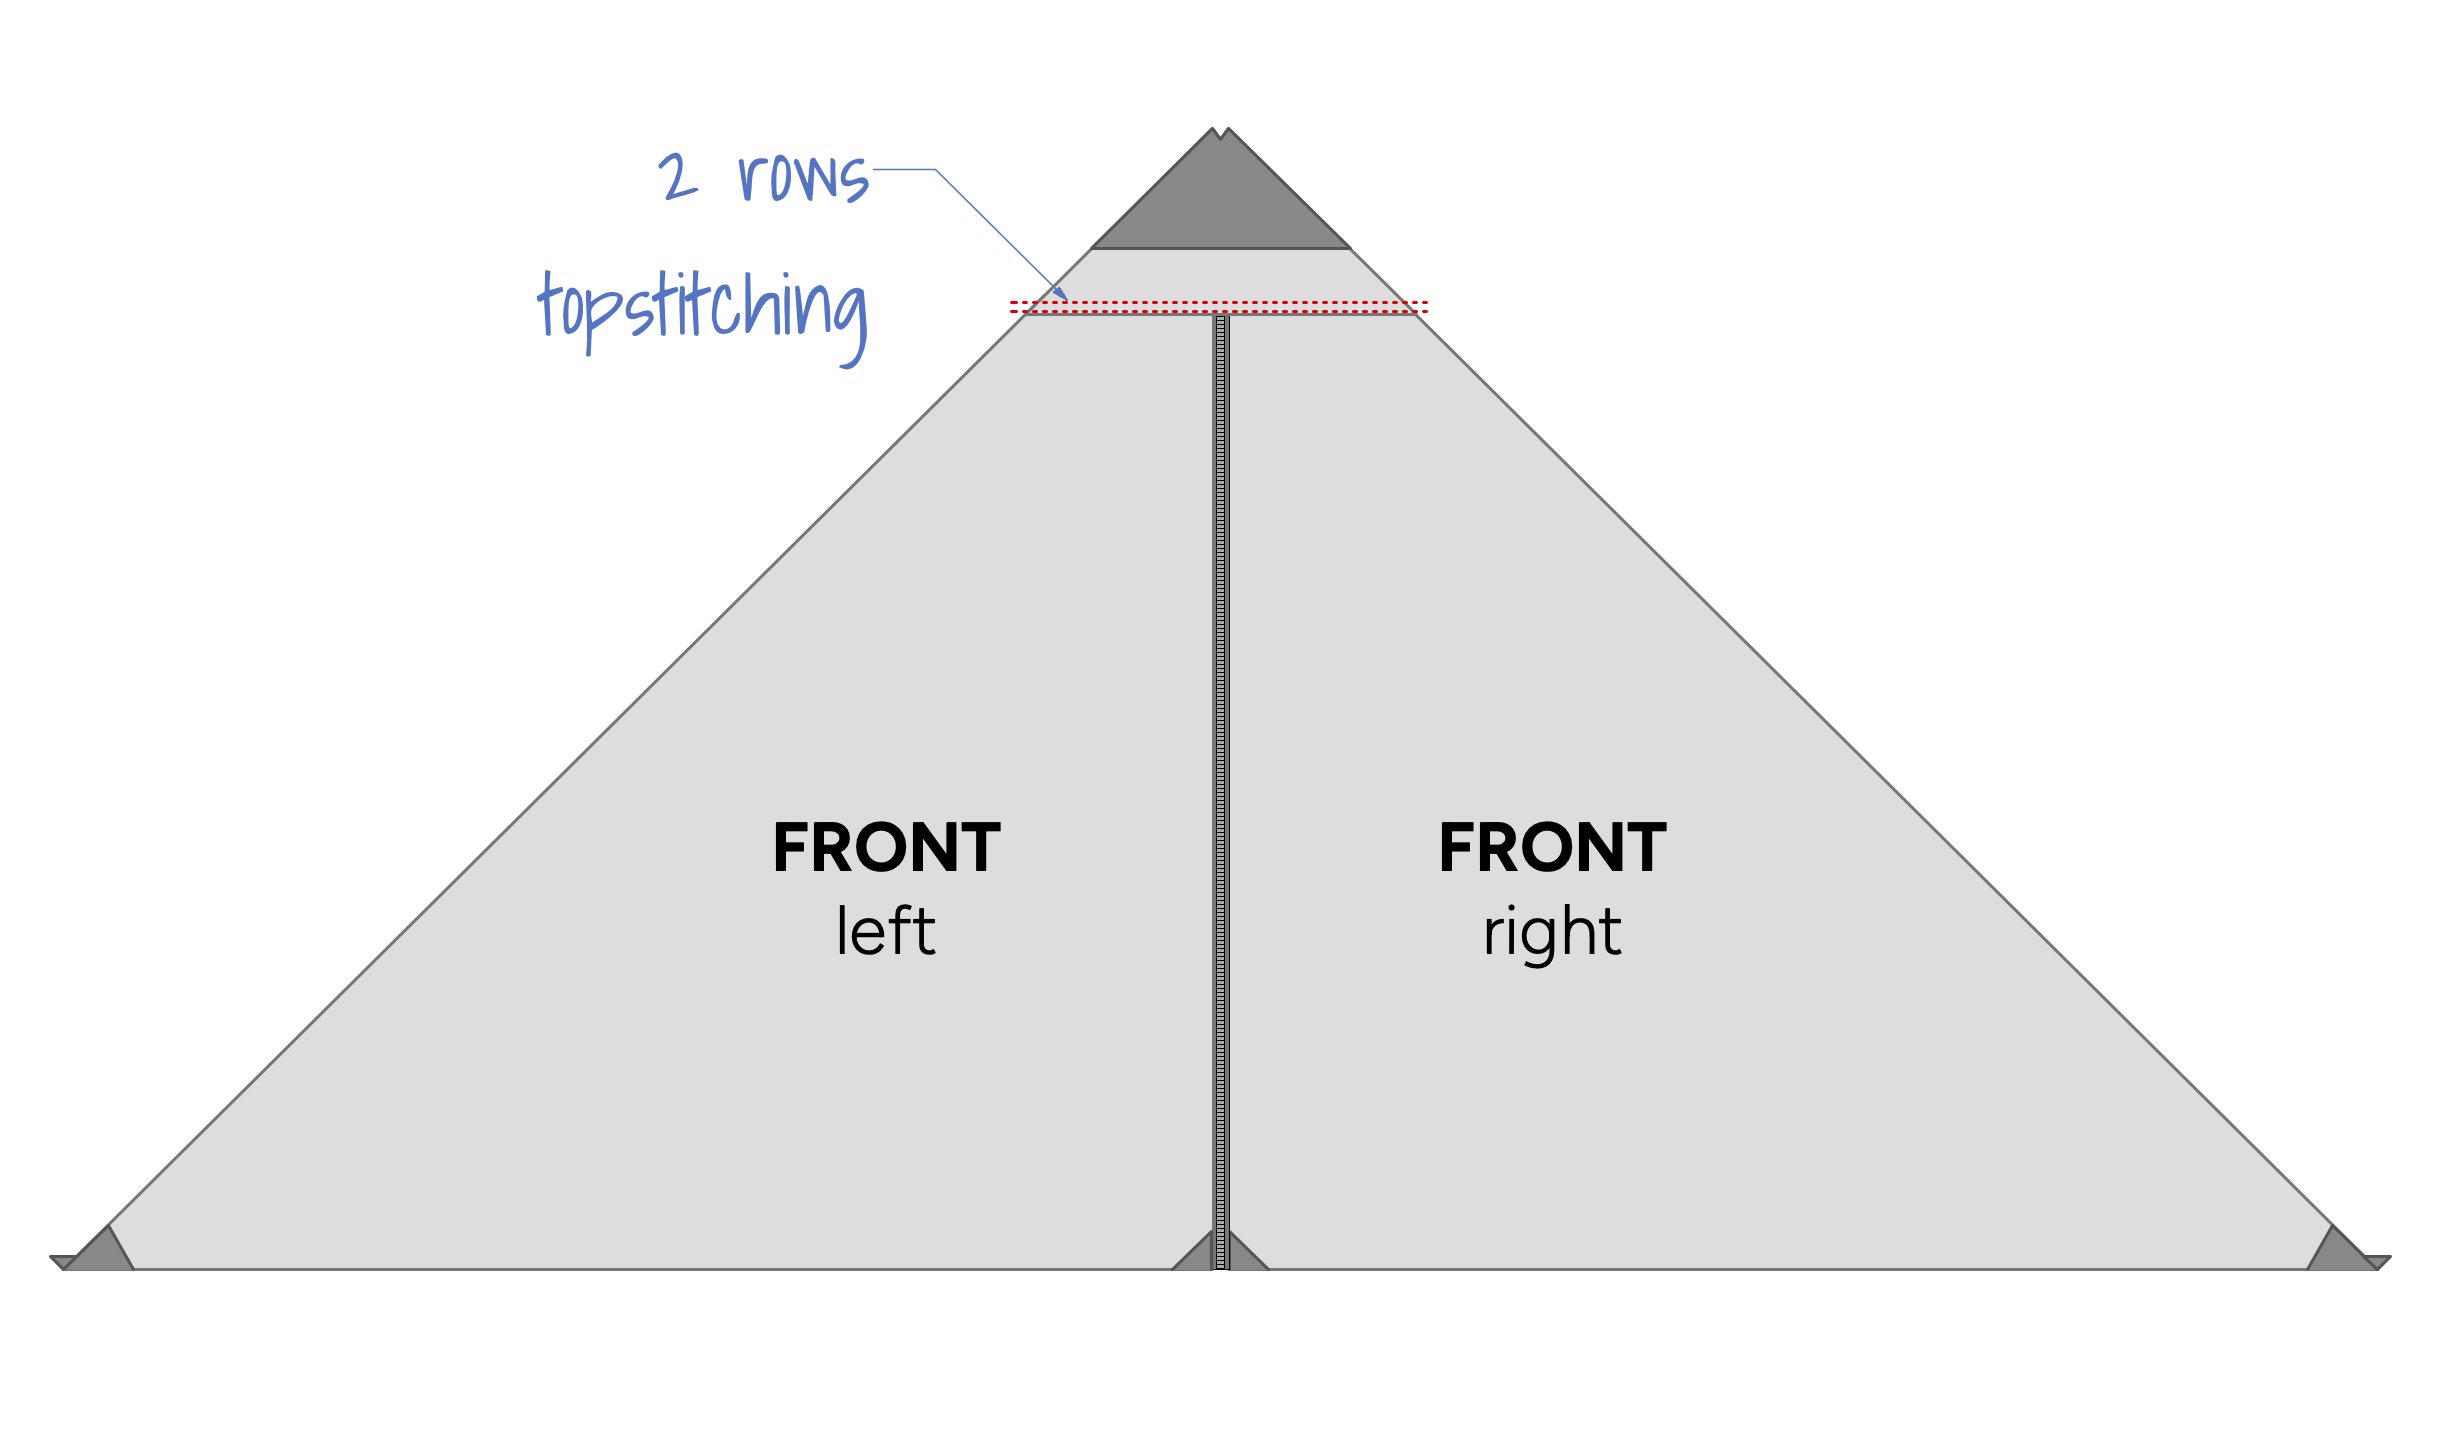
Pin the door top to the front panels right sides together with the top edges aligned as shown below. The door top should be centered on the zipper. Stitch the part in place with a ½” seam allowance.
Fold the parts open and press the seam allowance up toward the top. Top stitch the seam allowance in place, stitching ⅛” from the seam. Sew a second row of topstitching ¼” from the first as shown.
Cutting the catenary curves:
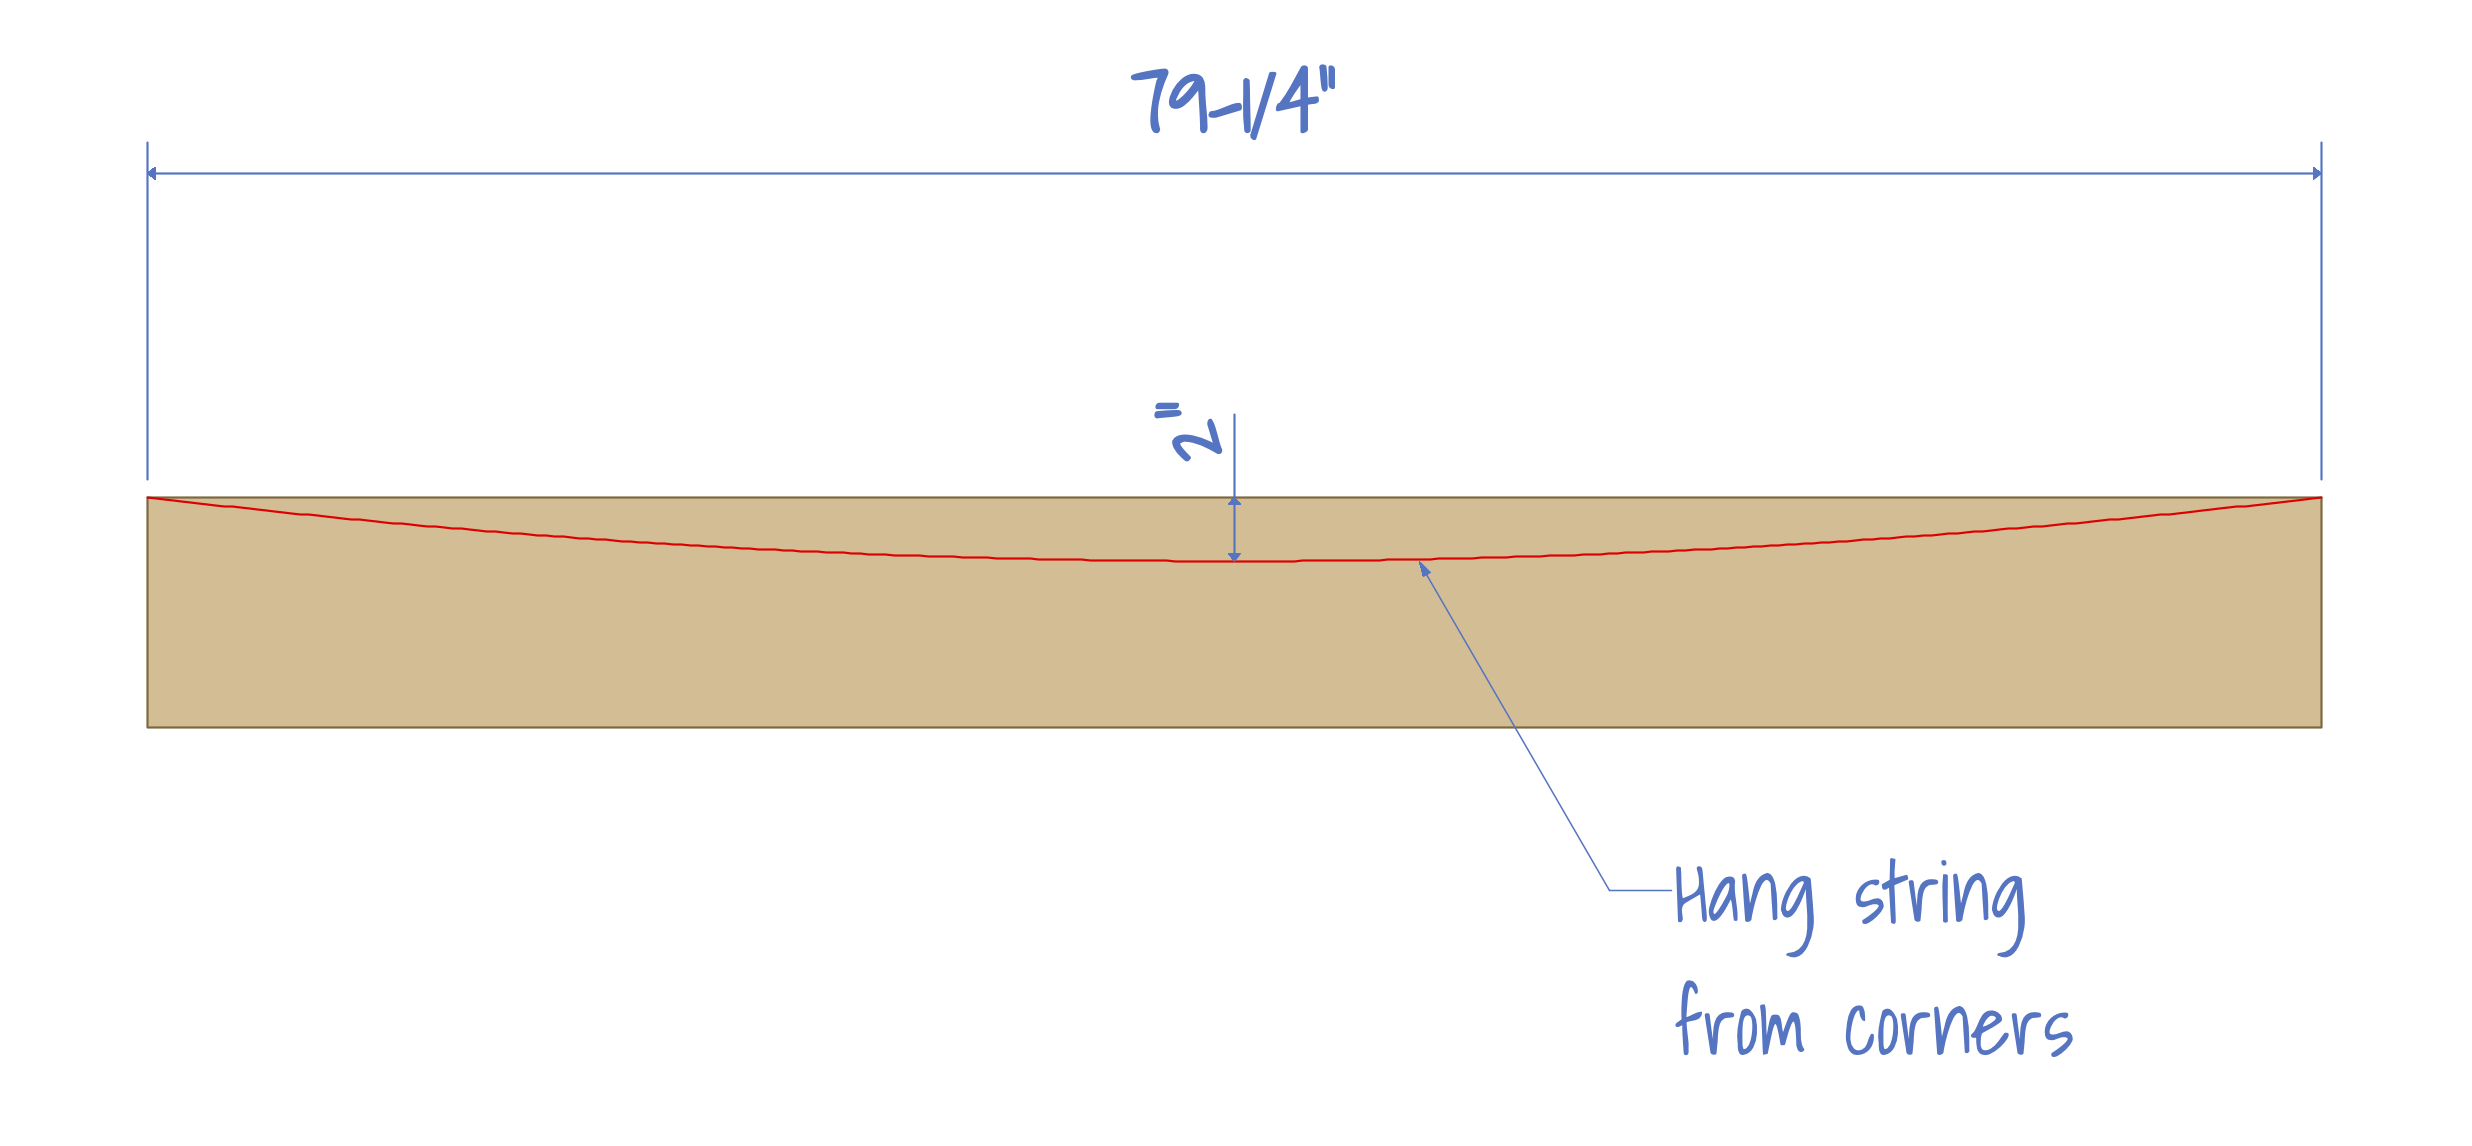
The first step in cutting the curves is to create a template. This could be done with a long piece of foam board or cardboard but I felt it would be easier to use ⅛” masonite. It would also result in a more sturdy template that I could save to use on future tents. Masonite can be purchased at most big box lumber stores in 4x8’ sheets. I had the store cut it into narrow strips.
Cut the template material to the length of the side of the tent panels. In this case 79-¼” as shown below. Find the center of the template material and measure down how far you want the curve to go. In this case I chose 2” and I’m happy with how that turned out.
Stand the template upright against a wall or other supports. Tape a piece of string to the template corners being careful to have the string run right to the corners as shown. I ended up taping the string on the back side of the template. The string should droop down to the mark at the center of the template as shown.
An easy way to mark the location of the string on the template is to use spray paint. Just lightly spray over the string leaving an outline of the string on the template. This is a trick I discovered reading this article which has a lot of other good information.
After marking the string use a jigsaw to cut out the curve as shown. If you end up with any wiggles or waves in your template use a sanding block to smooth them out.
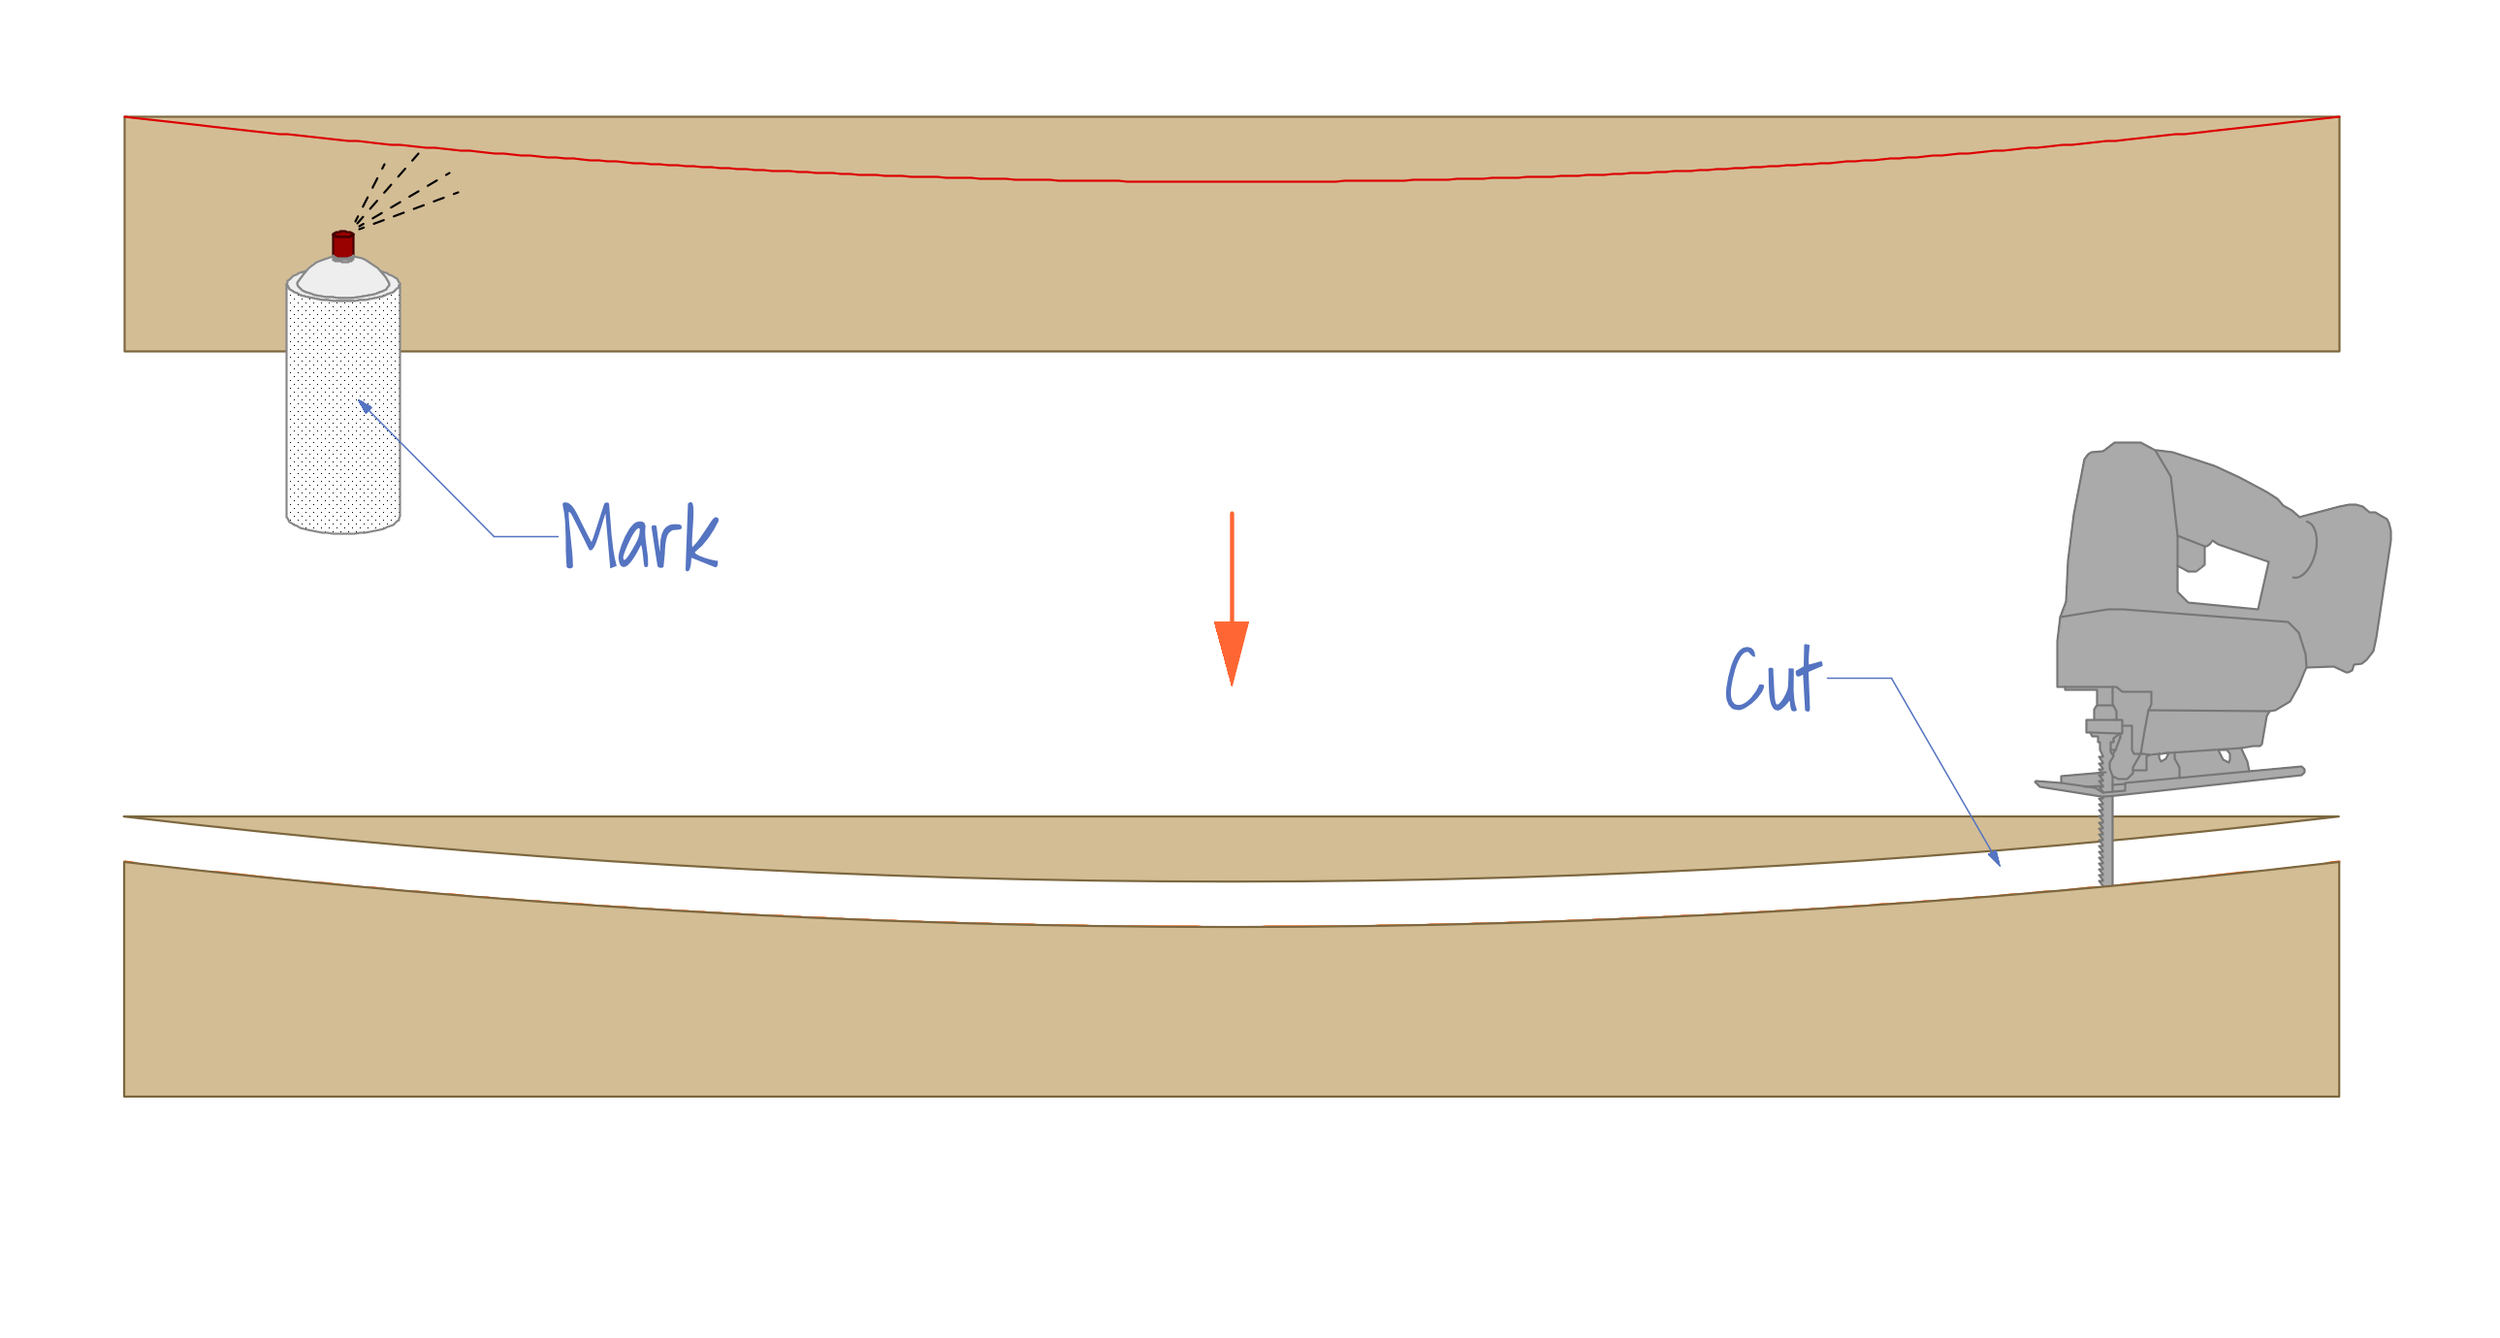
Once the template is complete you can use it to mark and cut the curves on the tent panels. I found it easiest to mark the curve on the panel with a fine tipped felt pen, and then cut out the curve with scissors.
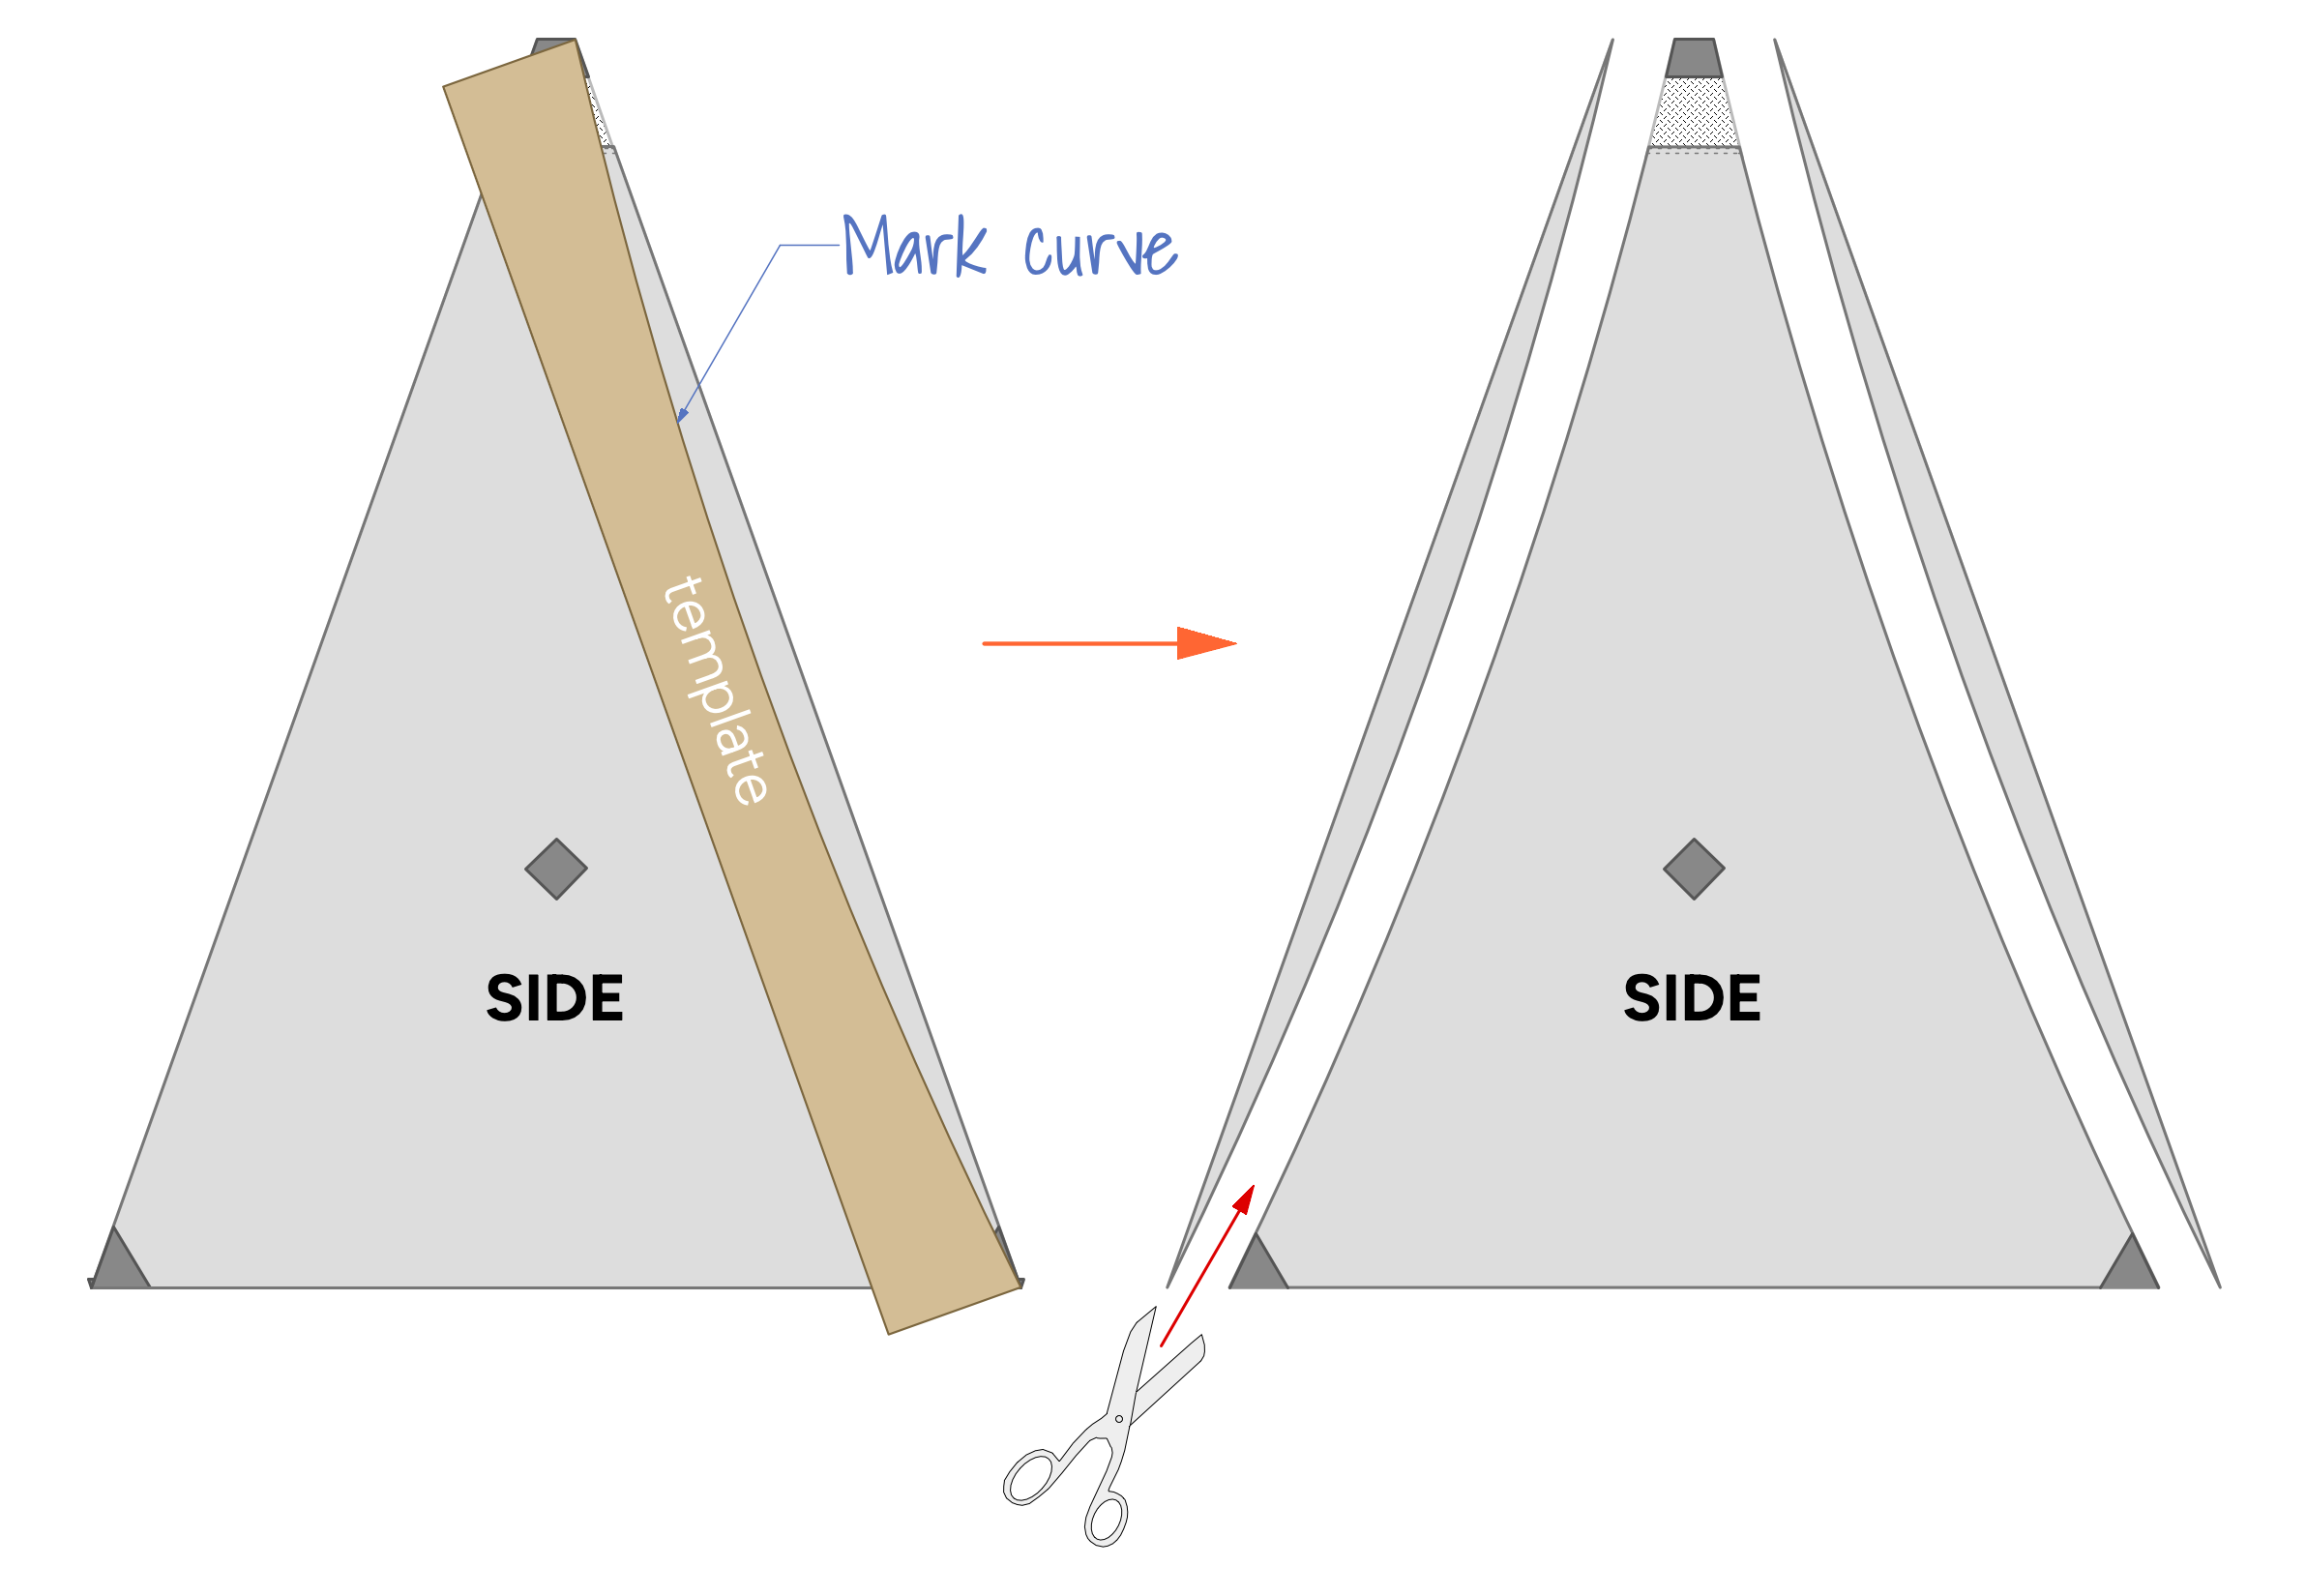
Side note: I found it difficult to work with the long template as it was longer than my work table so I ended up cutting the template in half. I then folded each panel in half along the edge and marked the panels that way. (Marking 2” in from the fold and aligning my template with the mark.) It worked, but if you have a spot big enough to lay out the full panels I think that would be simpler.
Cut the curves into the edges of all the panels as shown.
Preparing the vent covers:
Make a ¾” fold on the bottom edge of the vent covers as shown below. Fold so that wrong sides are together. Stitch right next to the fold and trim the overhanging corners flush as shown below.
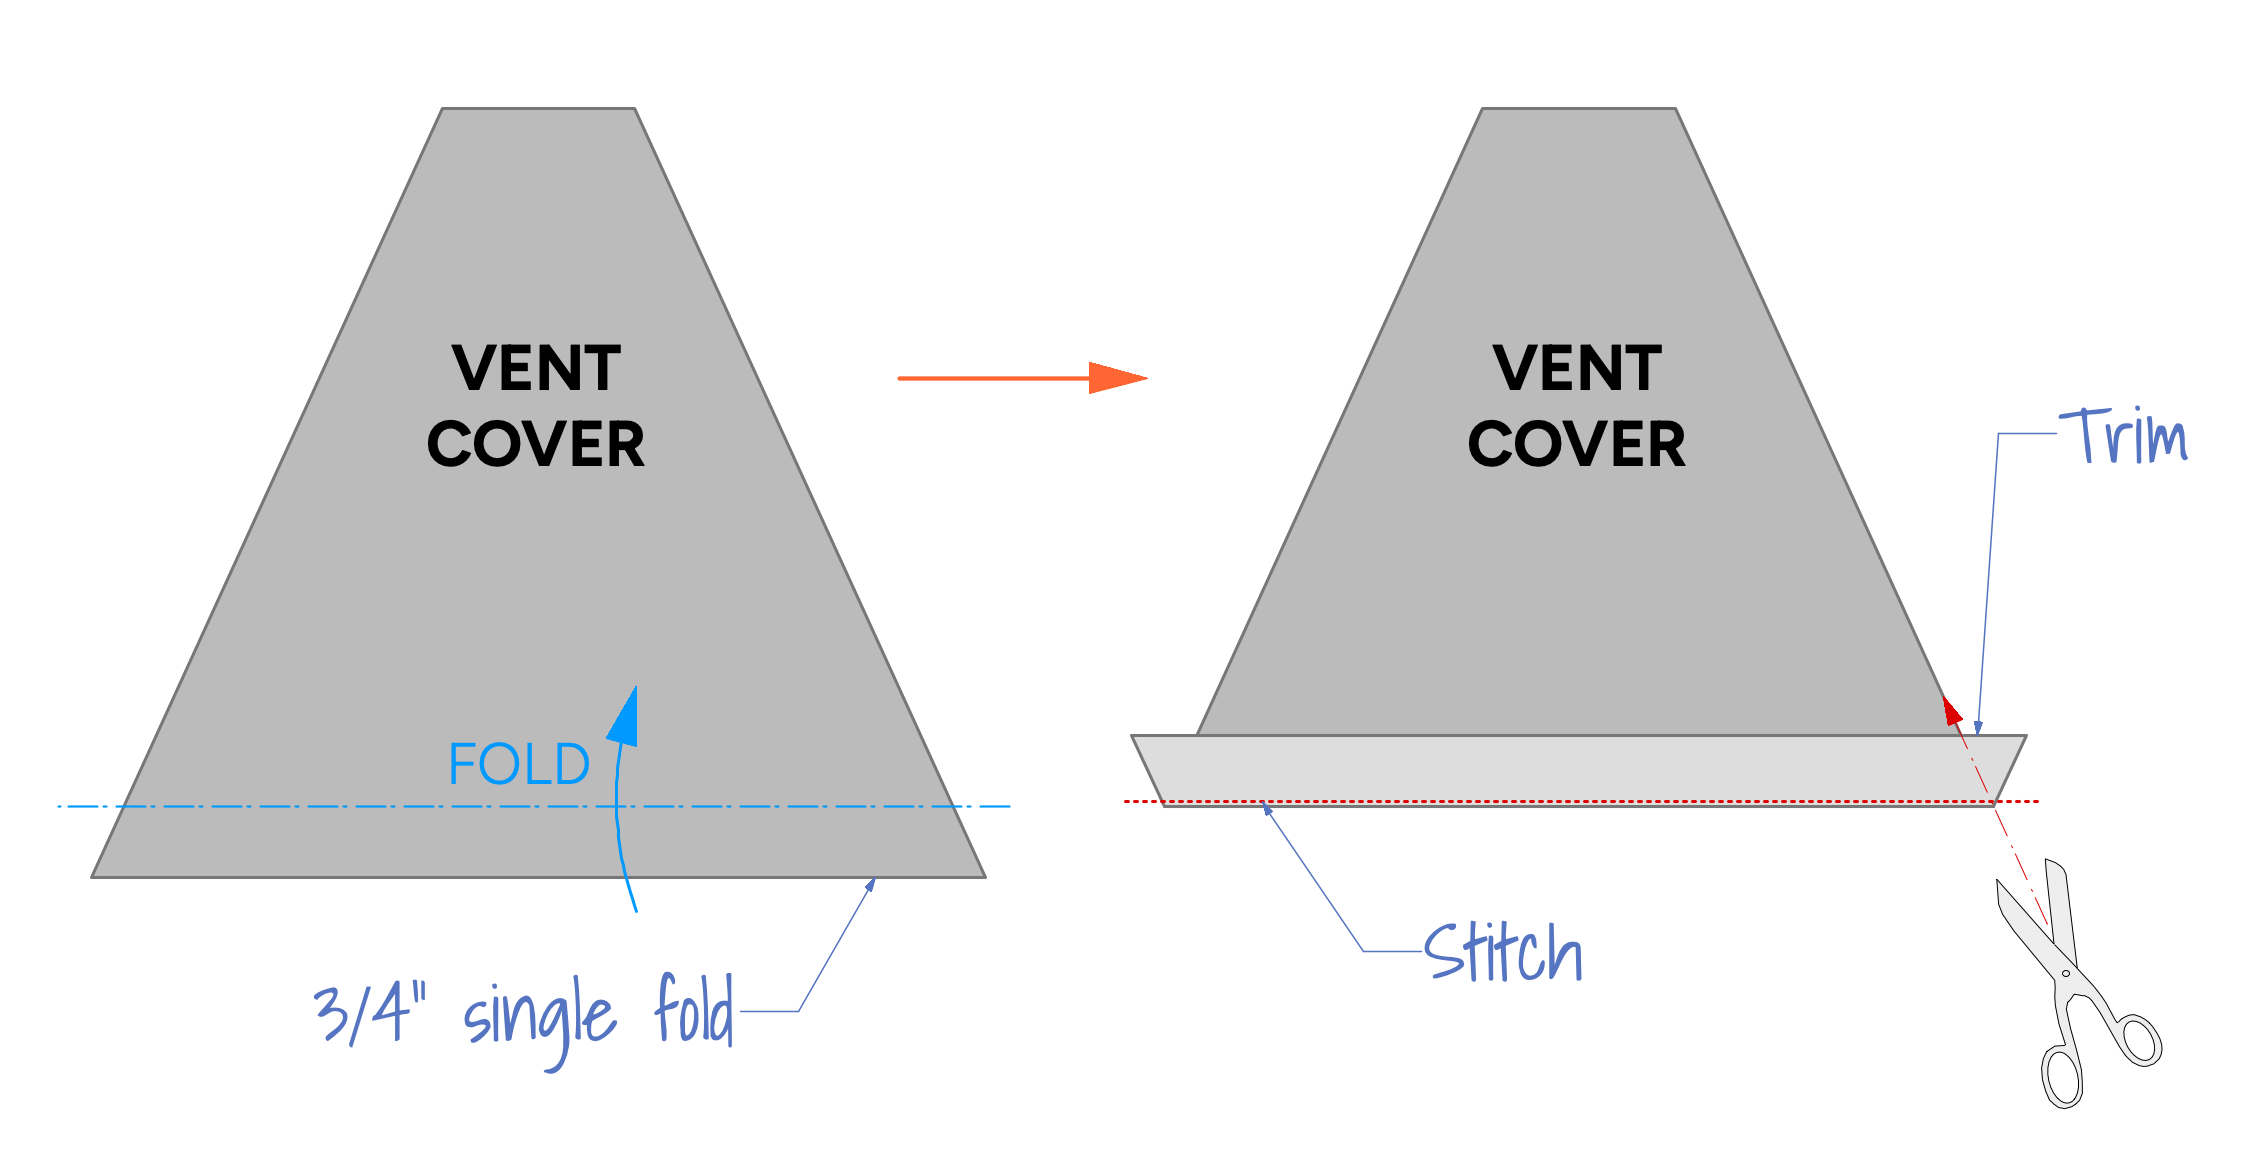
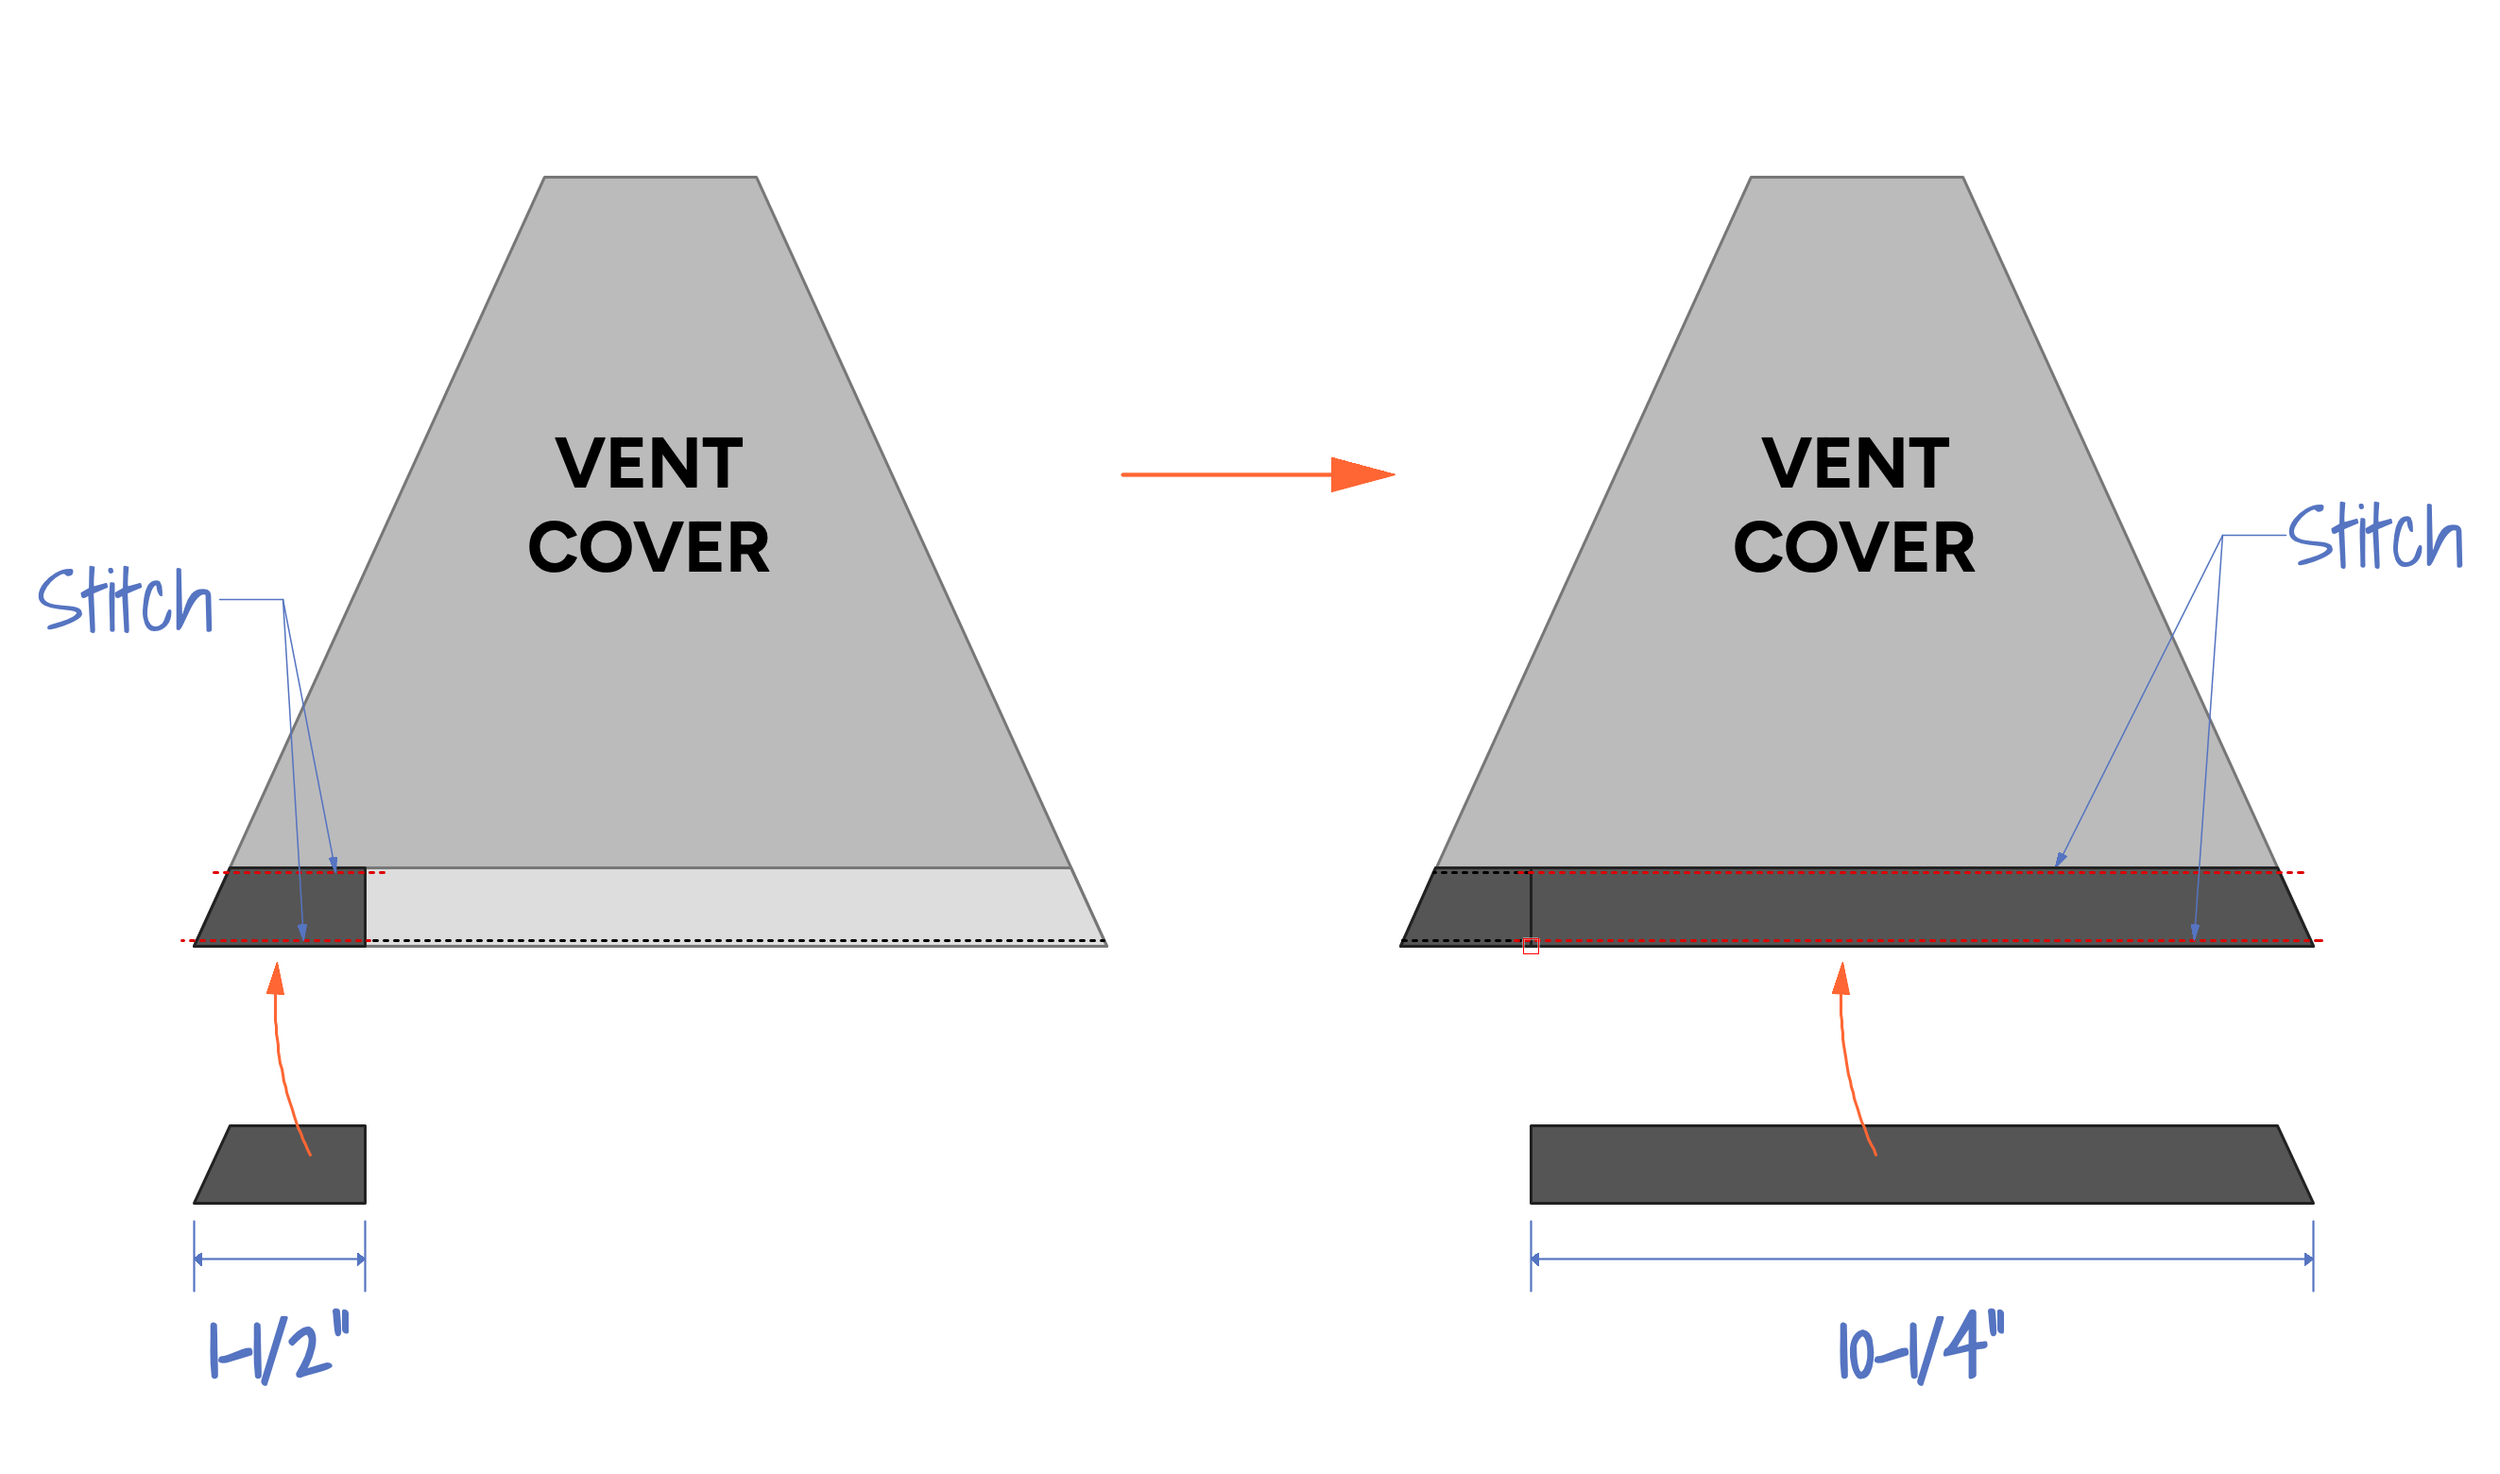
Pin a 1-1/2” piece of ¾” grosgrain to the bottom edge of the ventcover. The grosgrain should be placed on top of the flap from the previous fold. Stitch the grosgrain in place along the top and bottom edges as shown. Trim the end of the grosgrain to match the ange of the vent cover. Repeat this process with a 10-1/4” piece of grosgrain as shown. The inner ends of the grosgrain should meet. Leave these ends of the grosgrain open, as this is where the stiffener will be inserted later.
Pin the vent cover to the side panels with the top edge and sides aligned. The side of the cover with the grosgrain should be placed against the right side of the side panel. Stitch the vent covers in place along the top and sides as shown below.
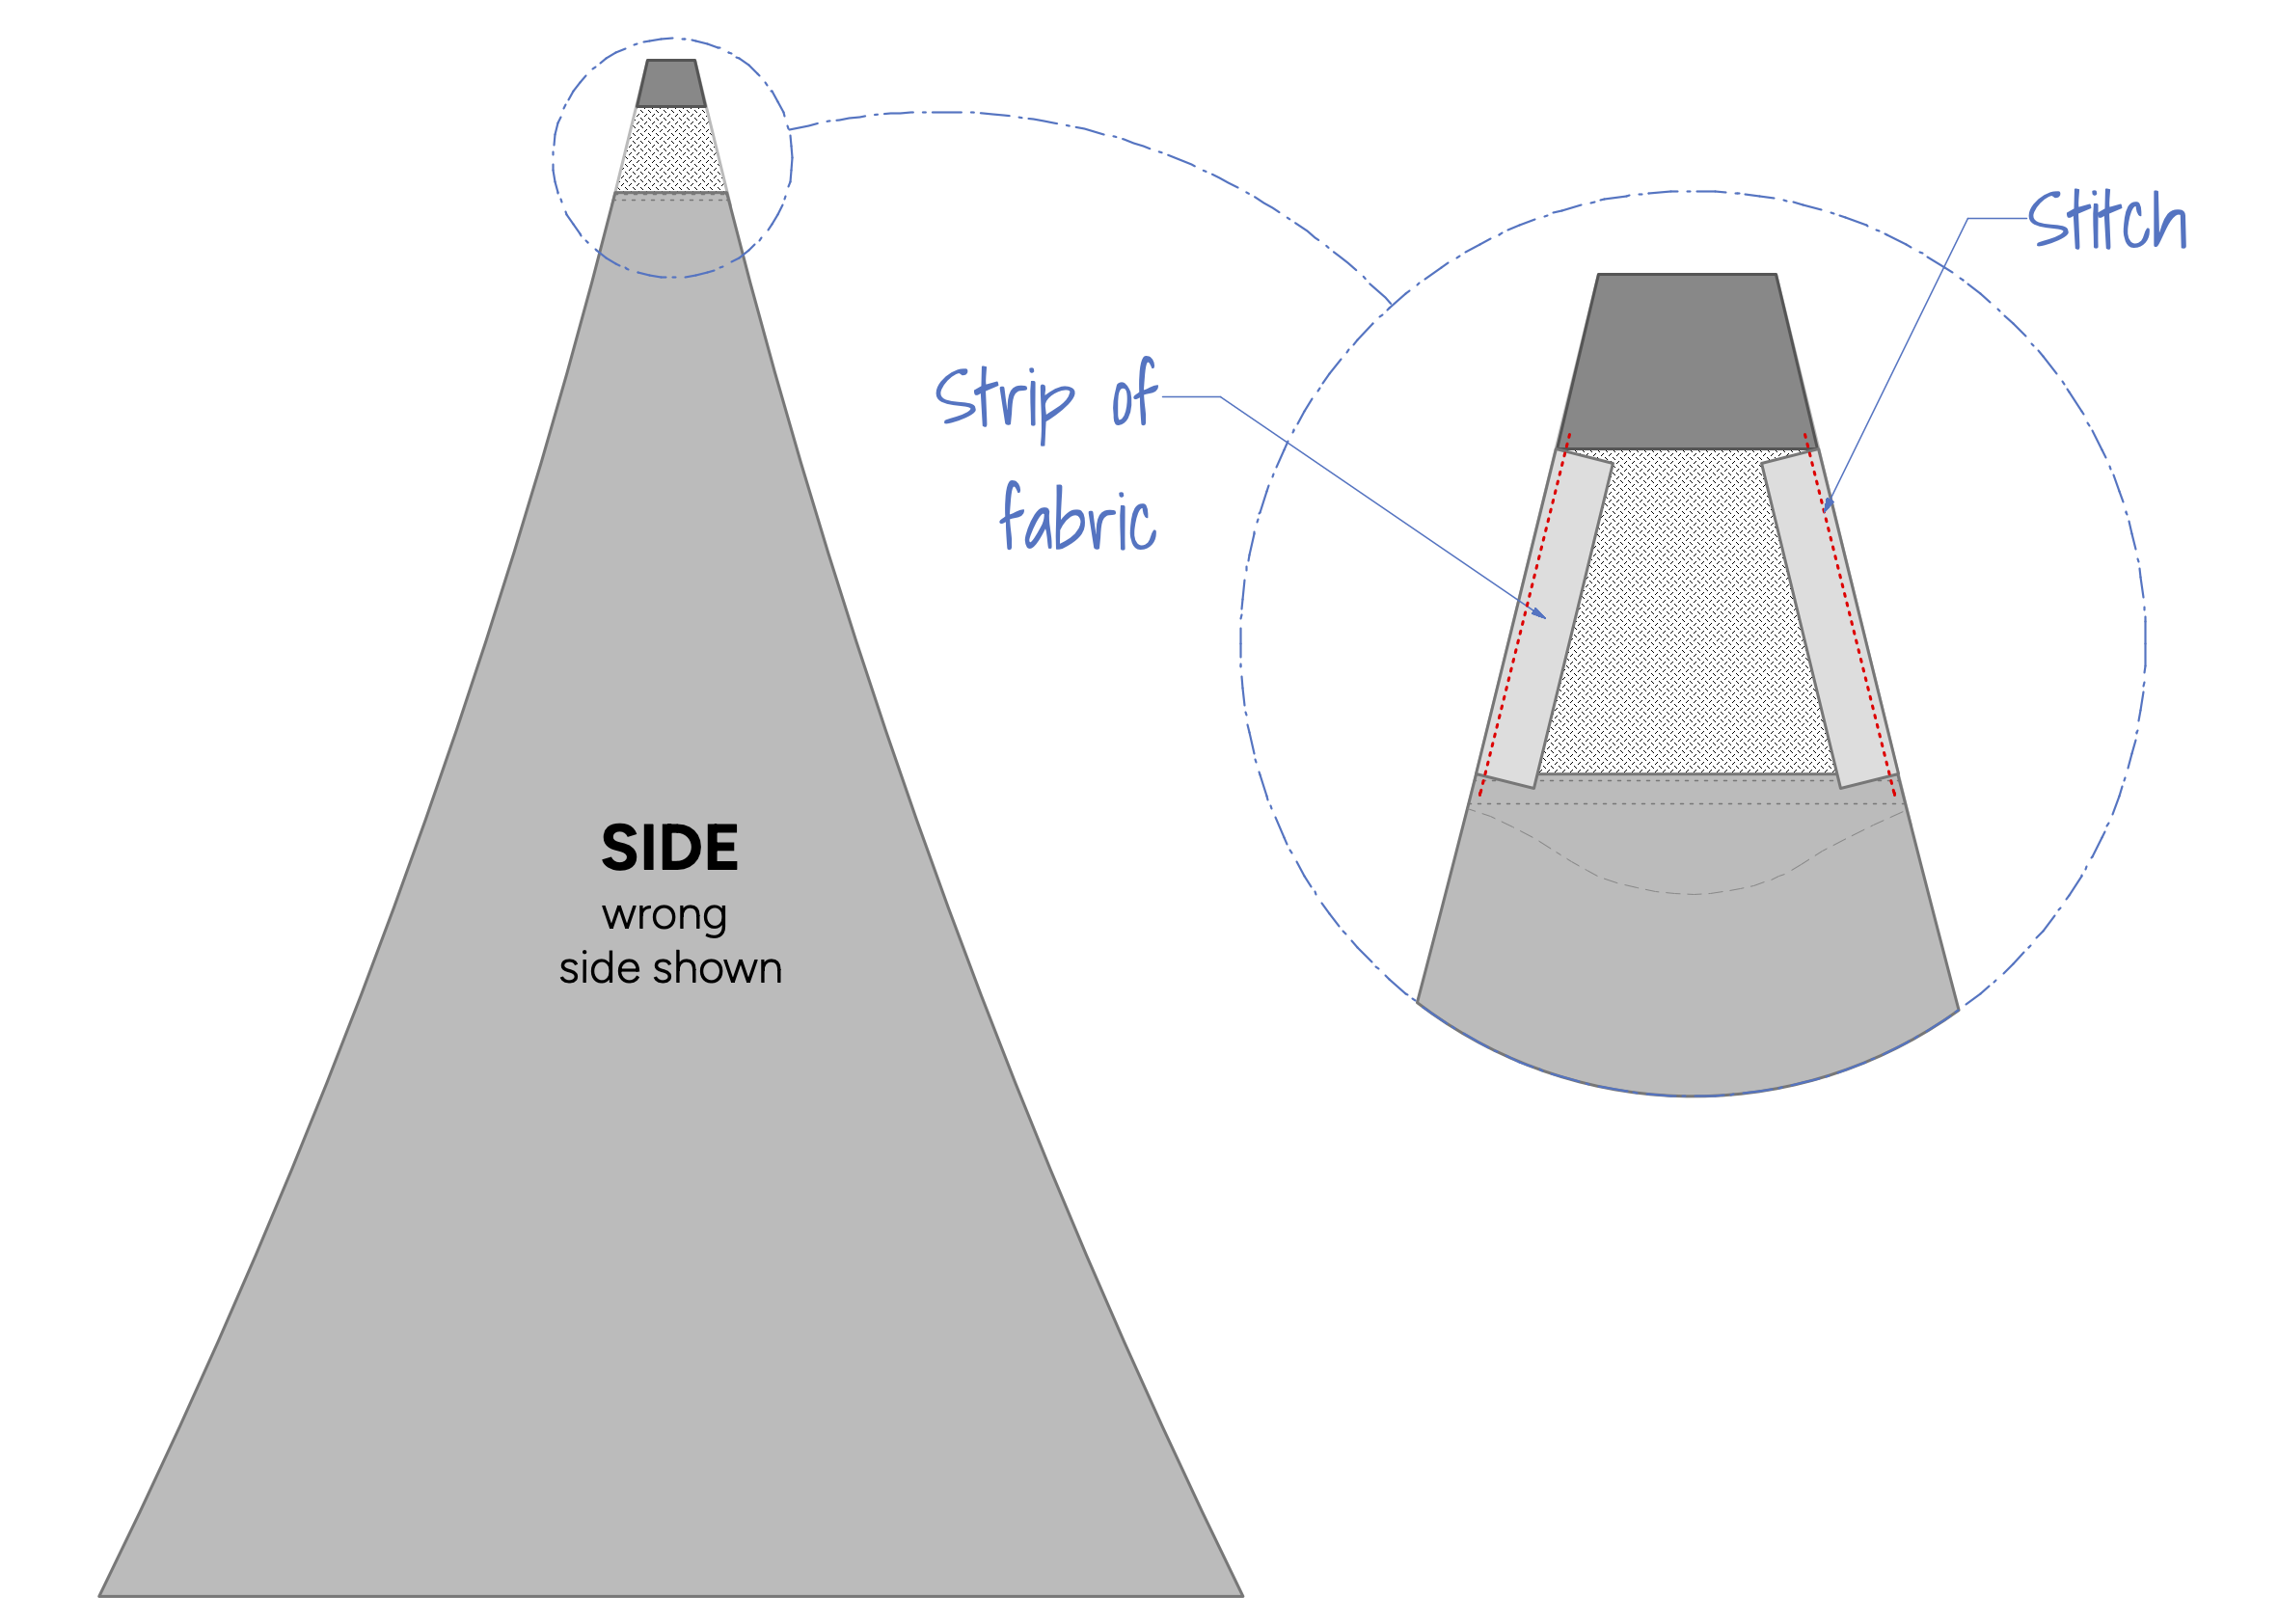
Take a 7-1/2”x3/4” strip of the tent fabric and pin it to the area where the mesh is located as shown. The wrong side of the strip should be against the mesh. Stitch the strip in place with a 1/4” seam allowance.
Note: This strip will be pressed to the side along with the seam allowance when top stitching. This creates a surface for the seam sealing tape to stick to.
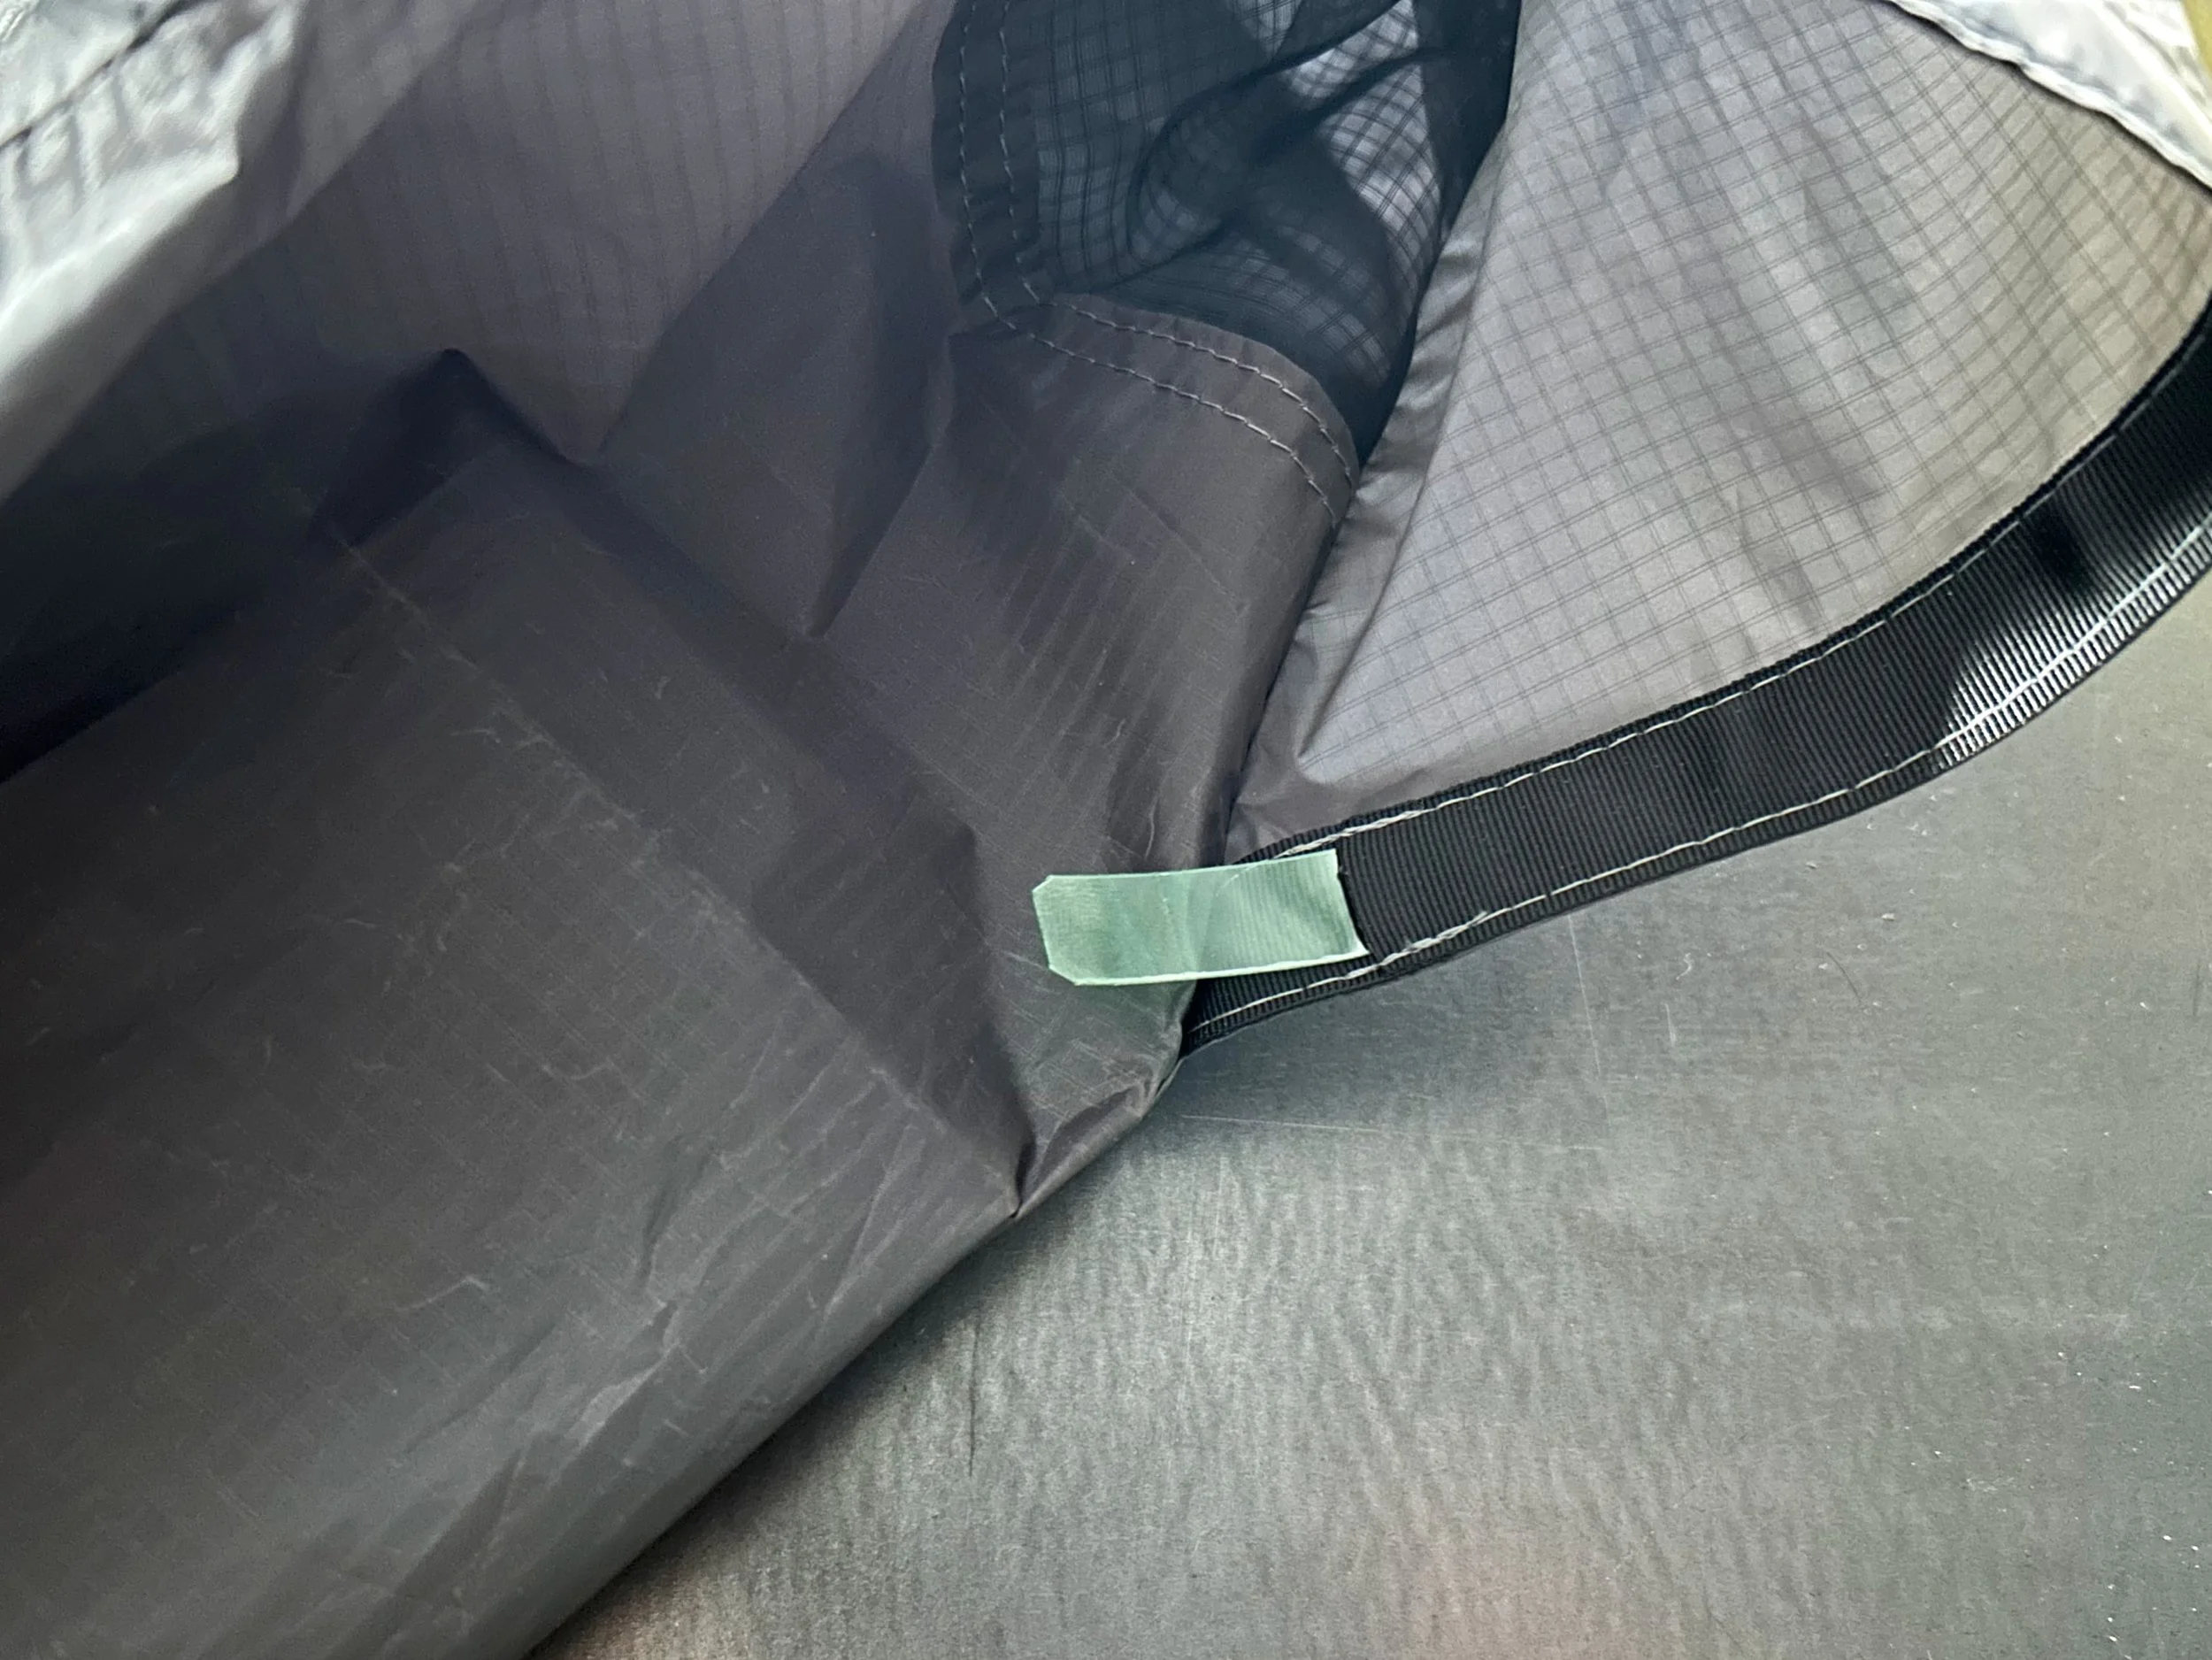
Take a 3” piece of ½” webbing or grosgrain and fold it in half forming a loop. Pin the loop to the guy-out reinforcement patch on the side panel. Stitch the loop in place with two bar tacks as shown below. Repeat on the other side panel and the back panel.
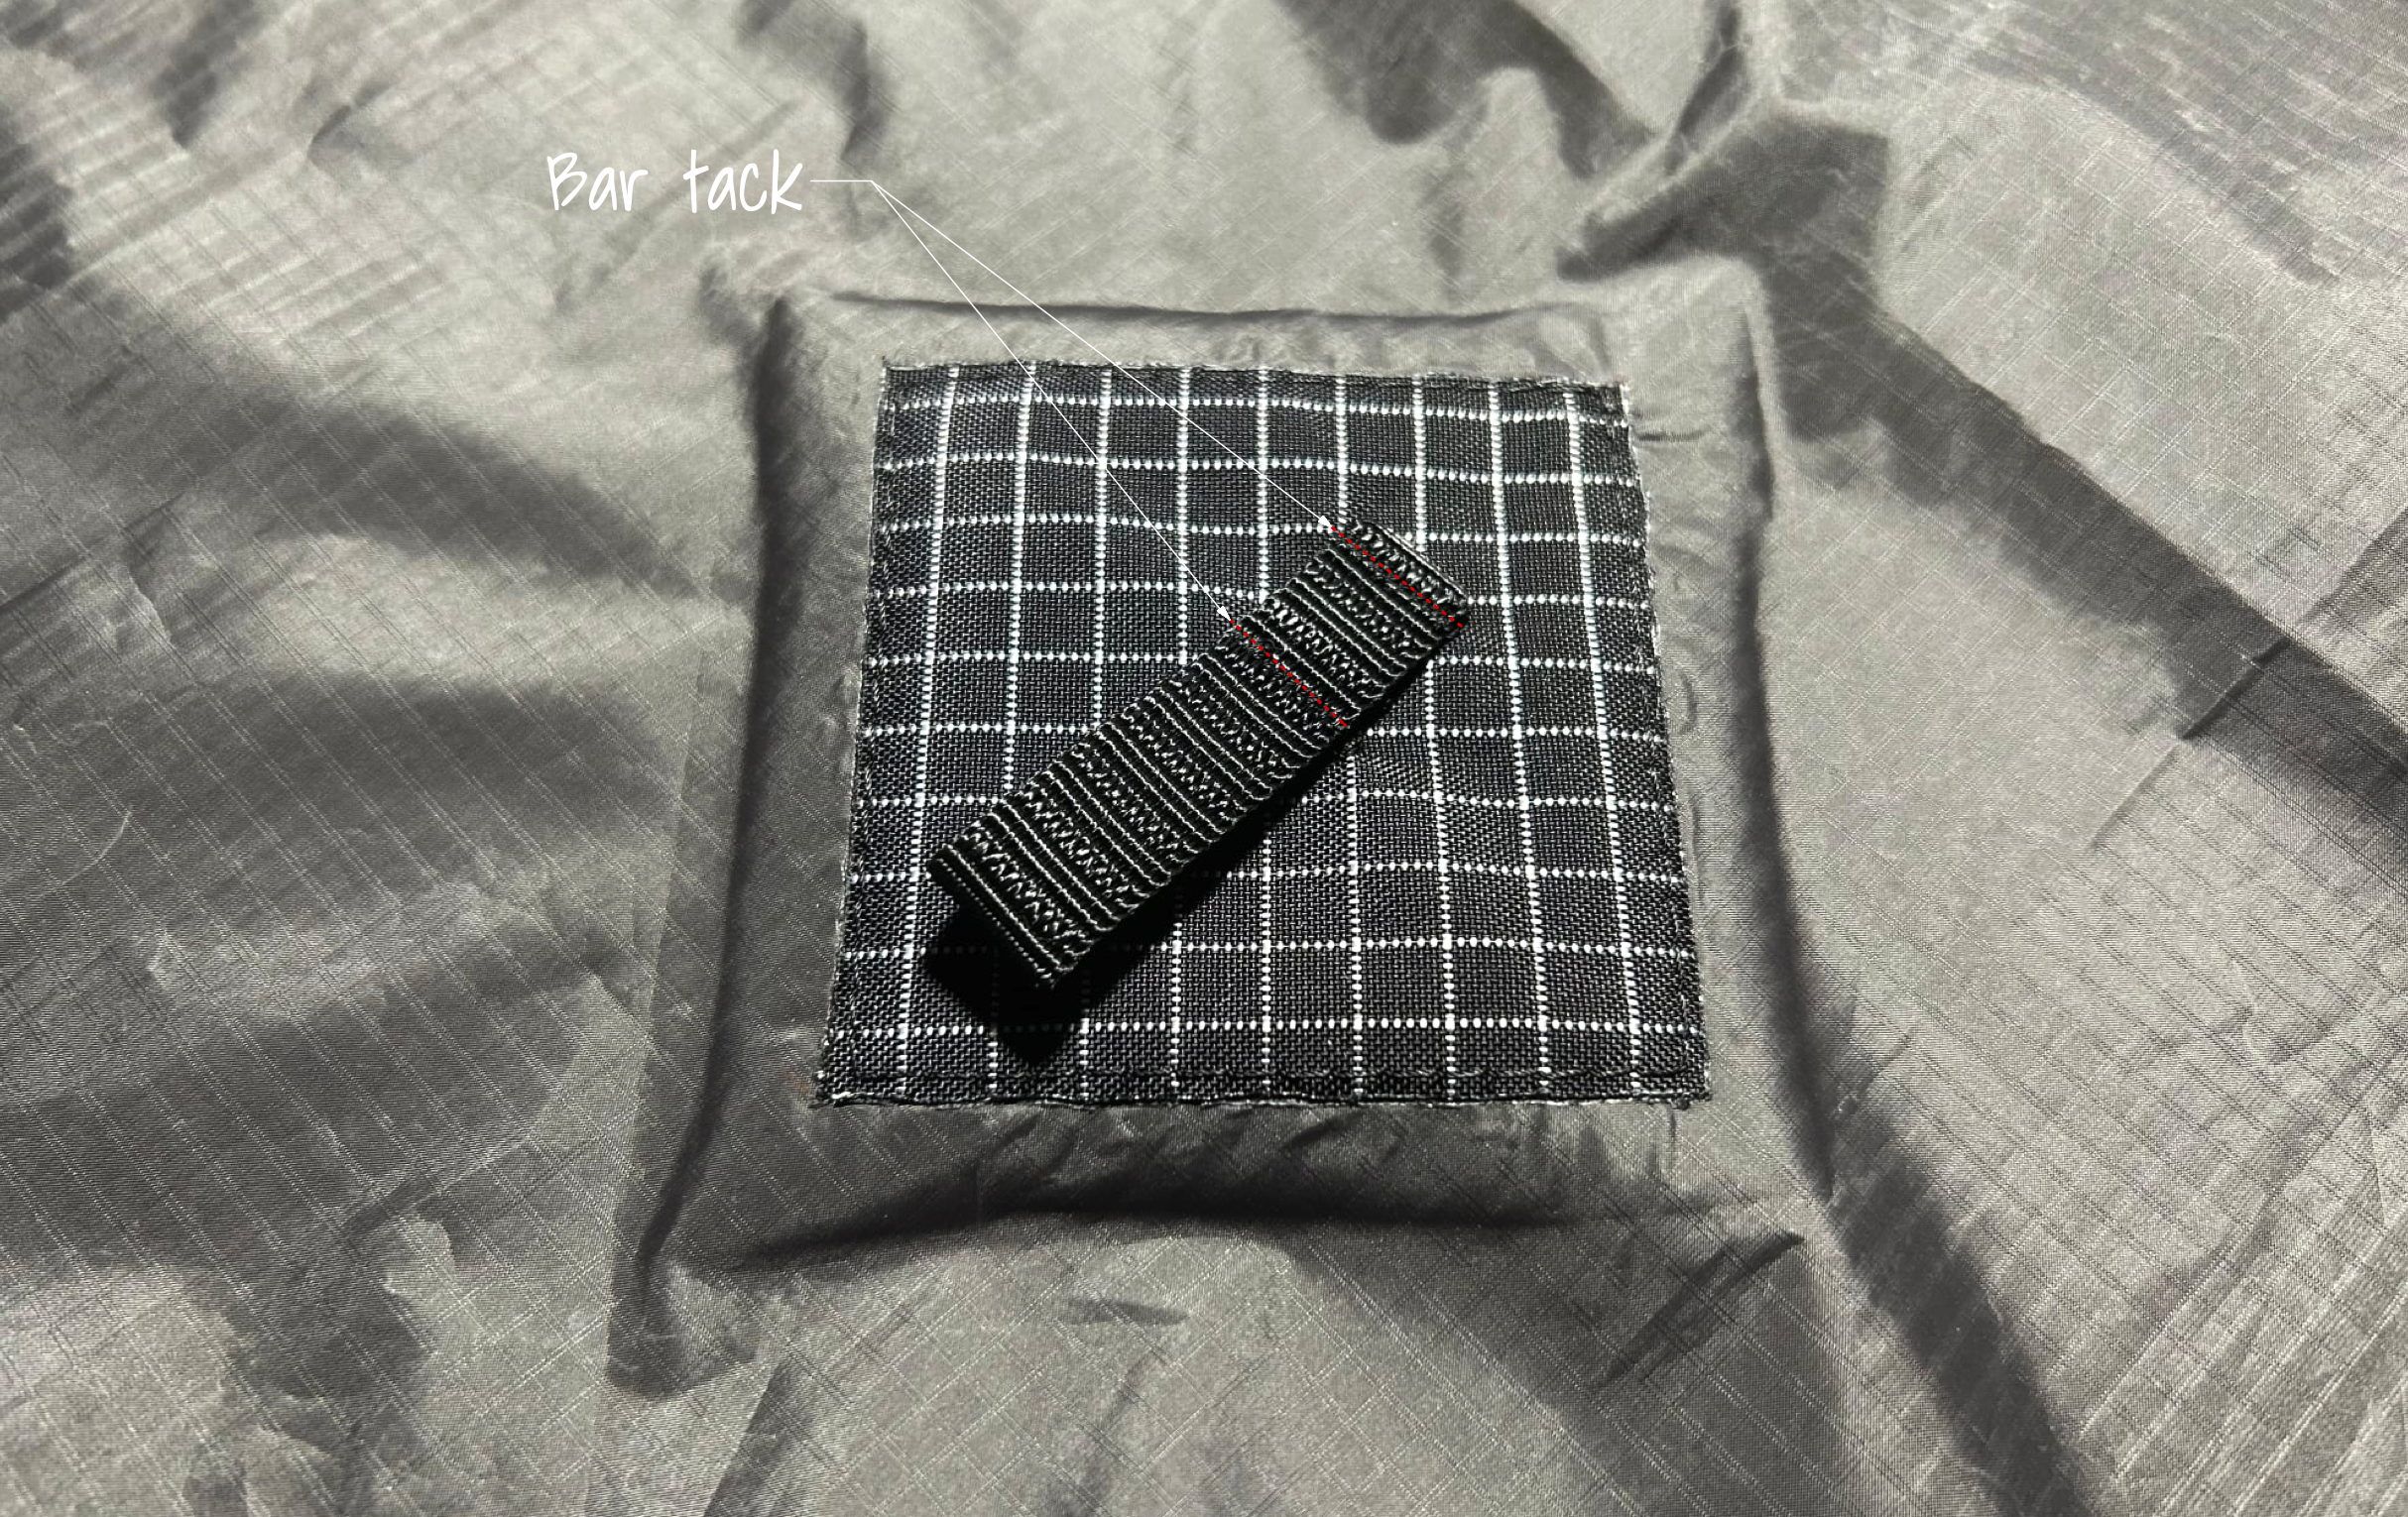
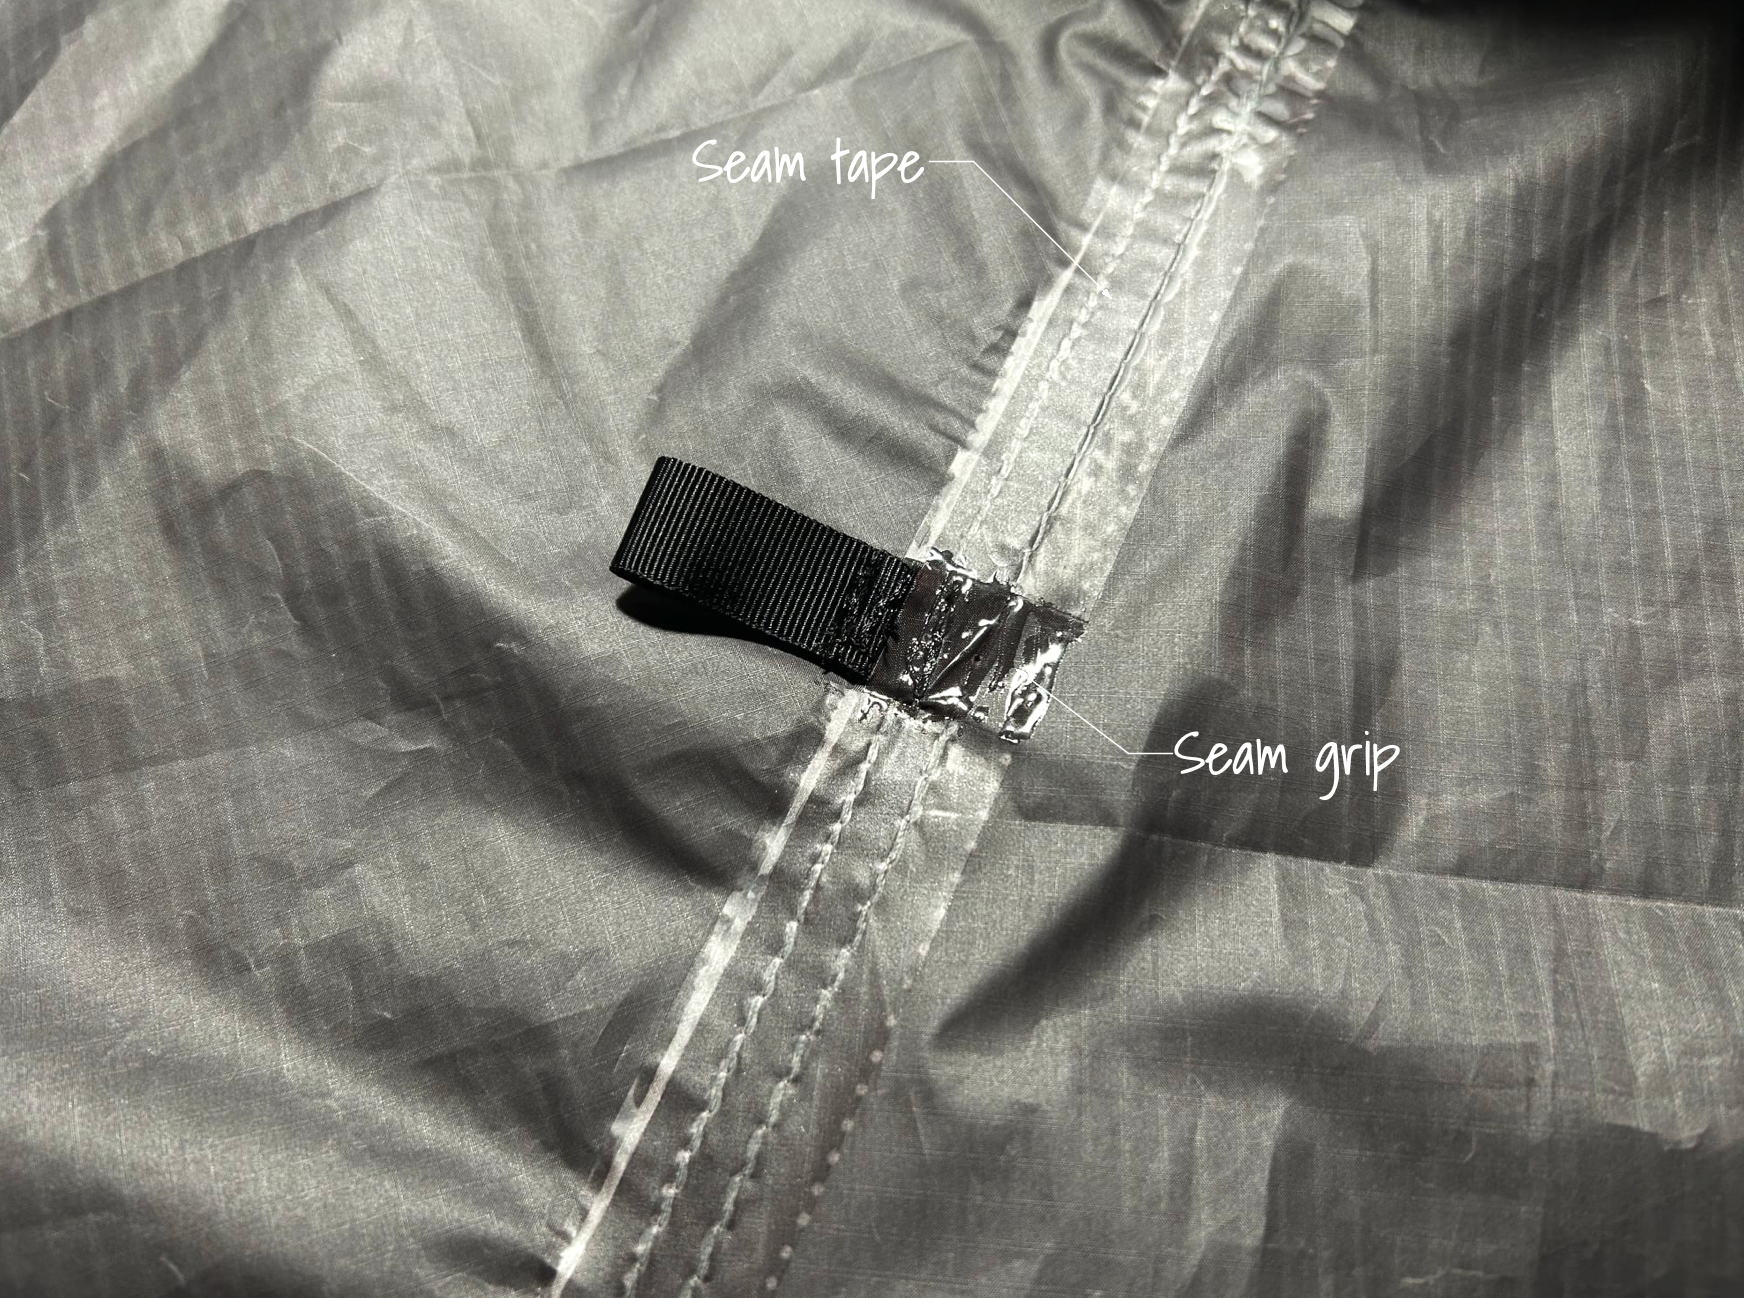
Use seam tape to seal the back side of the reinforcement patches as shown. I used seam grip on the bar tacks. You can find more information about using seam tape here. Repeat this process with the other patches.

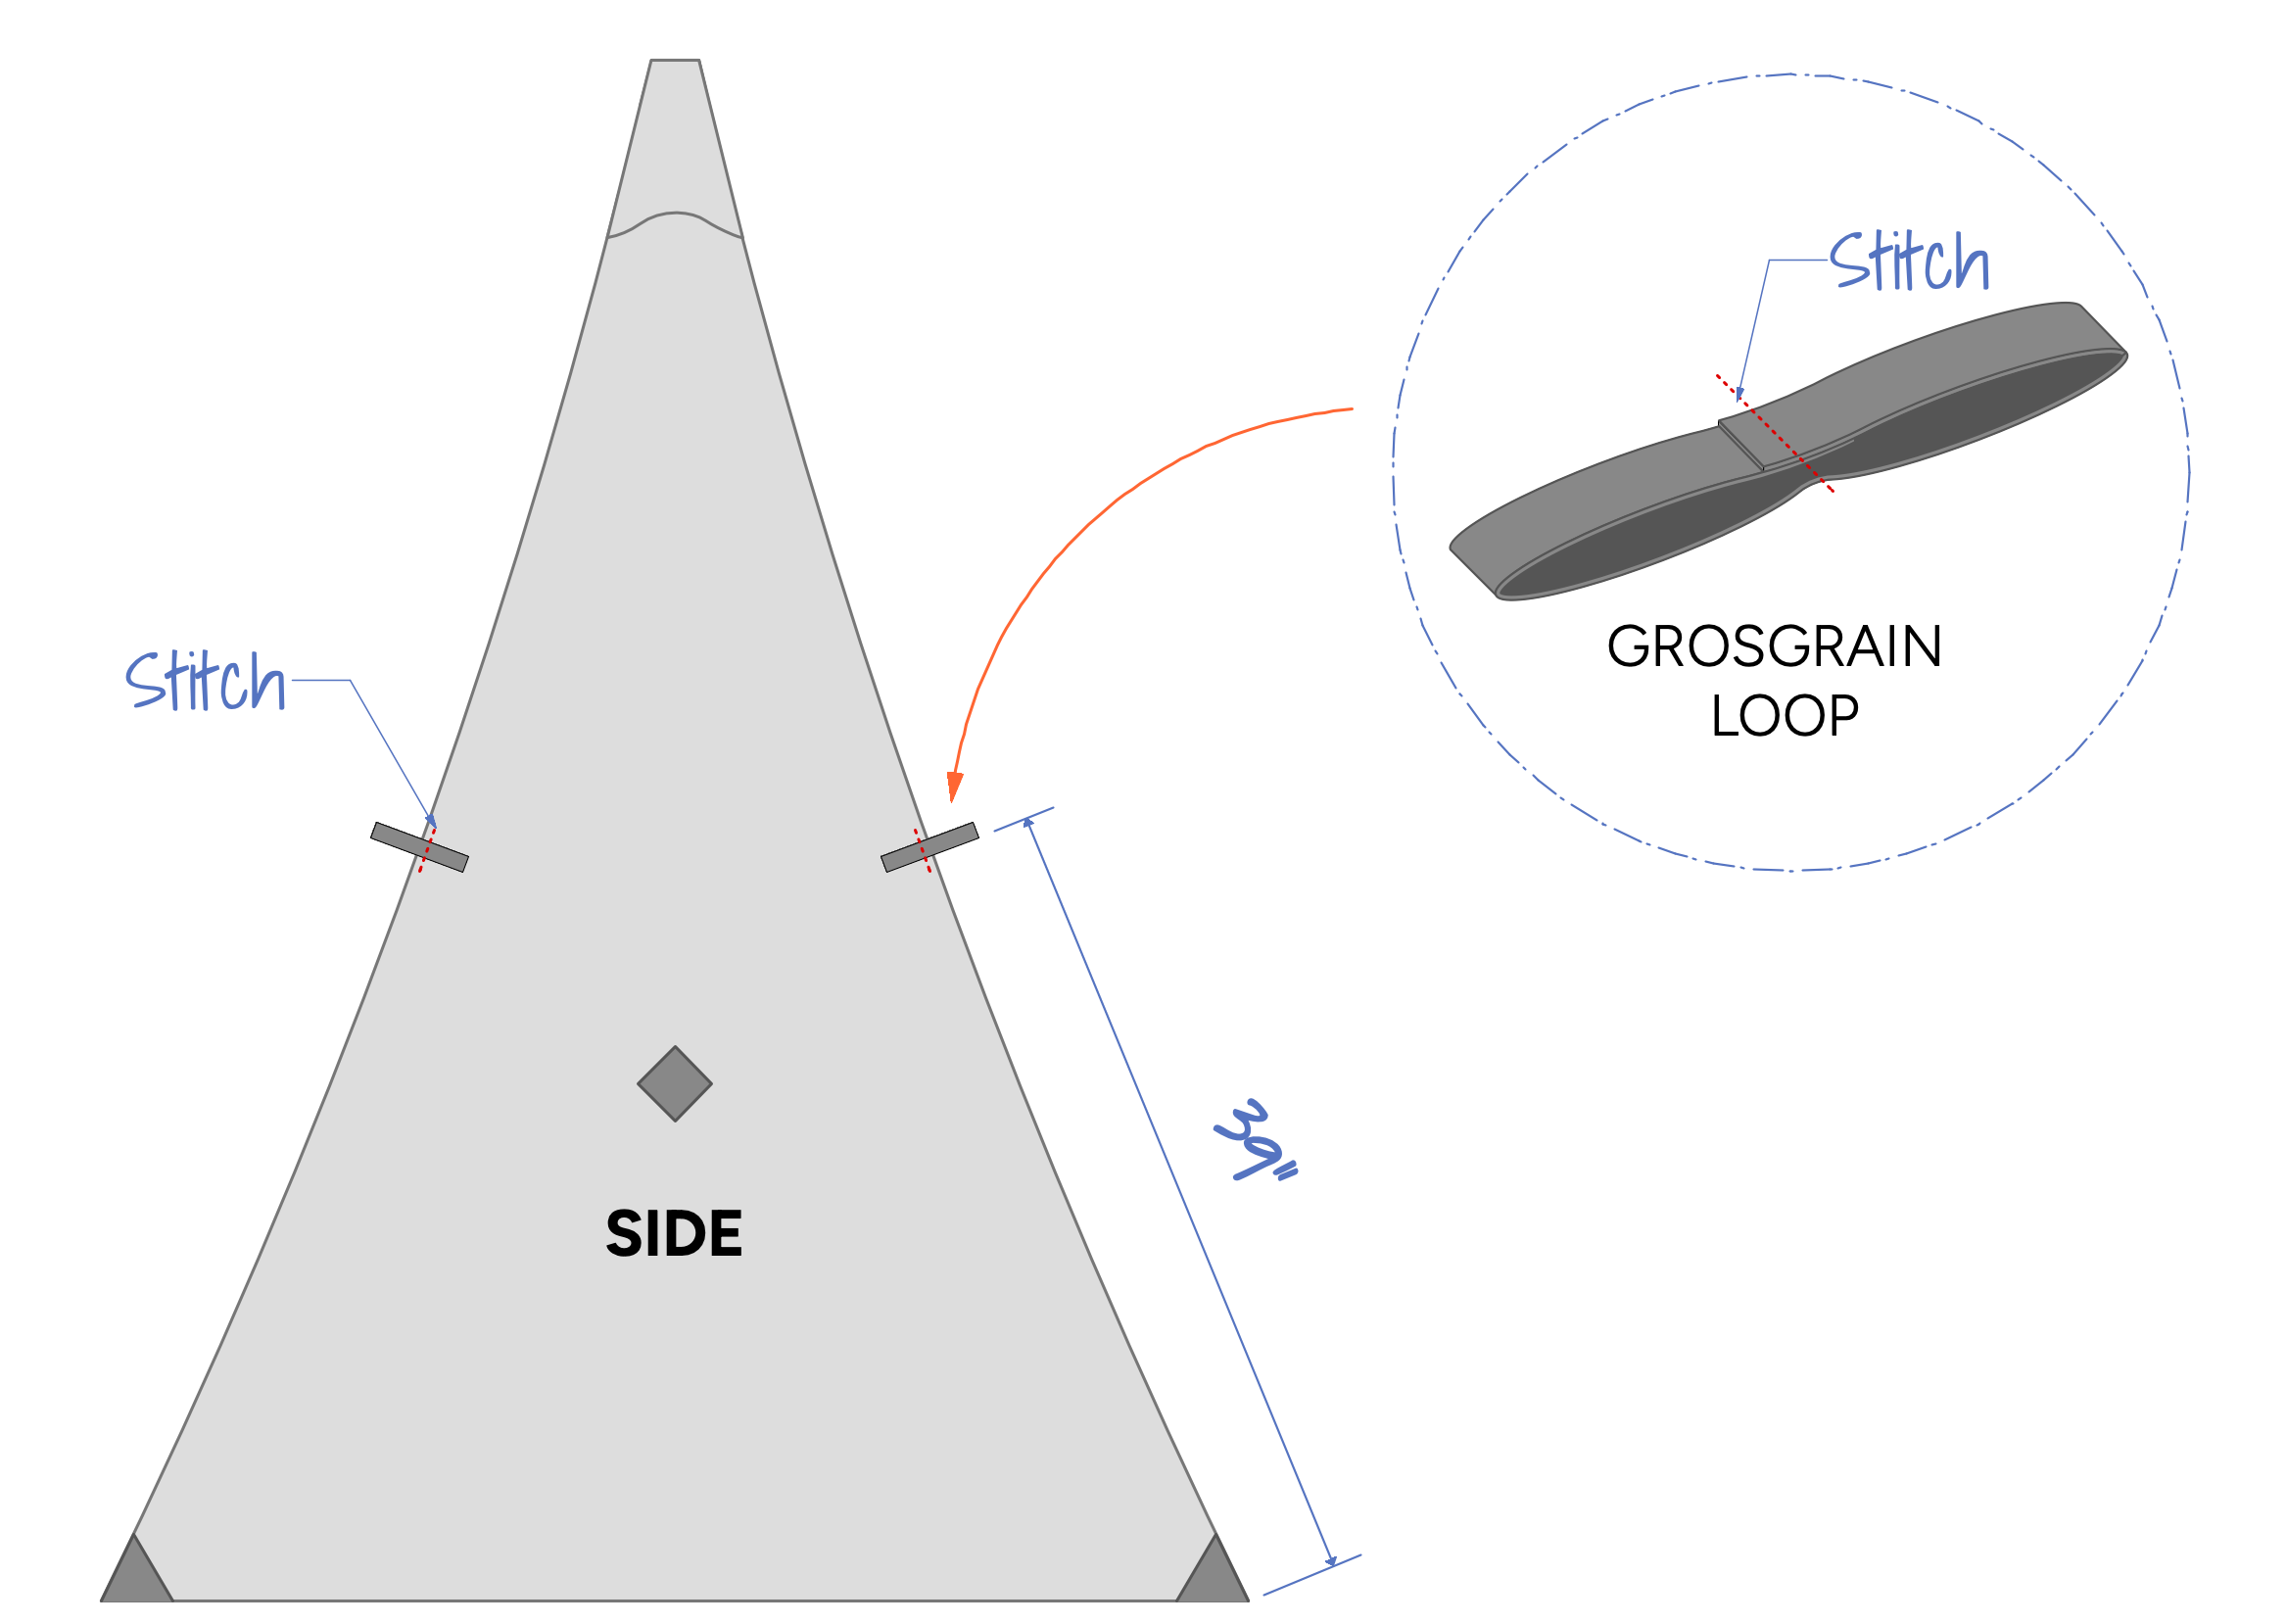
The next step is optional and adds additional guy-out loops that can also be used for retaining the open doors. Take a 6” long piece of 1/2” grosgrain and fold both ends into the center making a double sided loop as shown below. The ends of the grosgrain should overlap slightly. Stitch the center of the loop together stitching through all three layers of grosgrain.
Pin the loop to right side of the side panels, 39” from the bottom edge as shown. The stitching on the loop should be place on the edge of the fabric. Stitch the loop in place with a 1/4” seam allowance.
Assembling the panels:
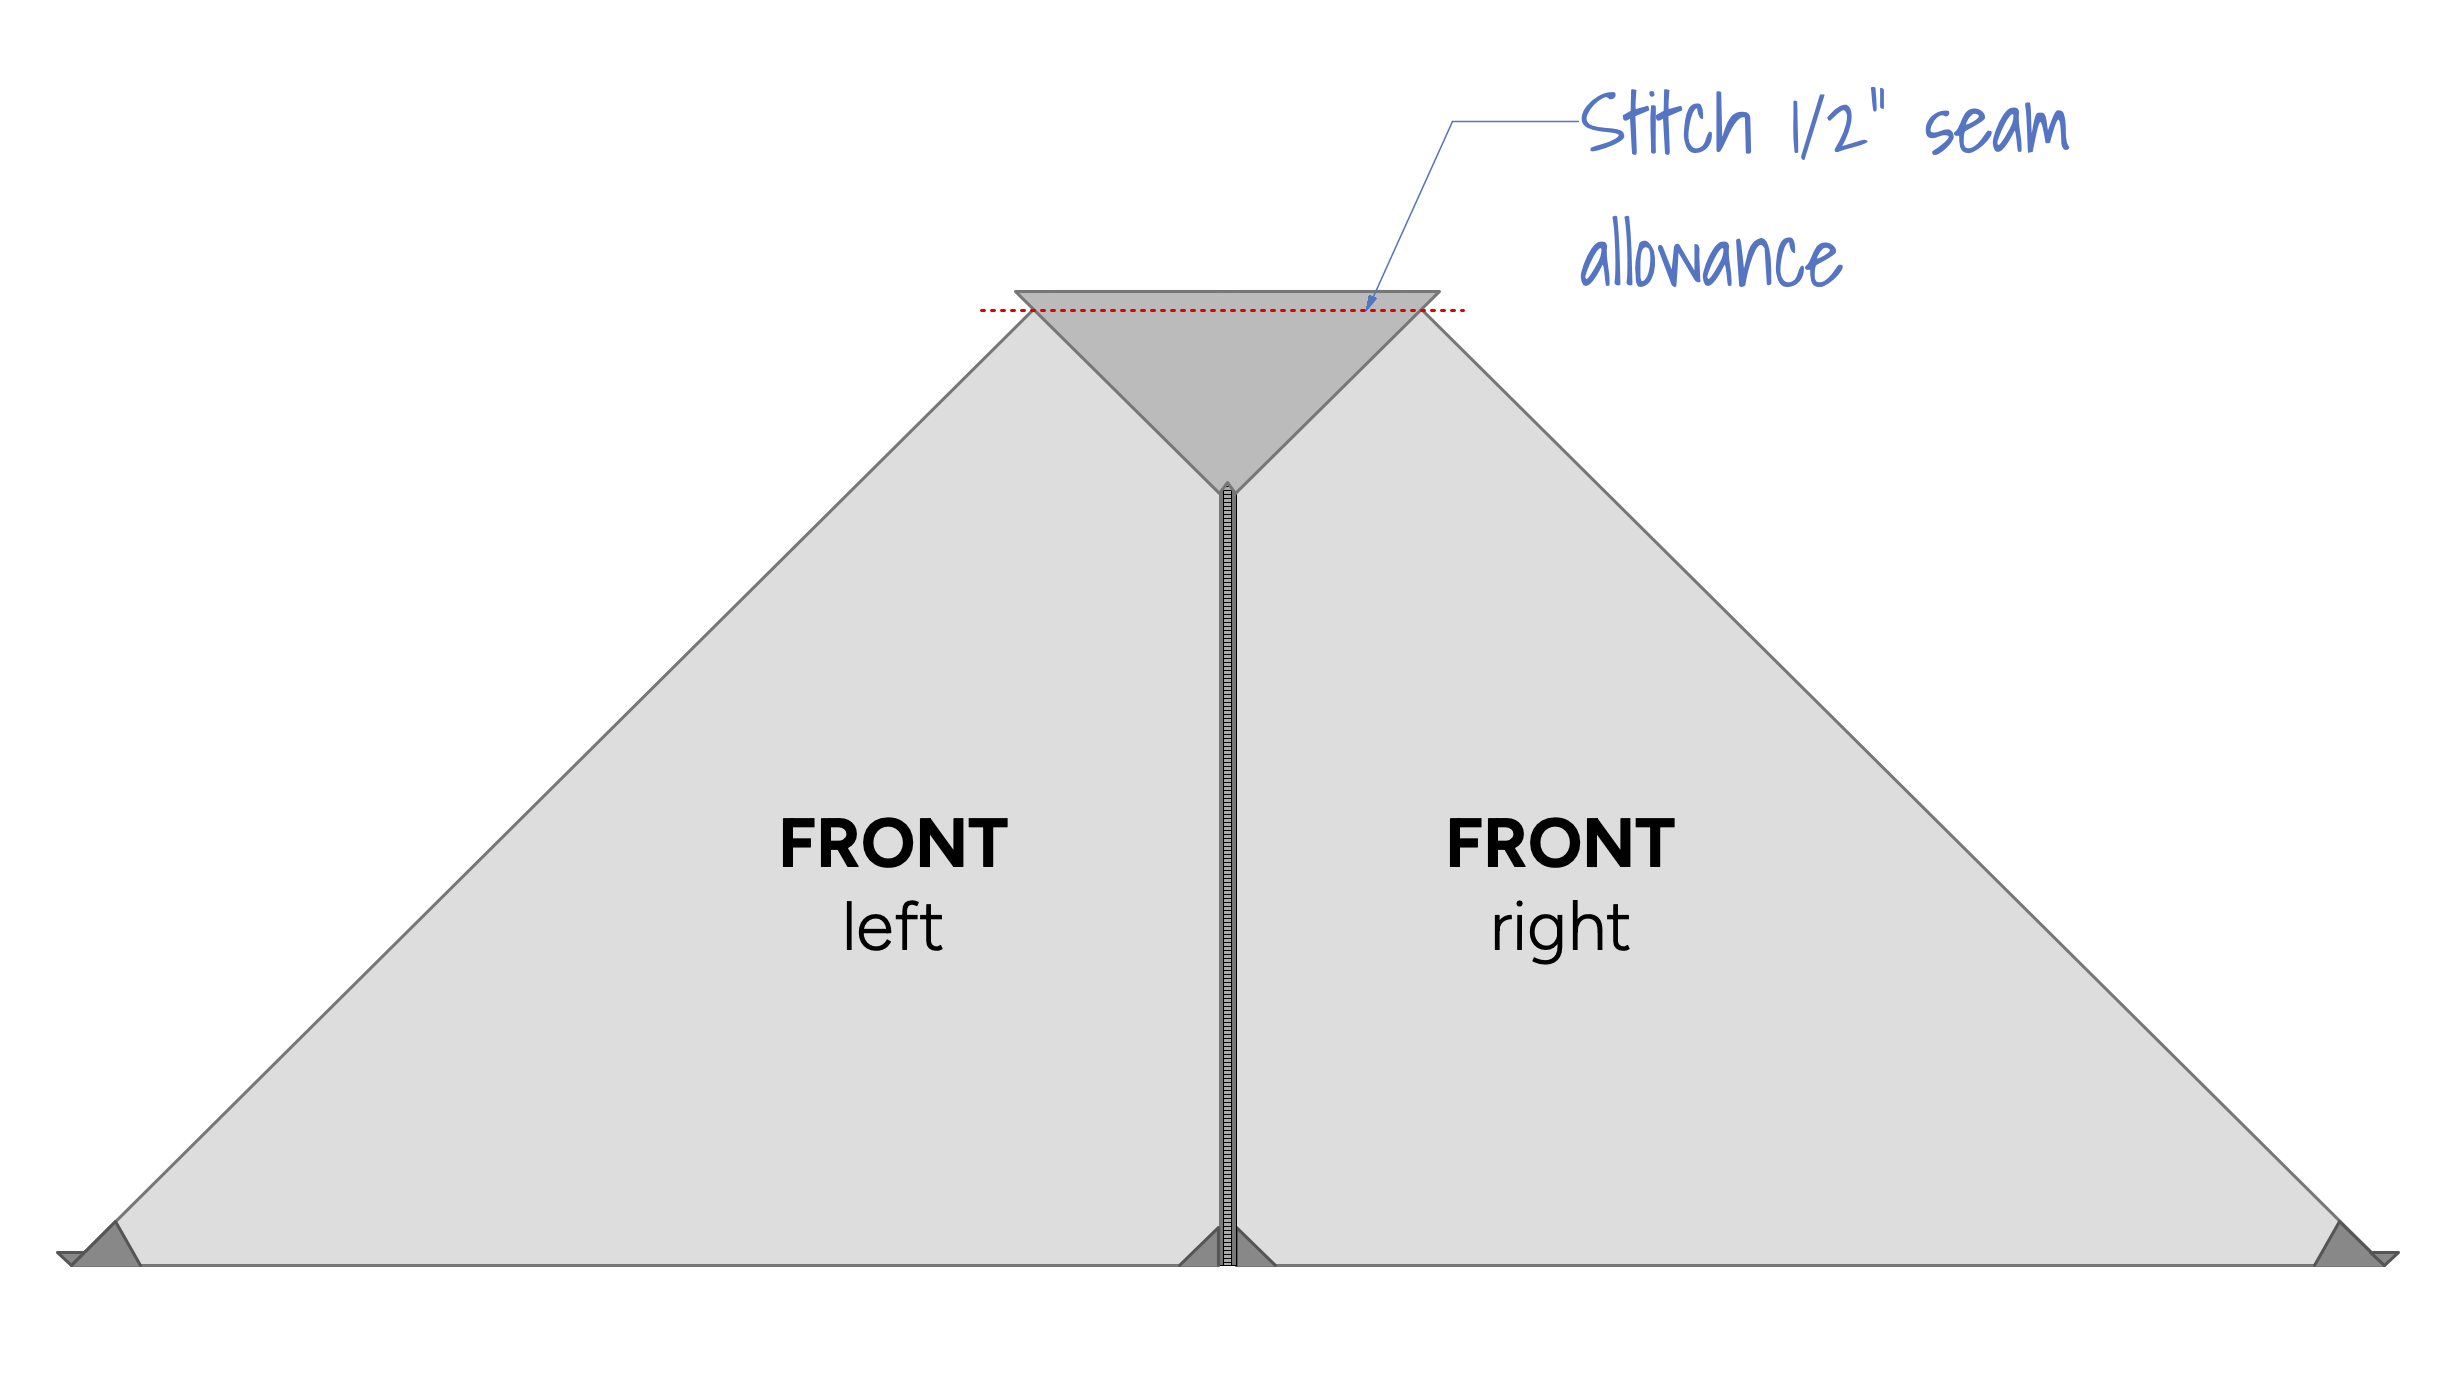
Pin the side panel to the front panel right sides together, with the edges aligned as shown. Stitch the panels together with a 3/8” seam allowance.
Press the seam allowance toward the front panel and top stitch about 1/4” from seam as shown below.
Note: When top stitching the main seams, it is important to press the seam allowance away from the vent (toward the front or back panels) so that the seam tape can be applied.
Apply the seam tape to the wrong side of the seams. I skipped the area with where the grosgrain loops attach because the tape doesn’t stick to the grossgrain. I came back a sealed this area with seam grip as shown below.
Note: I found it easier to apply the tape to each seam as I finished it, rather than waiting until all of the seams were done, to apply it. You can find more info about applying seam sealing tape here.
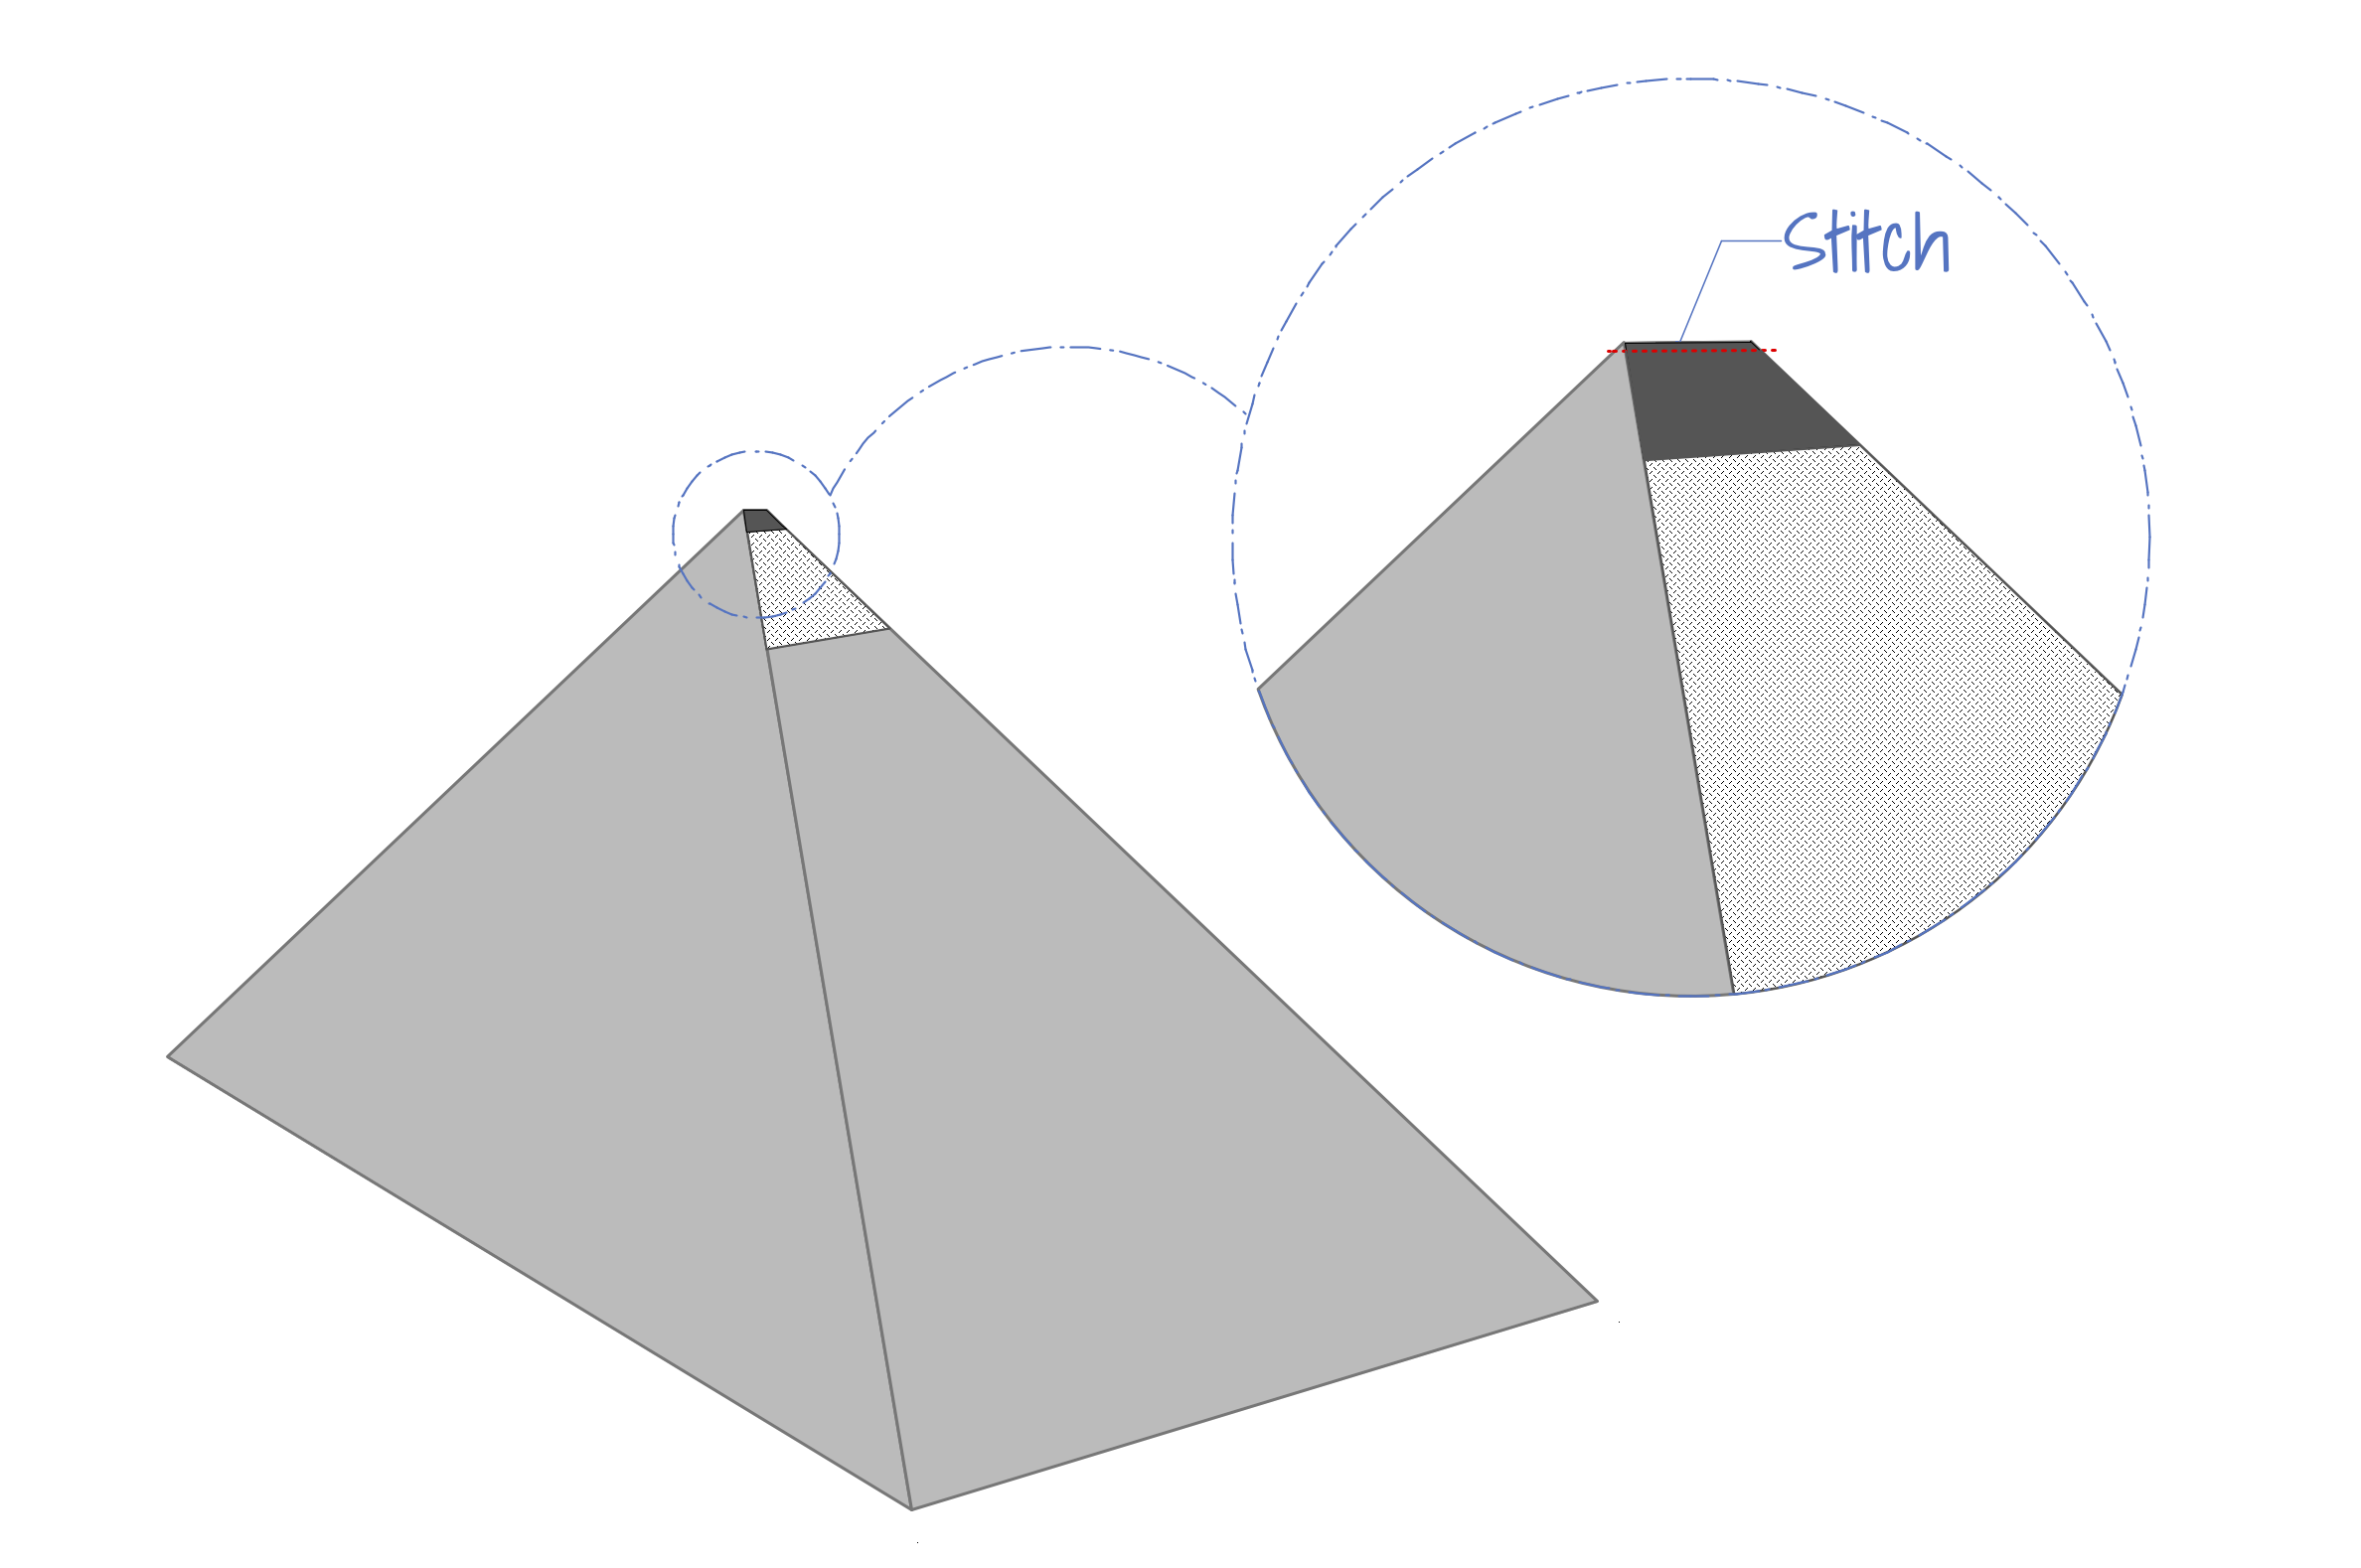
Continue this process with the other 3 main seams. Once all four main seams are done, stitch the peak of the pyramid with a 3/8” seam allowance as shown. I found it hard to apply the seam tape here, so I used seam grip to seal this seam instead.
Adding the linelocs:
Take a 3” piece of 1/2” grosgrain and thread it through a lineloc. Pin the grosgrain around the corner of the tarp. The grosgrain should be placed over and run in line with the main seam as shown below. Stitch the grosgrain in place with two bar tacks as shown.
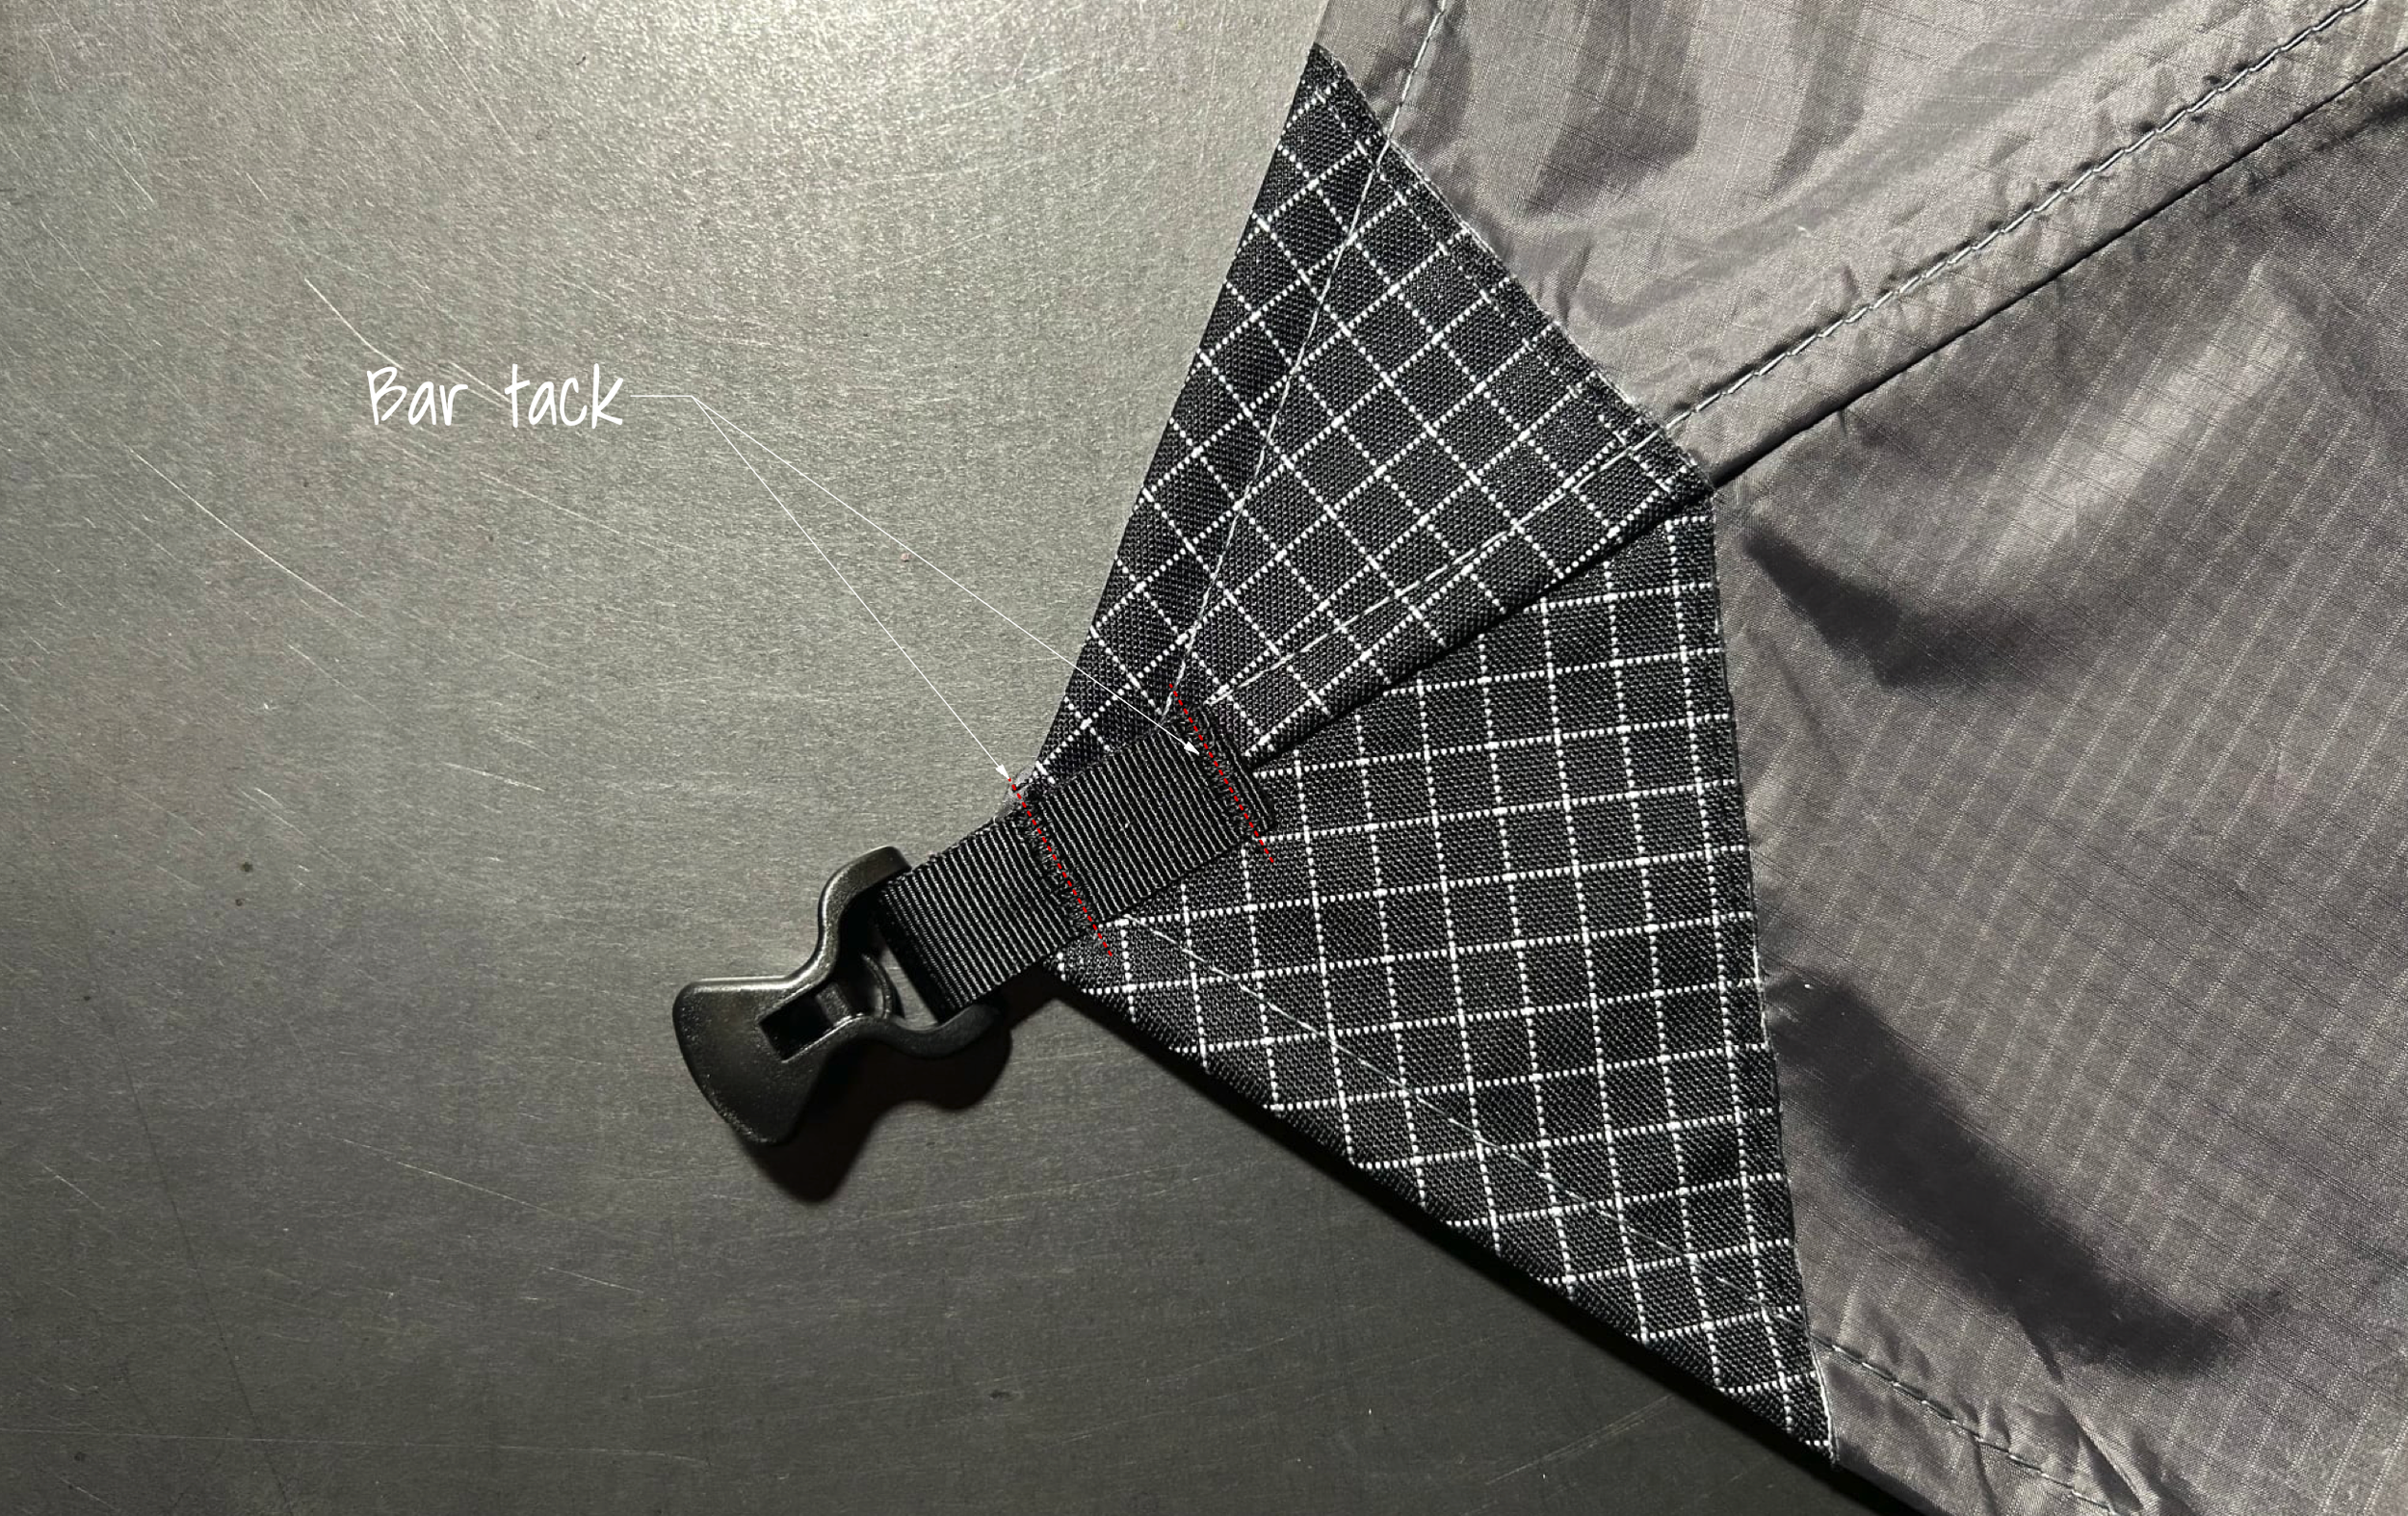
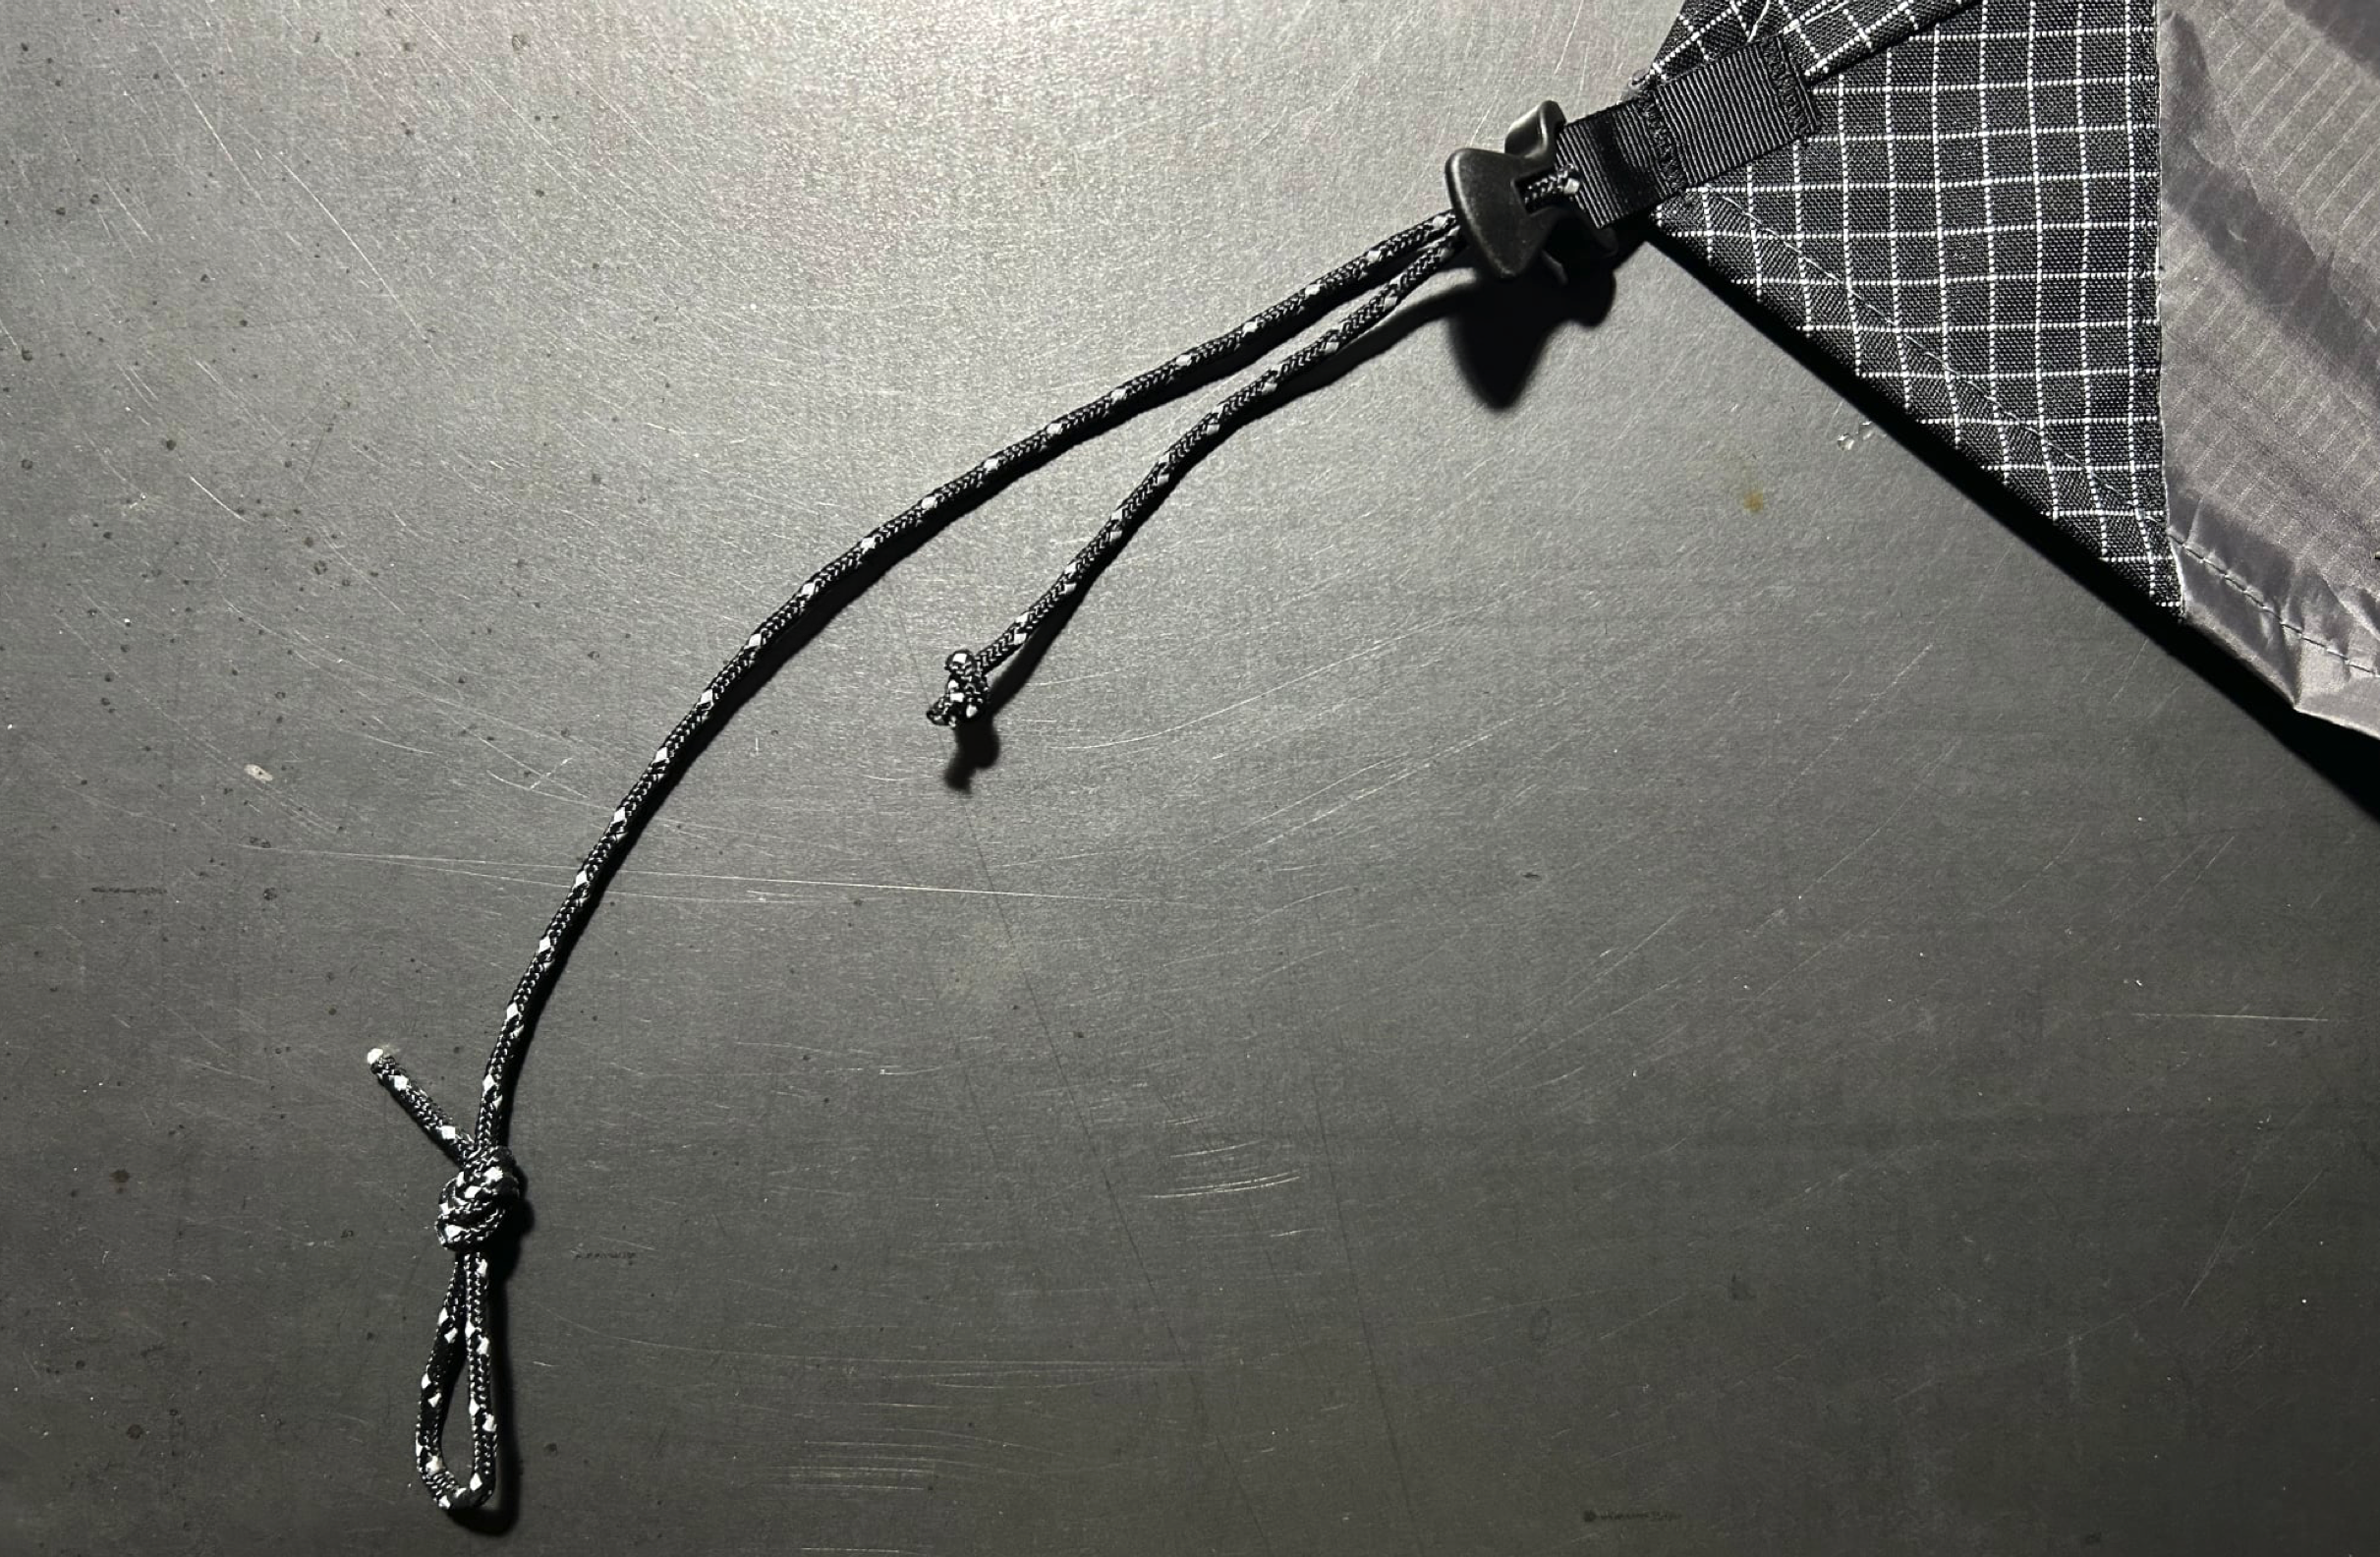
Take a 16” piece of cord and run it through the lineloc. Tie a loop in the adjustable end for a stake and knot in the tail end to keep it from sliding out as shown. Repeat the last two steps with the remaining corners and the back guy-out point.
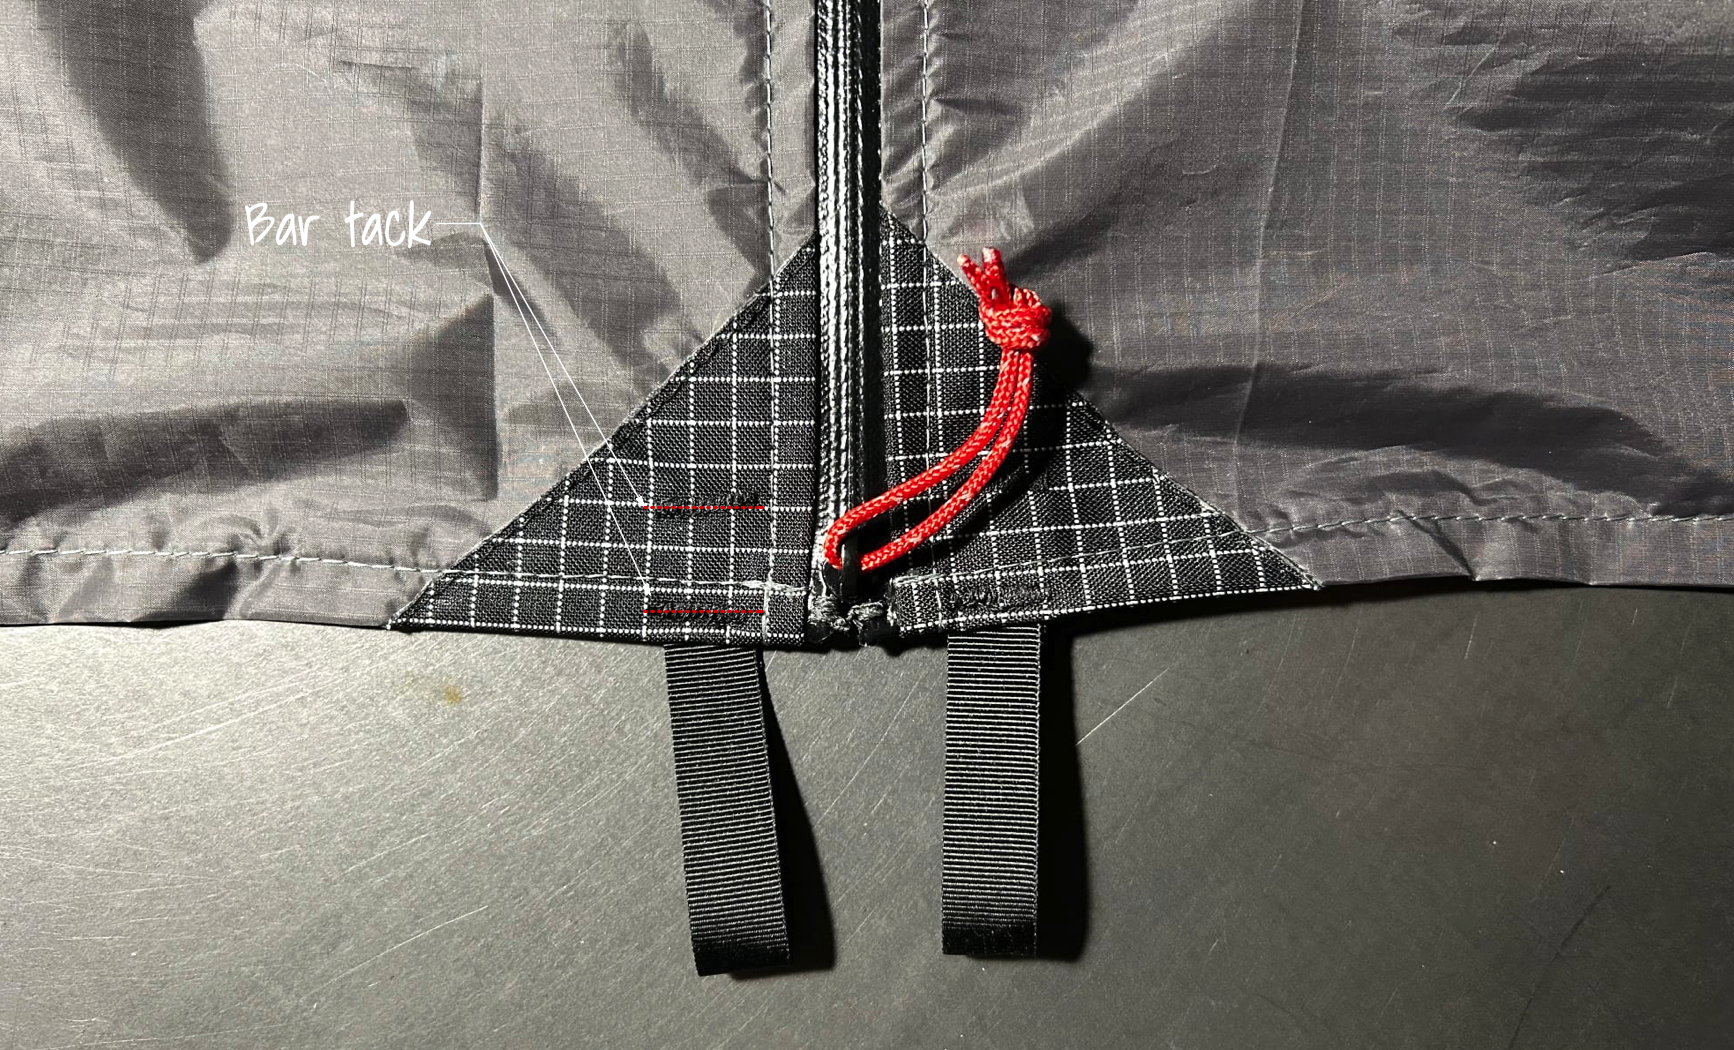
Door guy-outs:
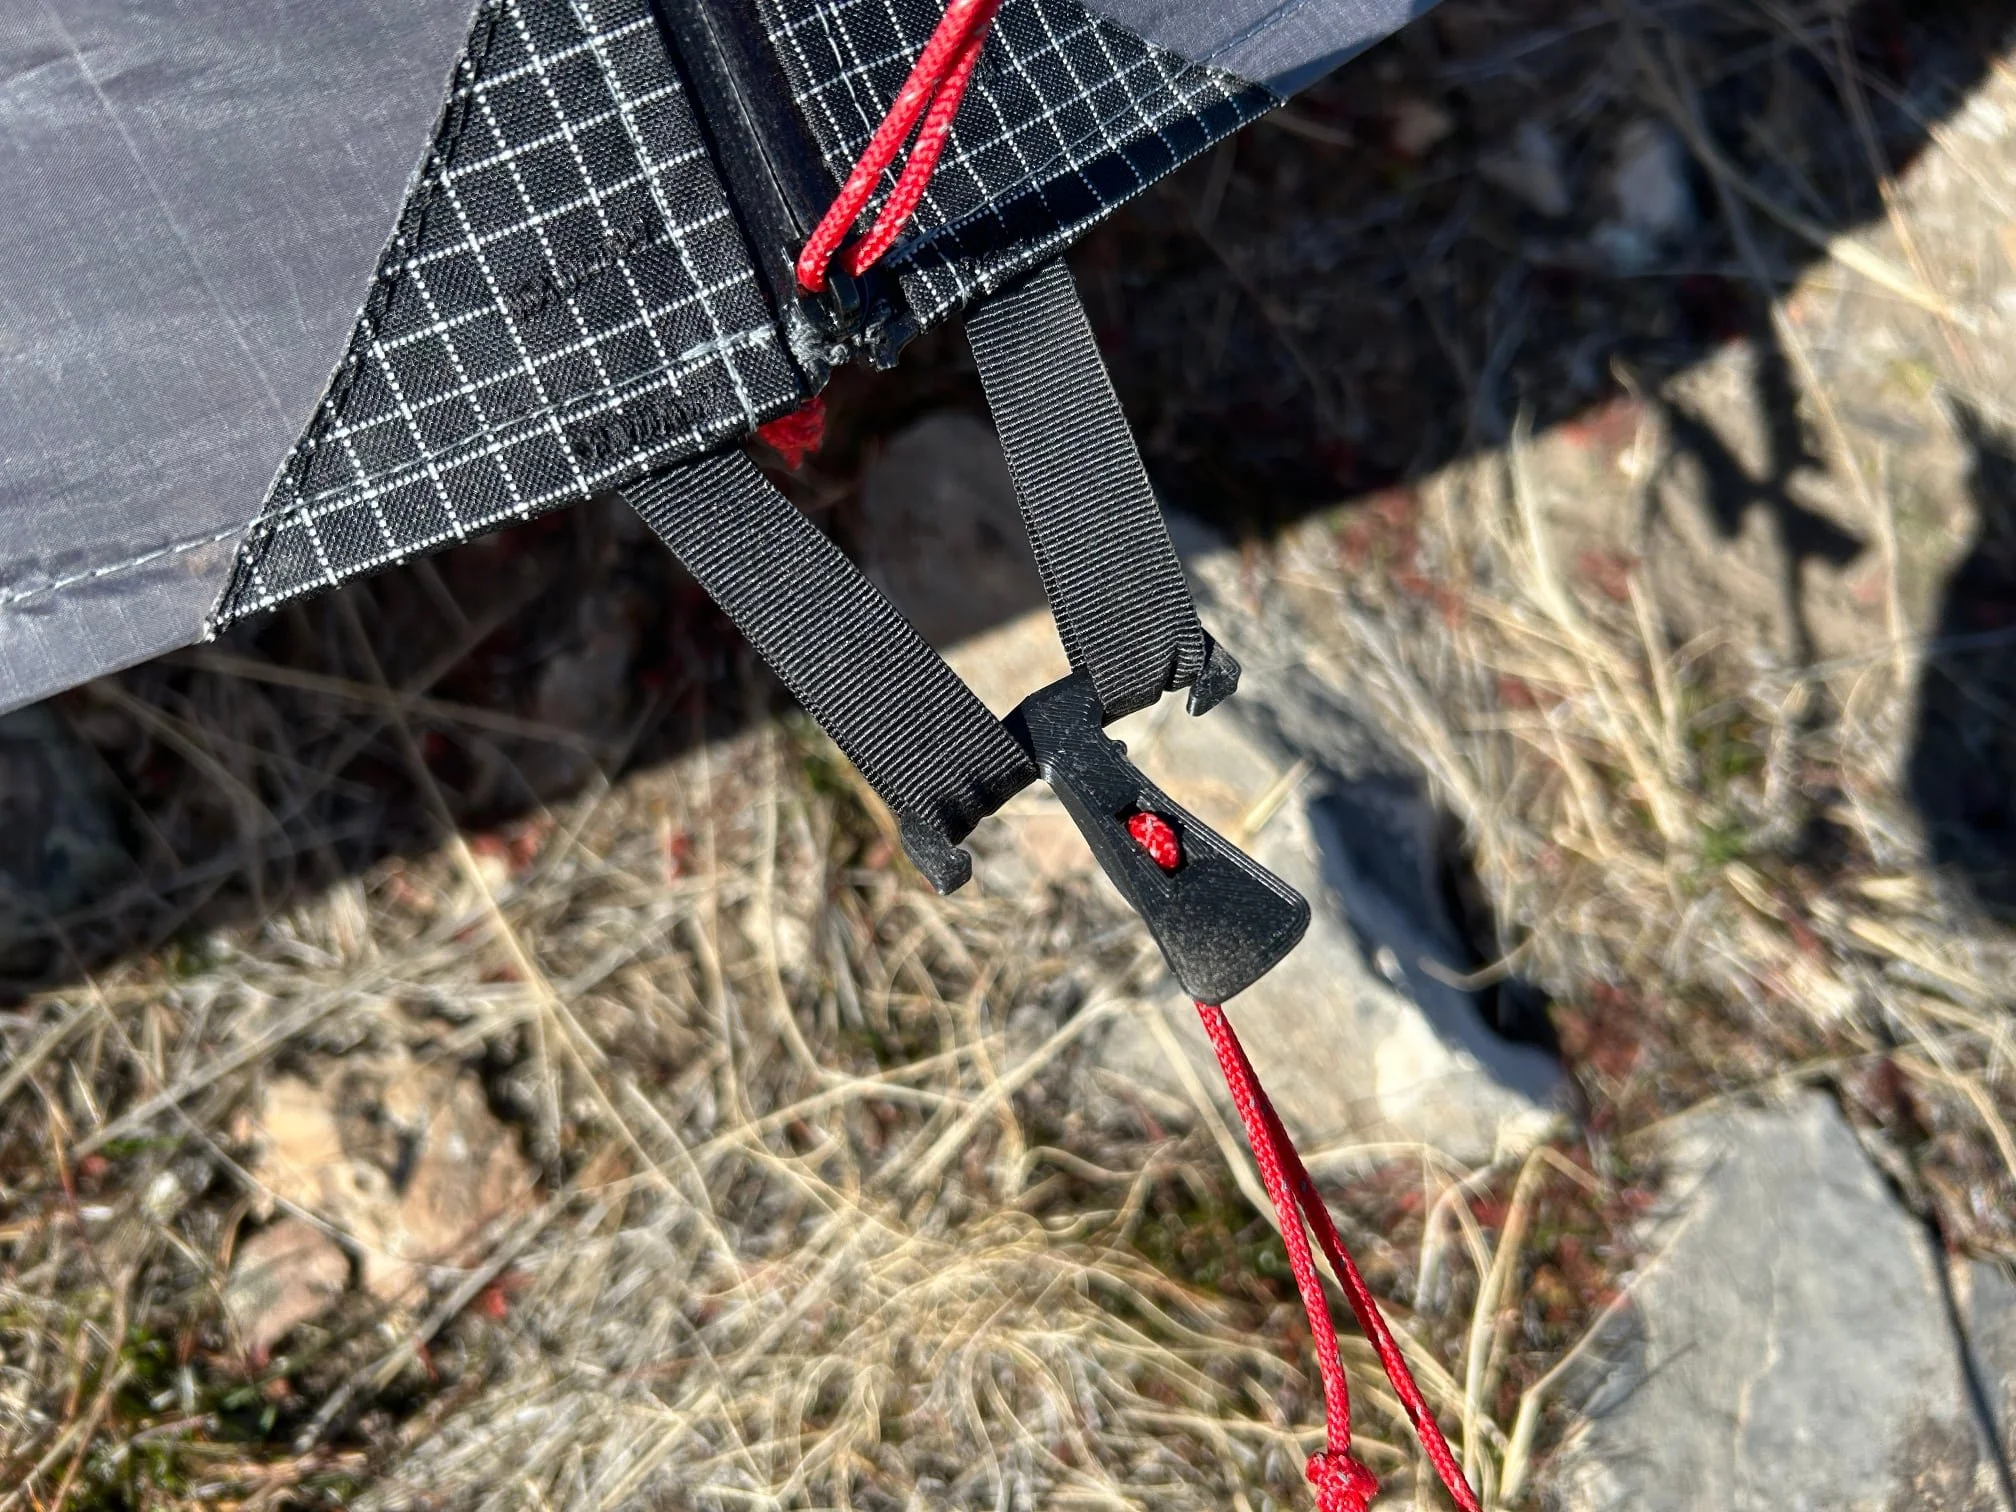
Take a 5-1/2” piece of 1/2” grosgrain and fold it in half. Pin it to the bottom edge of the front panels just to the outside of the door zipper and stitch it it place with two bar tacks as shown. Repeat on the other side of the zipper as shown.
Using a hook to connect both loops will help to take some of the tension off of the door zipper. I designed, and 3D printed an adjustable hook that works like a Lineloc for this purpose, but and adjustable 1” G-hook could also be used. Even a mini carabiner tied to the guy-line with a taught line hitch could work. If you want to print your own hook like the one in the photo you can download the STL file here. (The hook was designed to be used with 2mm cord.)
Adding the stiffener to the vent covers:
I used a strip of plastic cut from a 2-liter soda bottle to stiffen the hem of the vent covers, in order to help keep them open. To do this cut a strip of plastic 1/2” x 10-1/2” and insert it behind the grosgrain through the split where the two pieces meet as shown. It can be a little tricky to get both ends of the plastic behind the grosgrain. I found it easier to start with the short end.
Door retainers:
The final touch is to tie a piece of bungie with a toggle or hook to the seam guy-out loops, to be used as retainer for when the doors are open.
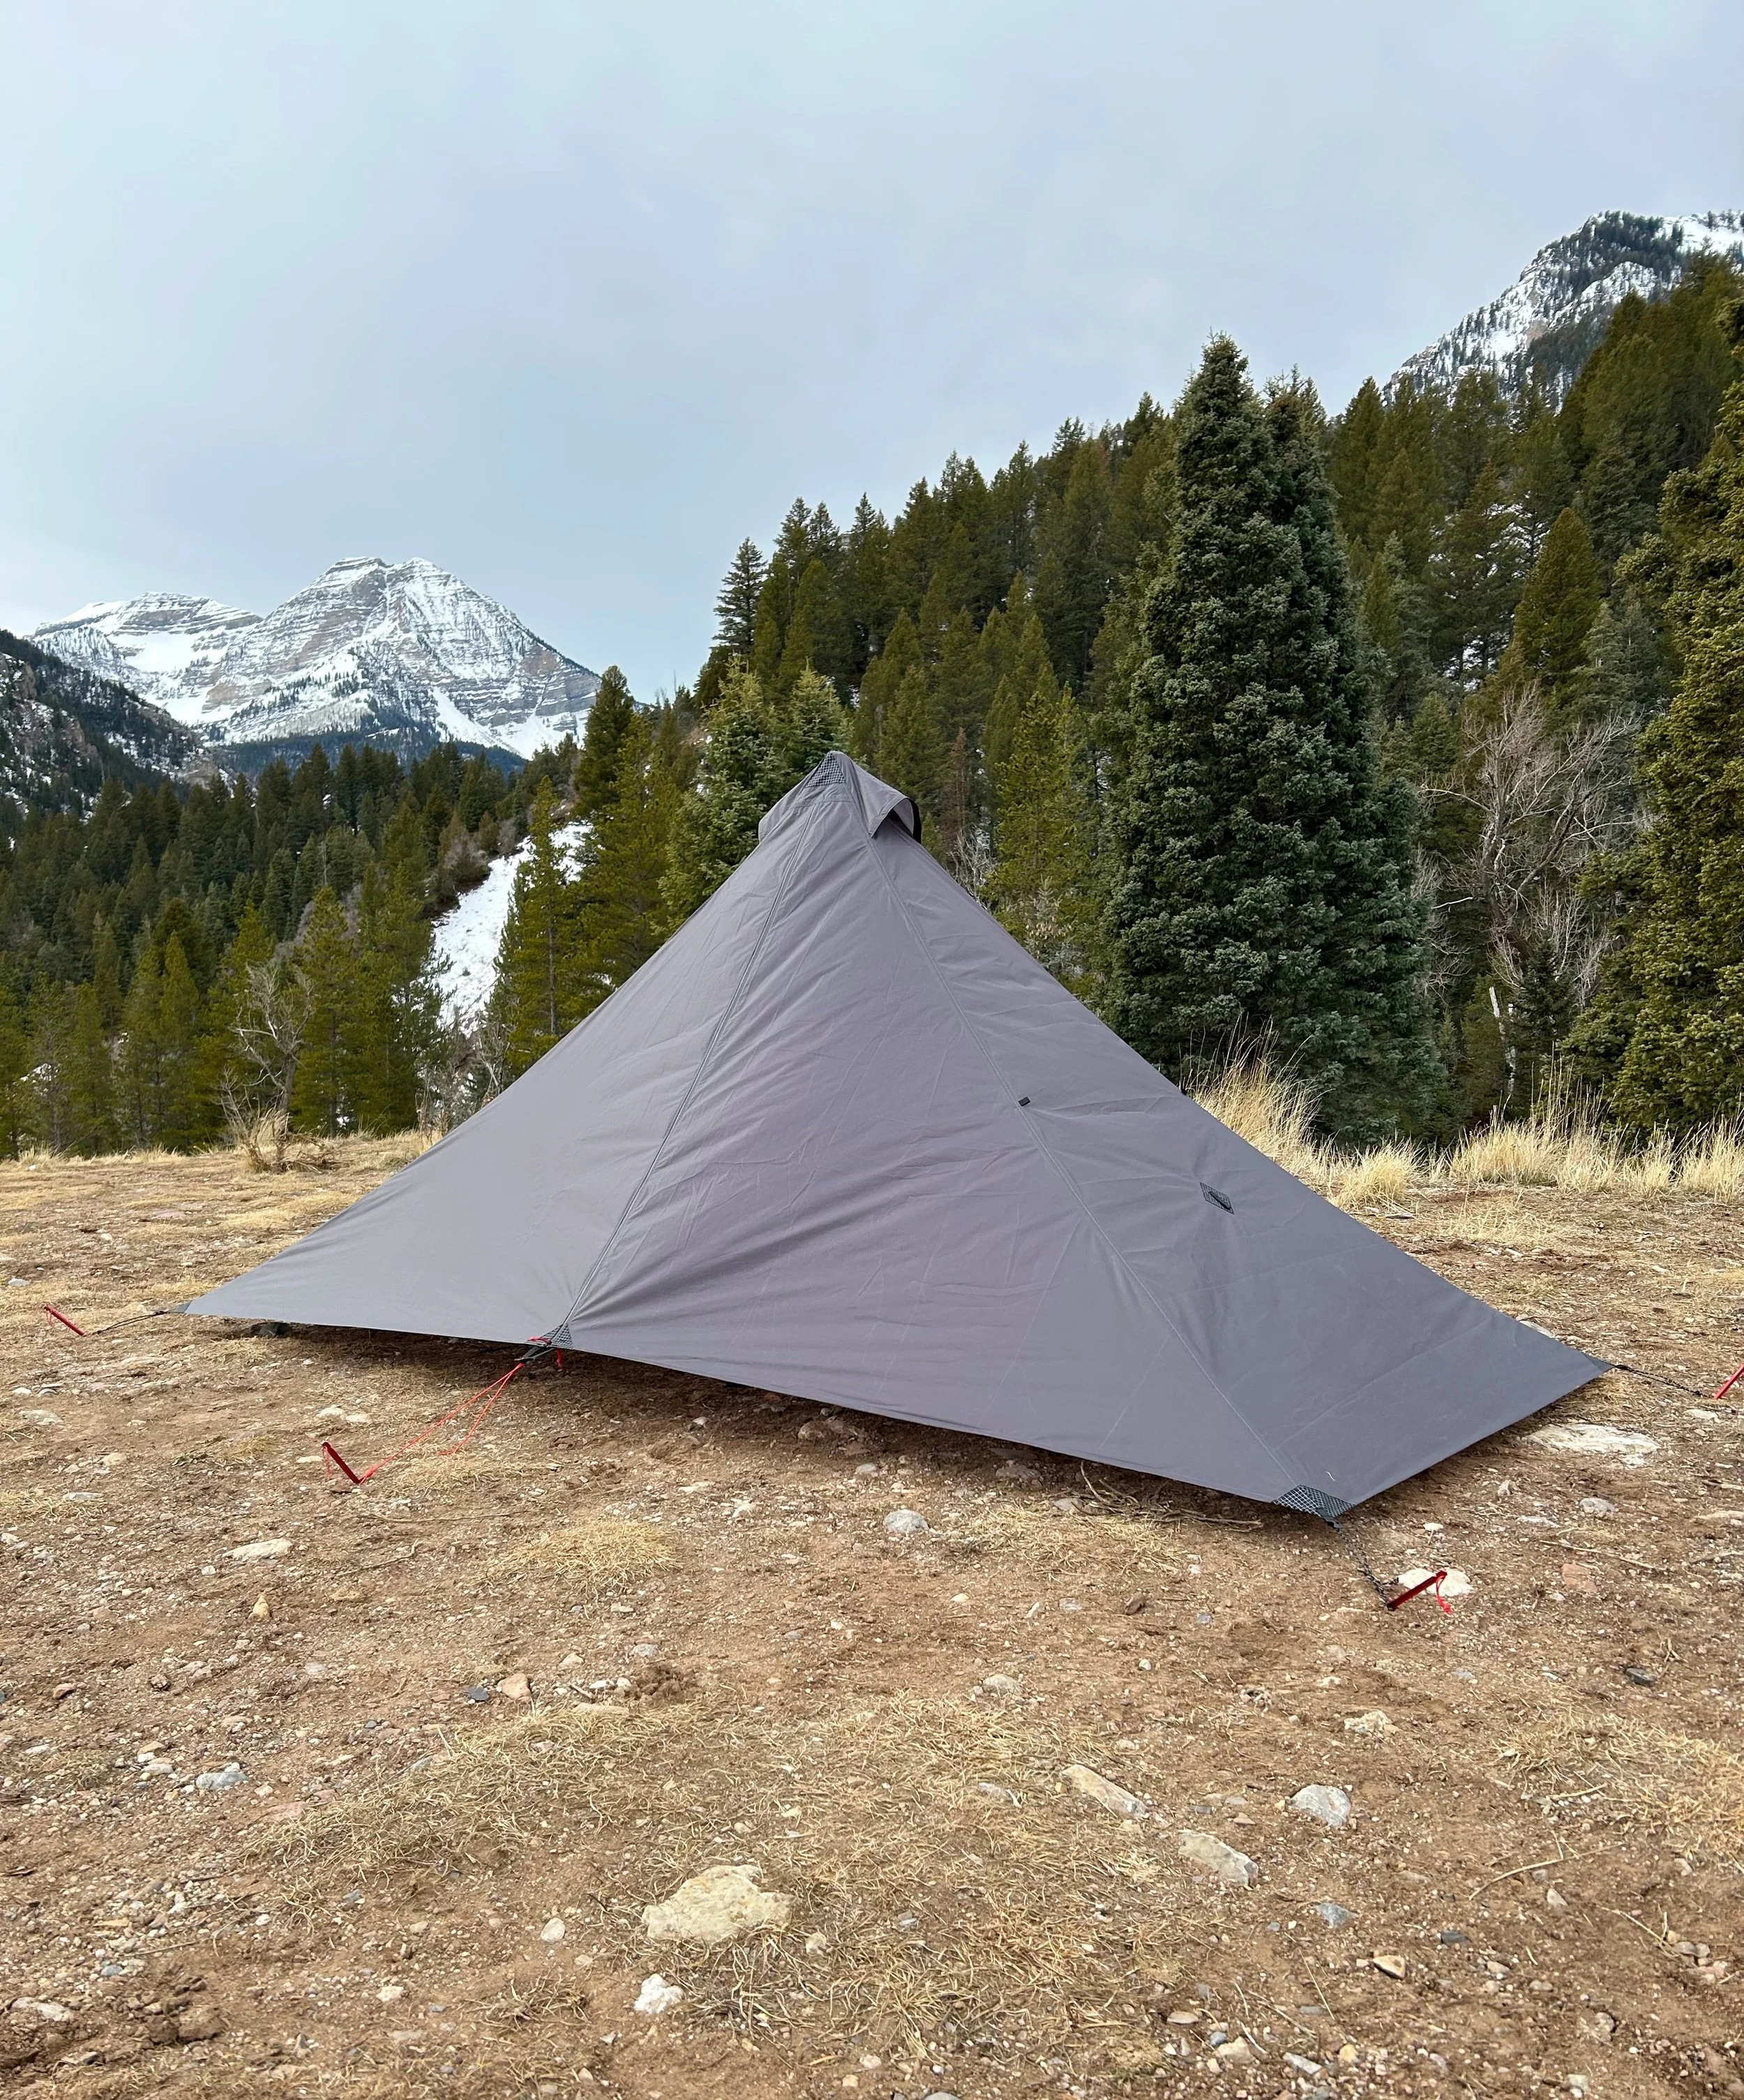
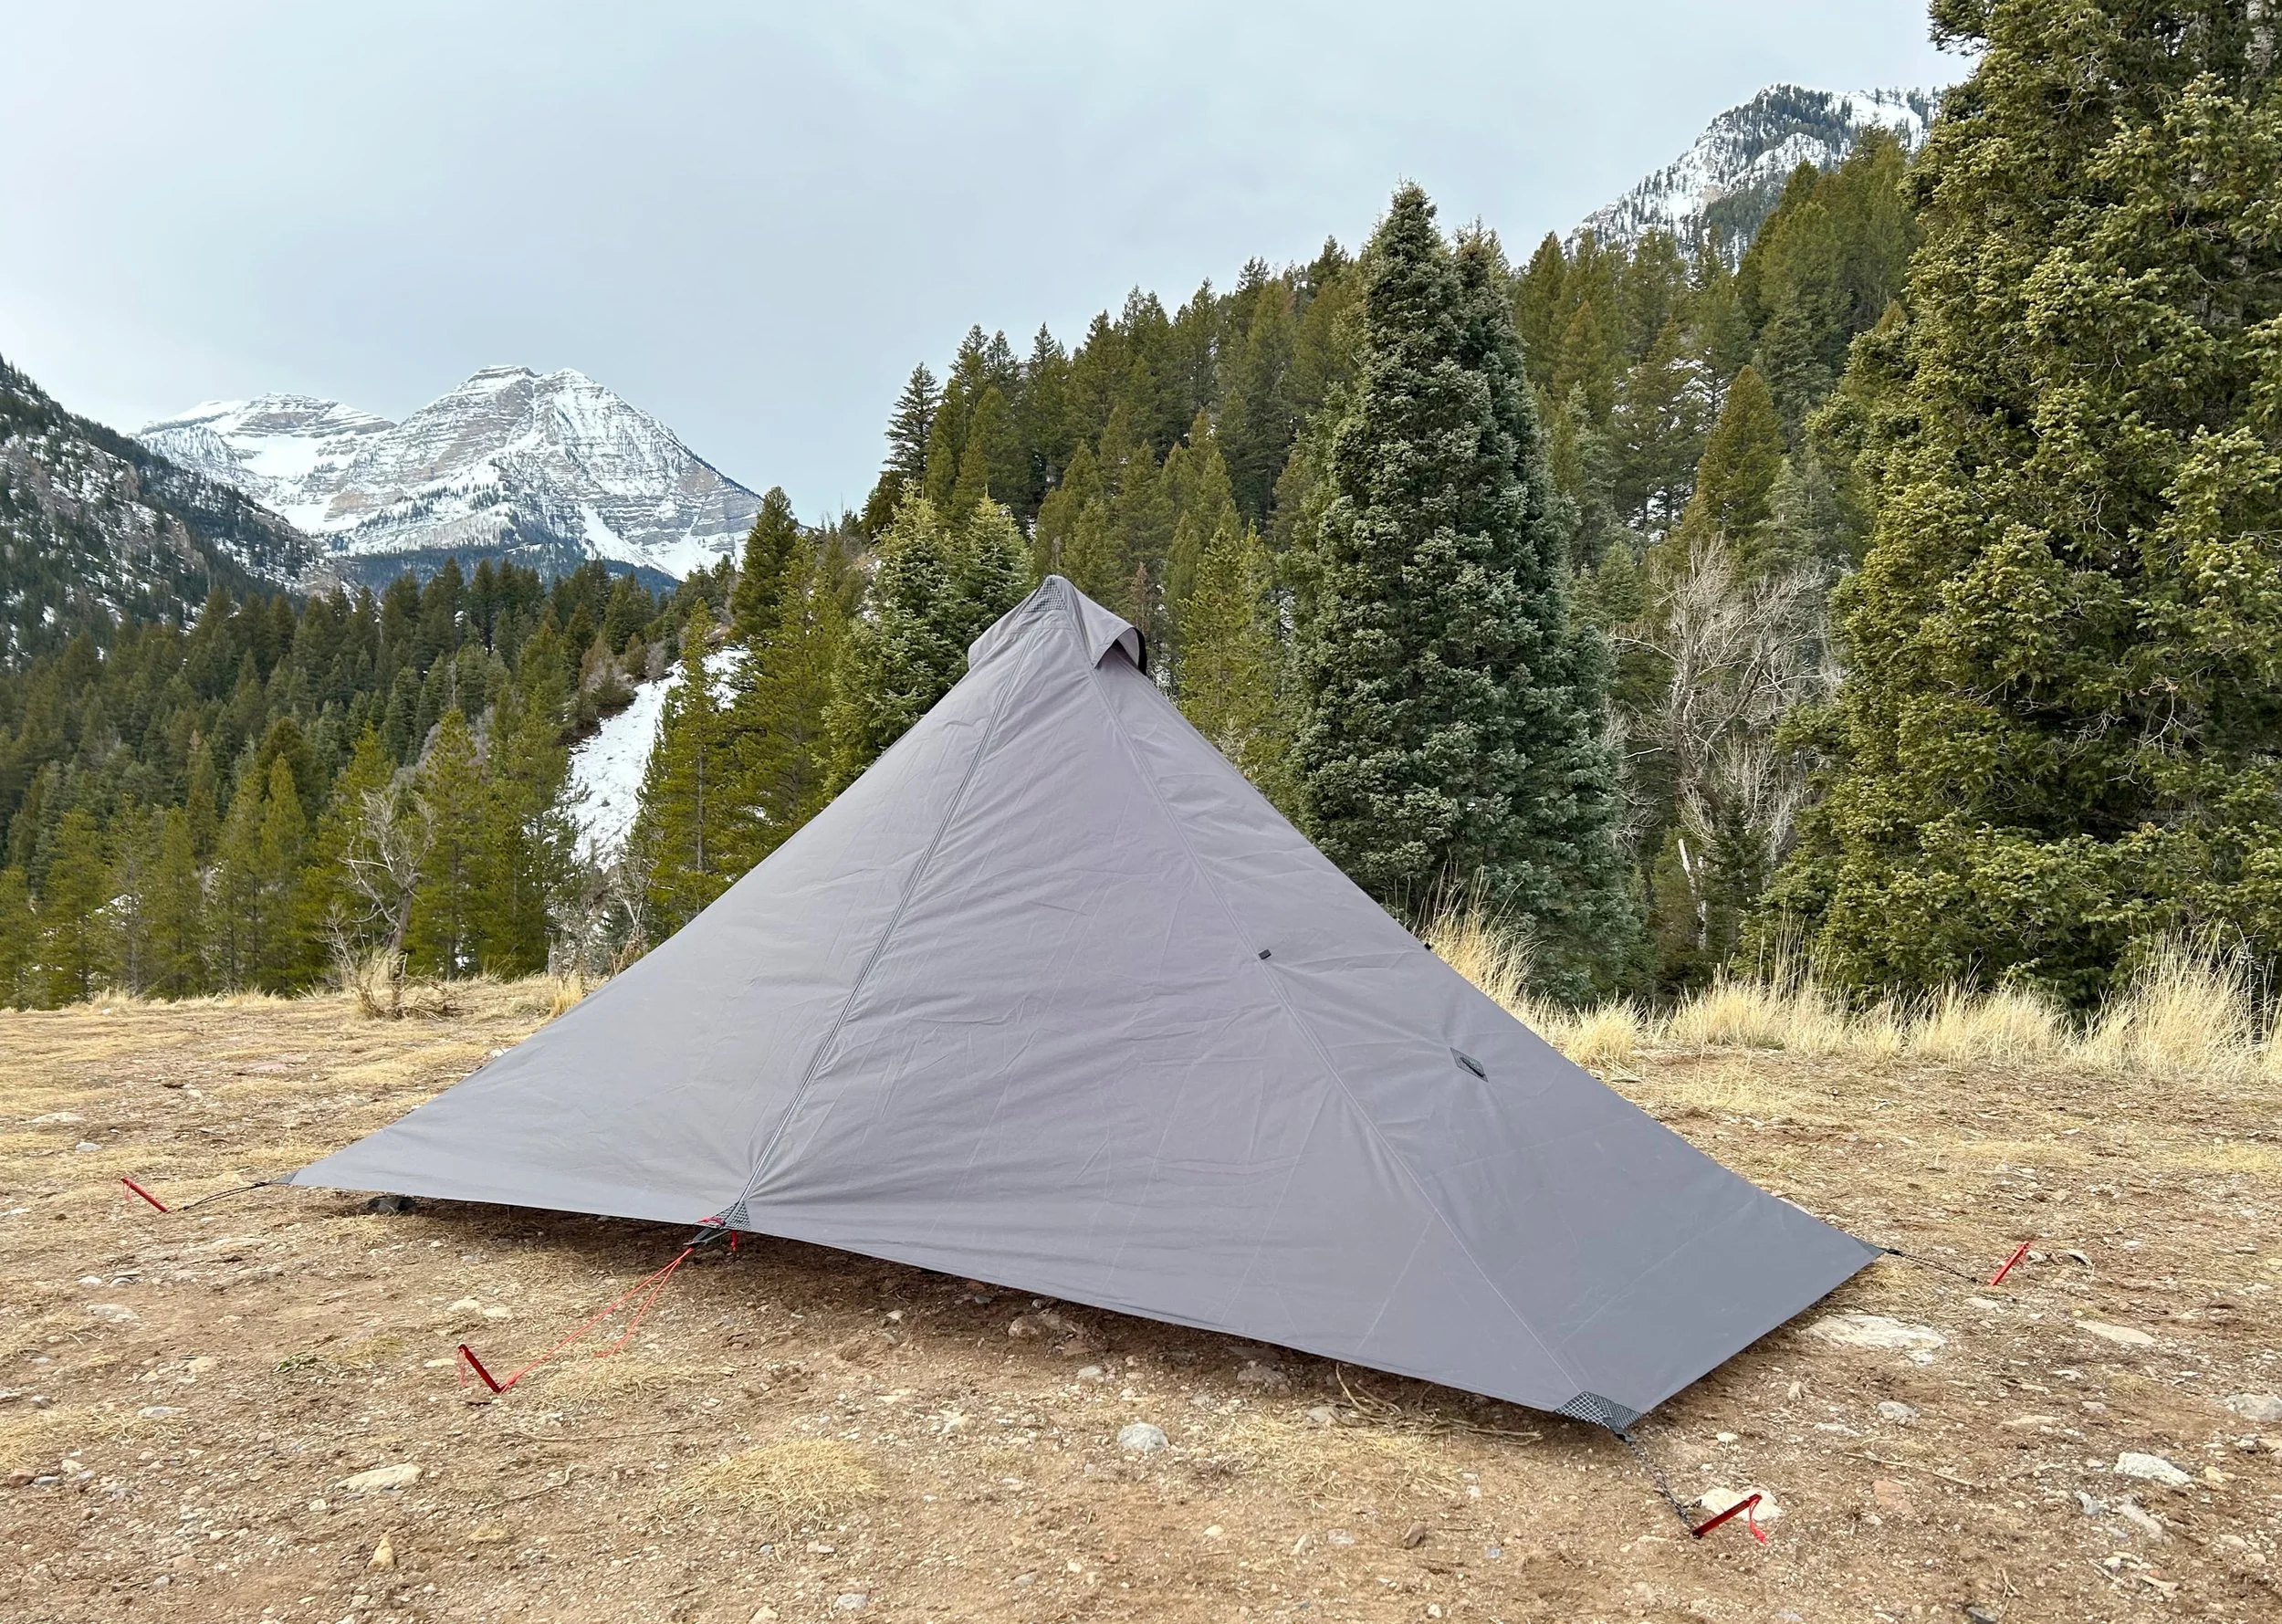
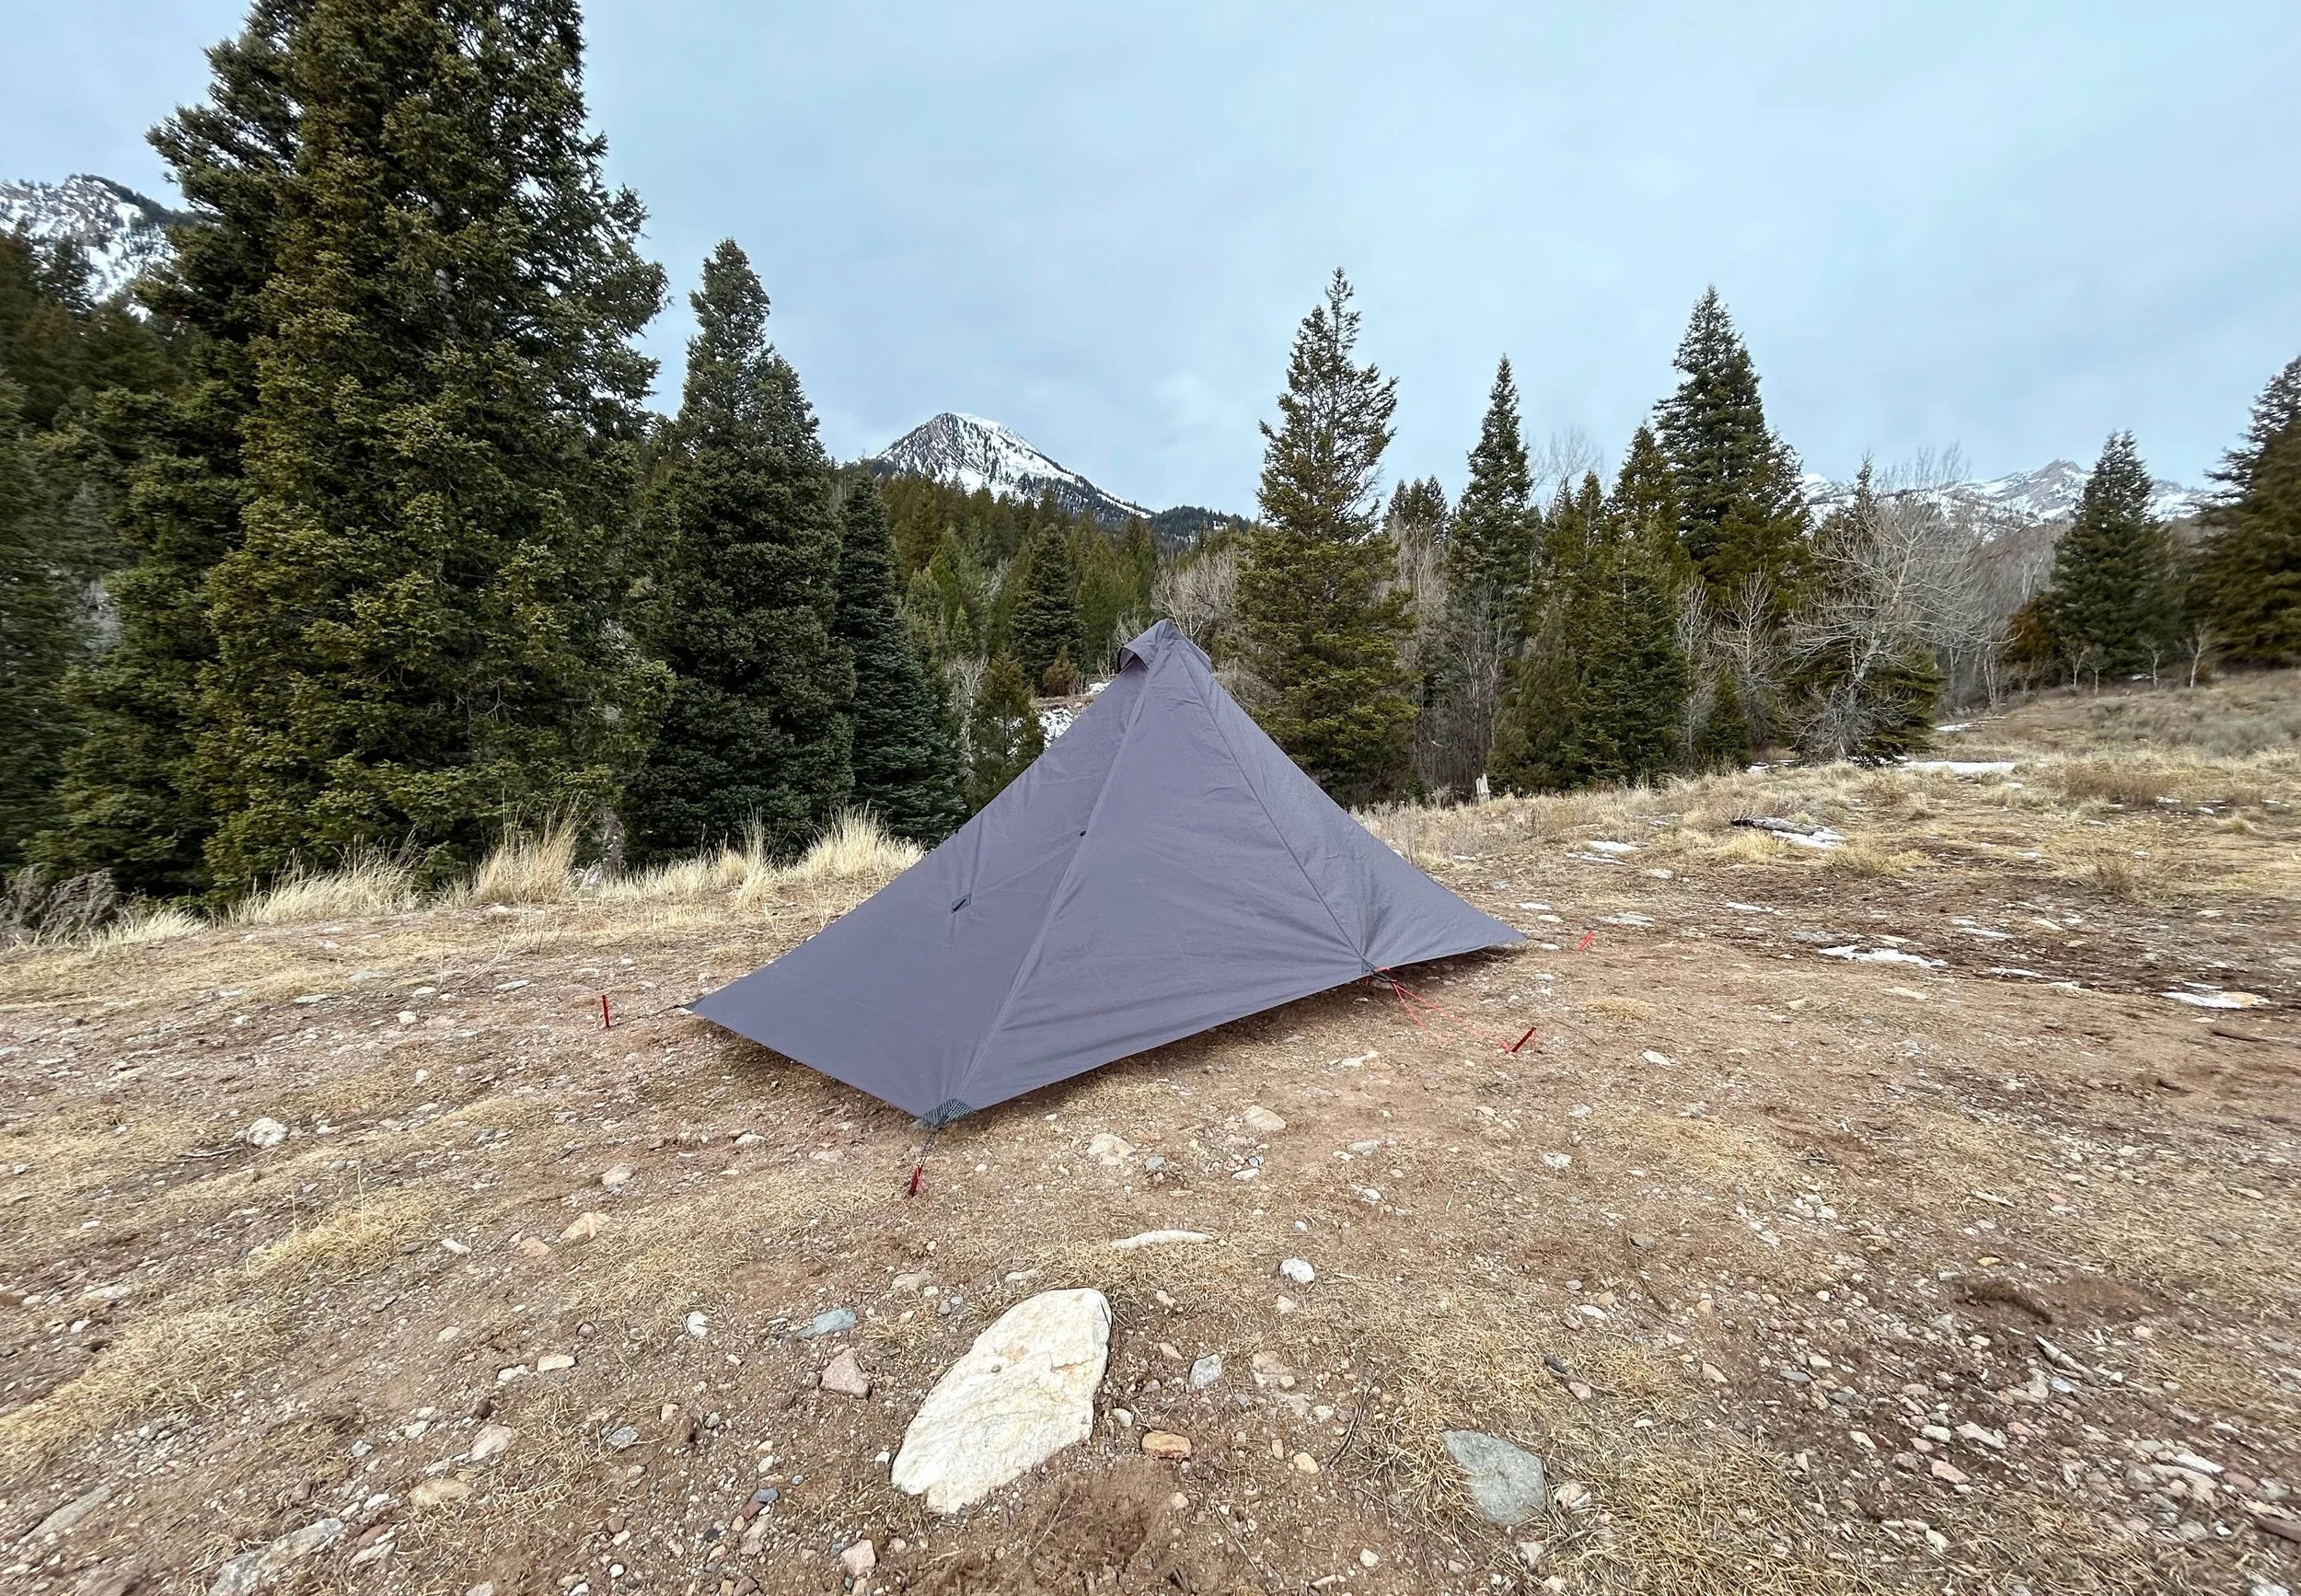
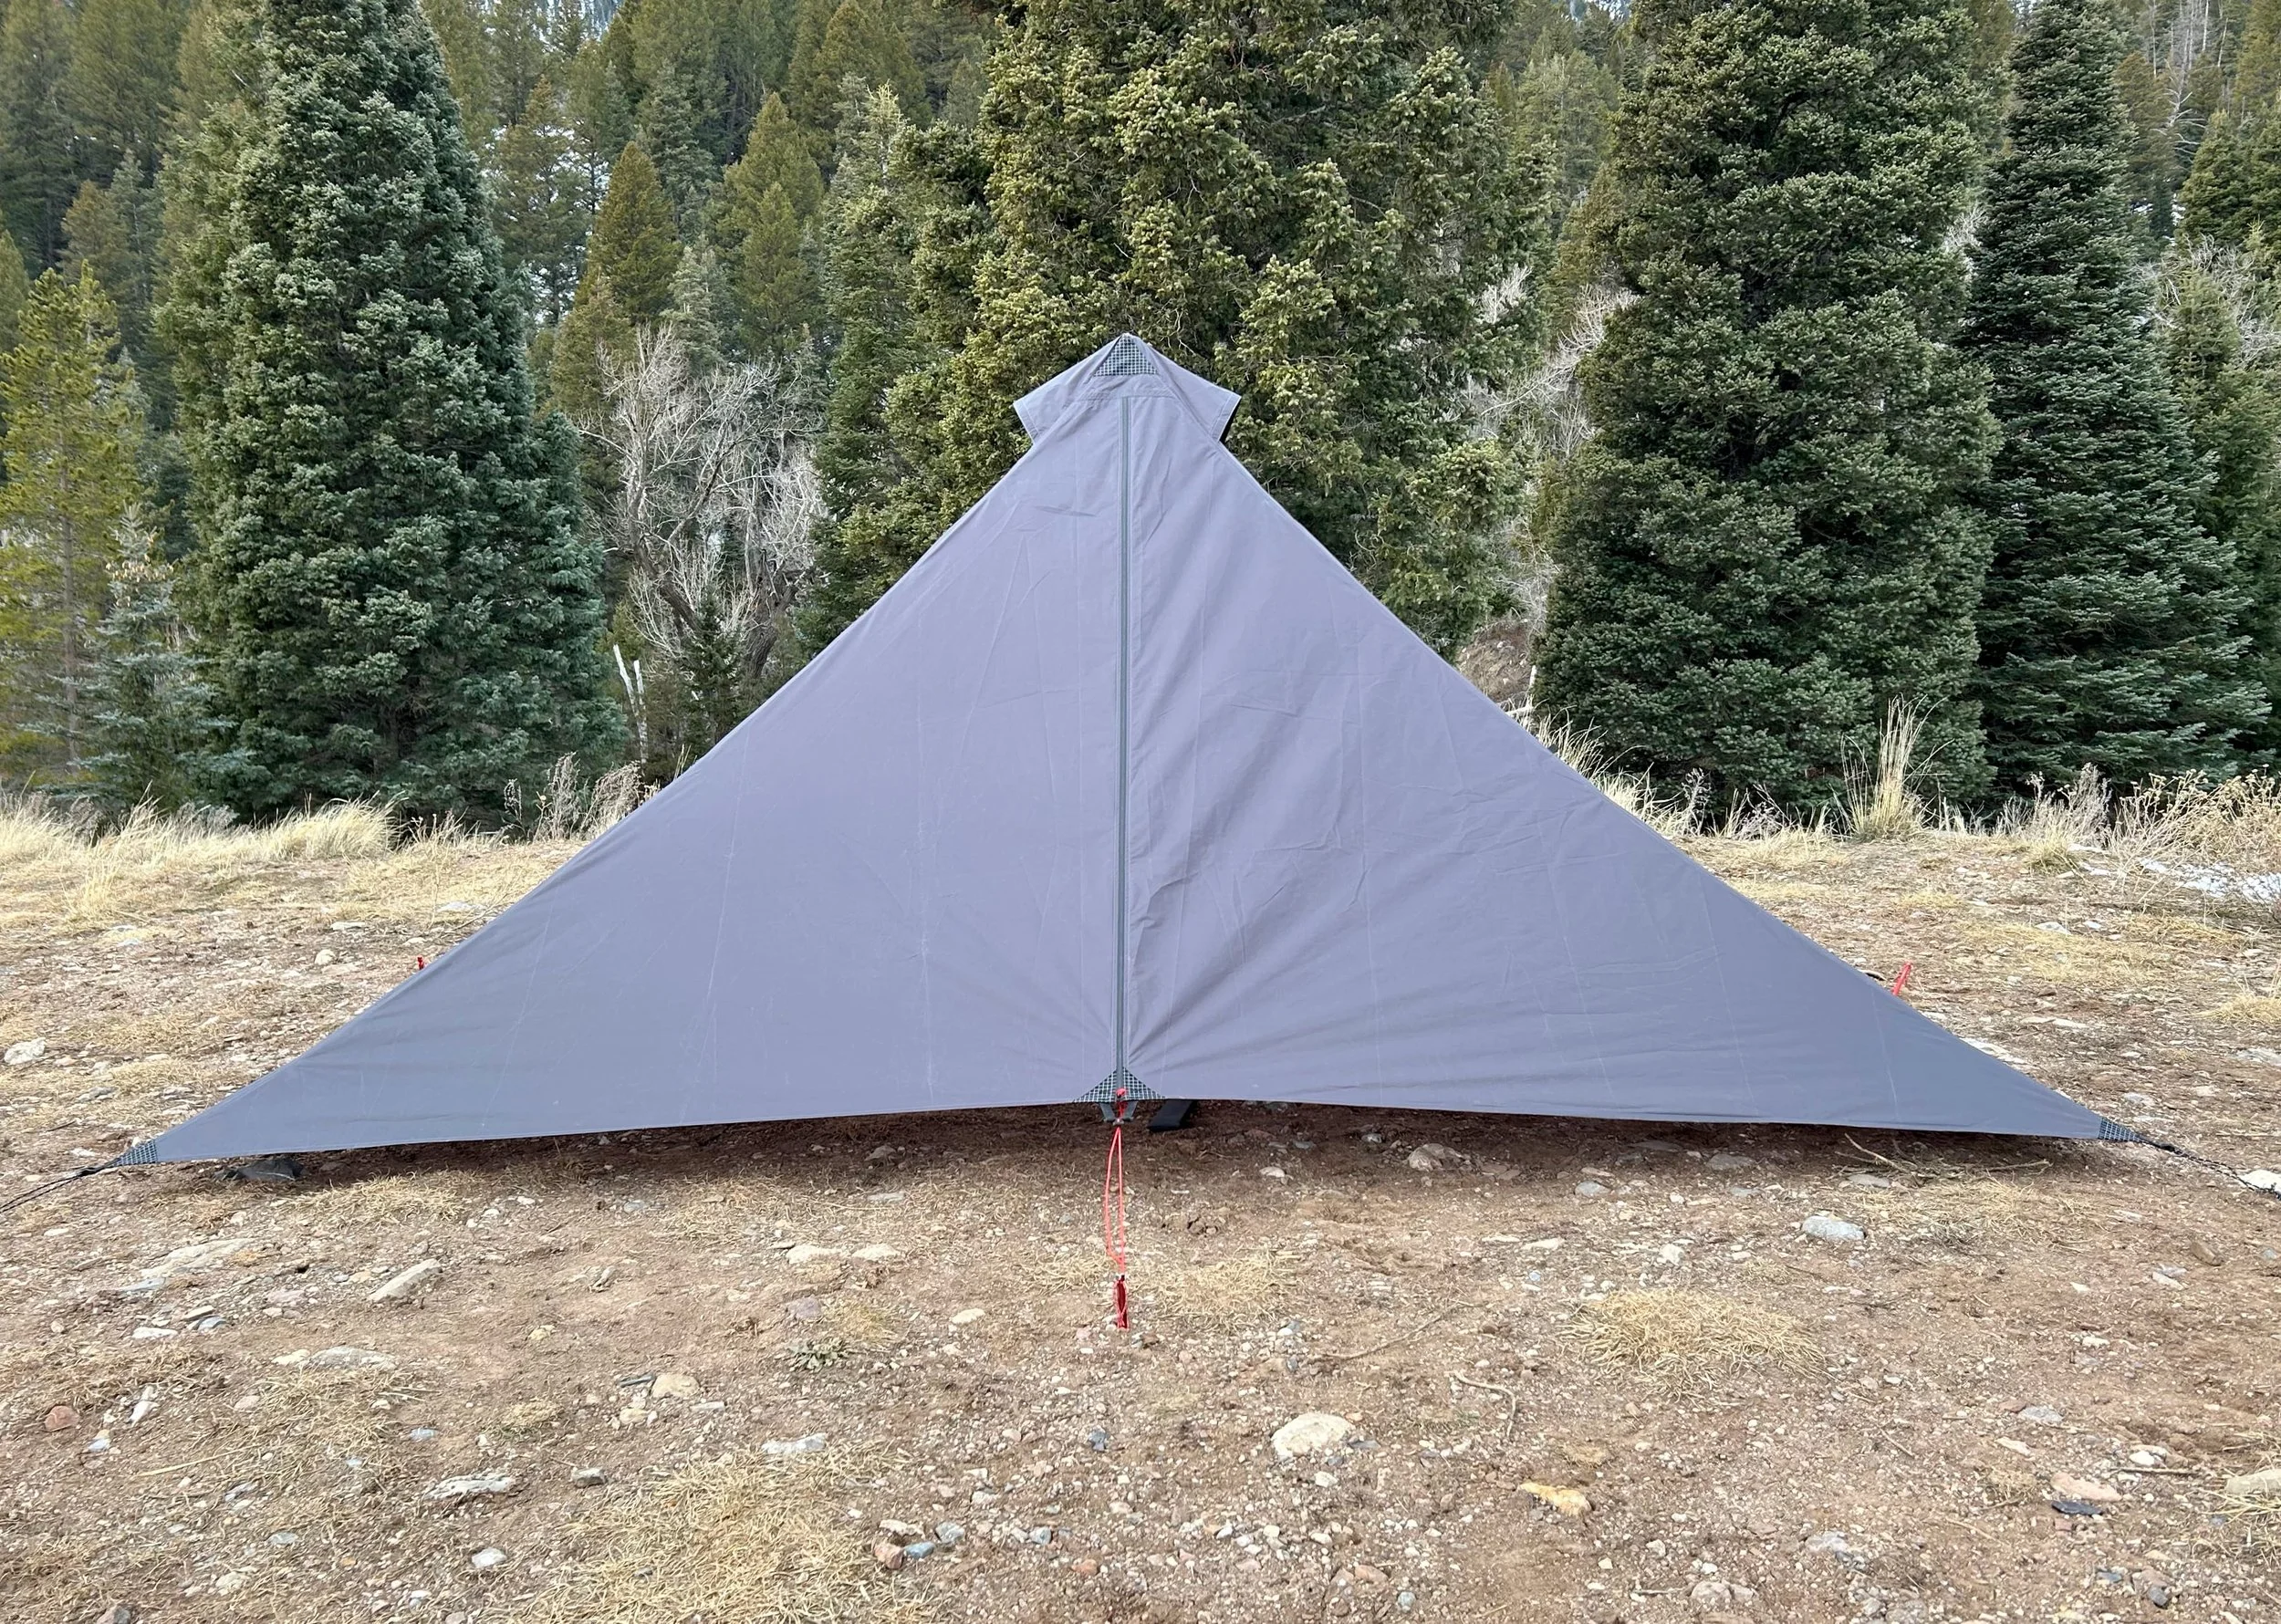
Finished tarp.

Related products we recommend
The links above are affiliate links. As an Amazon Associate Stitchback earns from qualifying purchases